How to Transplant Red elderberry?
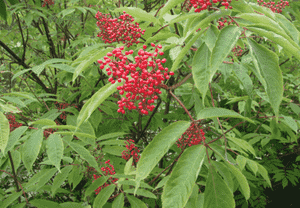
Transplanting red elderberry is most successful when performed in the milder temperatures of late spring through early summer. Select a location offering filtered light and damp, adequately draining earth. Consistent irrigation will facilitate this robust plant's adjustment.
What Preparations are Needed Before Transplanting Red Elderberry?
What is the Ideal Time for Transplanting Red Elderberry?
The optimal period for moving red elderberry is during the increasing warmth of late spring to early summer. This timing allows red elderberry to develop strong roots before the cold of winter. Ensuring red elderberry is relocated when the soil is warm and manageable, but not excessively hot, gives the plant a chance to adapt and flourish. Replanted during this season's mild weather, red elderberry benefits from ample growth time, perfect for a lush beginning and robust future development.
How Much Space Should You Leave Between Red Elderberry Plants?
When arranging red elderberry in your garden, make sure to maintain a separation of 8-12 feet (approximately 2.5-3.6 meters) between each specimen. This distance provides them sufficient room to grow freely and thrive. Another step towards cultivating a flourishing garden!
What is the Best Soil Mix for Red Elderberry Transplanting?
For red elderberry, selecting the appropriate soil is crucial. You should prepare a blend of loamy, clay, and sandy soil that drains effectively. Incorporate a foundational fertilizer rich in organic matter to supply essential nutrients. Enjoy your gardening!
Where Should You Relocate Your Red Elderberry?
Red elderberry enjoys sunlight but performs best in partial shade. When selecting a site, aim for a location that receives partial to full sun throughout the day. Remember to keep it away from intense afternoon sun, as this can hinder its growth.
What Equipments Should You Prepare Before Transplantation Red Elderberry?
Gardening Gloves
To safeguard your hands from soil and prevent any harm from thorns or sharp edges while tending to the plant.
Shovel
To excavate the red elderberry from its initial spot and to prepare the new planting hole in the ground.
Garden Trowel
Useful for digging smaller, more precise holes and for lifting minor plants.
Pruning Shears
Essential for trimming any damaged roots or branches of the red elderberry during the relocation process.
Wheelbarrow
Crucial for transporting the red elderberry from its original position to the new planting area.
Watering Can or Hose
To ensure the red elderberry remains hydrated throughout this procedure.
How Do You Remove Red Elderberry from the Soil?
How Do You Remove Red Elderberry from the Soil?
From Ground: To begin, thoroughly water around the red elderberry to moisten the soil, making it easier to extract the plant. Then, use a shovel to dig a deep, wide trench around the red elderberry, being careful not to harm the root ball. Once completed, slide the shovel beneath the root ball to lift it. Transfer the plant to a wheelbarrow for simple relocation.From Pot: Ensure the soil is slightly moist before starting. Tilt the pot to the side and gently tap or shake it to loosen the soil. Carefully slide the red elderberry out, making sure to support the plant at its base.From Seedling Tray: Confirm the tray's soil is damp, then using a small gardening trowel or even a spoon, carefully dig around the seedling to avoid damaging the delicate roots. Gently remove the seedling while holding it by its leaves, not the stem.
Step-by-Step Guide for Transplanting Red Elderberry
Preparation
Before transplanting, water the red elderberry generously the day prior. This helps alleviate stress on the plant during the move.
Digging
In the new area, use your shovel to excavate a hole that is twice the width of the red elderberry root ball and of equal depth.
Placement
Gently position the red elderberry in the hole at the same depth it was previously situated. Carefully center the plant.
Filling
Begin refilling the hole with the excavated soil. Gently pat down the soil as you proceed, ensuring there are no air pockets that could dry out the roots.
Watering
Once transplanted, thoroughly water the red elderberry, making sure the water reaches the roots.
Mulching
Apply a layer of mulch around the plant's base – this aids in retaining moisture and protecting the plant during its initial stages.
How Do You Care For Red Elderberry After Transplanting?
Protection
In the initial days, shield the transplanted red elderberry from intense sunlight or strong winds. Utilize a shade cloth if necessary.
Pruning
If the red elderberry appears stressed after transplanting, consider light pruning to reduce its water requirements. However, avoid extensive pruning in the first year.
Monitoring
The red elderberry should be closely observed during the first few weeks. Regularly check for signs of wilting or disease. Provide additional water if needed, but avoid overwatering.
Frost Care
The red elderberry may require extra protection if frosts are anticipated soon after transplanting. Using a plant blanket can assist with this.
Troubleshooting Common Issues with Red Elderberry Transplantation.
What is the best time of the year to transplant red elderberry?
The most suitable time for relocating red elderberry is during the mild seasons, from S3 to S6. This period offers optimal growing conditions for the plant.
What's the proper spacing for red elderberry when transplanting?
When relocating red elderberry, ensure a generous distance of approximately 8-12 feet (2.4-3.7 meters) between plants. This spacing will allow them to reach their full potential size.
What's the ideal depth for transplanting red elderberry?
Dig a hole that is twice as wide as the root ball and equally deep. This should provide ample space for your red elderberry to establish its root system.
What type of soil is best when transplanting red elderberry?
Red elderberry thrives best in well-drained soil. Incorporate some organic matter like compost to enhance the soil's fertility and ensure a successful transplant.
How to deal with wilting leaves after transplanting red elderberry?
Red elderberry might experience some transplant shock, causing its leaves to wilt. Ensure consistent watering but avoid overwatering, as this can worsen the situation.
Why isn't my red elderberry growing after transplantation?
Your red elderberry might be suffering from transplant shock, poor soil conditions, or insufficient water. Ensure proper post-transplantation care, and the plant should recover.
Should I prune red elderberry after transplanting?
Yes, pruning red elderberry after transplanting is recommended as it invigorates the plant and maintains its compact form. Remember to do so carefully.
How often should I water red elderberry after transplantation?
Initially, water the red elderberry deeply every day until it becomes established. Then, adjust the watering to a couple of times per week.
How can I improve red elderberry's survival rate after transplanting?
Ensure providing optimal growing conditions, such as the correct soil and regular watering. Also, protect the plant from extreme weather conditions initially.
What if my red elderberry hasn't blossomed after transplanting?
Remember, red elderberry needs time to adjust after transplanting. It might not bloom the first season, but with proper care, it should bloom the following year.



