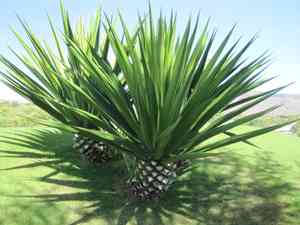
How to Transplant Sisal?
The ideal period for relocating sisal plants is from mid-summer through late summer, facilitating excellent root development prior to colder temperatures. Select locations that receive ample sunlight and have good drainage, and when moving the plant, ensure a substantial root mass for a successful transition.
What Preparations are Needed Before Transplanting Sisal?
What is the Ideal Time for Transplanting Sisal?
The optimal period for relocating sisal is during mid to late summer, allowing for vigorous development prior to colder months. This timeframe is particularly beneficial as the warm season promotes quick establishment and root growth, leading to a more robust plant. Approach this period with optimism, as it's a season of development where sisal can truly flourish. Be assured, transplanting within this prime window enhances the plant's capacity to endure future stresses and contributes to its longevity and output.
How Much Space Should You Leave Between Sisal Plants?
Begin by ensuring sisal has sufficient room to expand! Position them approximately 4-6 feet (1.2-1.8 meters) apart. This prevents overcrowding and fosters healthy development.
What is the Best Soil Mix for Sisal Transplanting?
For sisal, well-drained soil, especially sandy or loamy types, is perfect. Mix a slow-release fertilizer into the base of the soil blend before planting. This will nourish your sisal and boost its vitality.
Where Should You Relocate Your Sisal?
Select a spot to plant sisal where it will receive abundant sunlight. These plants adore sun and flourish in full light conditions. However, some light shade during the most intense midday sun can also be advantageous.
What Equipments Should You Prepare Before Transplantation Sisal?
Gardening Gloves
To safeguard your hands while handling soil and sisal.
Spade or Shovel
Needed for excavating holes in the ground for relocation and for extracting sisal from its original spot.
Garden Fork
It can help loosen surrounding earth and facilitate easier removal of sisal without harming its roots.
Pruning Shears
If sisal is a mature plant, you might need pruning shears to trim off damaged or dead growth before relocation.
Watering Can or Hose
For hydrating sisal during and after relocation to ensure its roots remain moist.
Wheelbarrow
For moving sisal to its new site, especially if it's a mature specimen.
Garden Trowel
Useful for minor digging around delicate roots when removing sisal from its initial pot or seedling tray.
How Do You Remove Sisal from the Soil?
How Do You Remove Sisal from the Soil?
From Ground: Hydrate the sisal to moisten the soil before digging. Excavate a wide trench around sisal with a shovel or spade, ensuring the plant's root ball is protected. Once the trench is deep enough, work the garden fork or spade beneath the root ball to lift it. From Pot: If sisal is in a container, water it a few hours before relocation. Hold the base of sisal and invert the pot. Gently tap the pot and allow sisal to slide out. Handle sisal by its root ball, not the stem or leaves. From Seedling Tray: Dampen the soil with water and use a garden trowel to carefully scoop out each sisal seedling, taking care not to harm its roots or leaves.
Step-by-Step Guide for Transplanting Sisal
Preparation
Prepare the new planting area by digging a hole twice the width and depth of sisal's root ball. Loosen the soil at the bottom and sides of the hole with a garden fork.
Placement
Center the sisal in the hole, ensuring it stands upright and the top of its root ball is level with the surrounding soil surface.
Backfilling
Refill the hole with soil, gently firming it with your hands. Ensure sisal remains upright and its root ball is covered, but not buried too deeply.
Watering
Water thoroughly using a watering can or hose to moisten the soil and eliminate air pockets.
Monitoring
Observe the plant for several days to ensure it's adapting to its new location. Look for signs of wilting or discoloration on the leaves that might indicate stress.
How Do You Care For Sisal After Transplanting?
Protection
Depending on the climate, sisal might need some shade in the initial days after relocation to prevent sun-scorch. Consider using a shade cloth if necessary.
Watering
Keep the soil around sisal consistently moist, but not waterlogged. Avoid letting the soil dry out, especially in the first few weeks post-relocation.
Pruning
If any leaves of the sisal turn yellow or appear unhealthy after transplant, remove them so the plant can focus its energy on establishing new roots.
Inspection
Keep an eye out for any pests or diseases that might take advantage of sisal's weakened state post-relocation. Immediate treatment is necessary if an infestation occurs.
Troubleshooting Common Issues with Sisal Transplantation.
When is the best time to transplant my sisal plant?
The ideal time to transplant sisal is during the transitional stages between the 5th and 6th season.
How can I know if my sisal is ready for transplanting?
The roots of sisal should fill the pot before transplanting. If roots are emerging from the drainage holes or circling the pot, it's prepared for relocation.
What spacing should I keep while transplanting my sisal plants?
Ensure you position the sisal plants approximately 4-6 feet (1.2-1.8 meters) apart. This provides ample space for the plants to reach full maturity.
I'm finding it hard to remove my sisal from the pot. Any tips?
Invert your plant and tap the bottom of the pot. If it's too resistant, cut the pot away but be careful not to cut the plant's root.
Should I water my sisal before or after transplanting it?
Both! Water the sisal thoroughly the day before relocating it and after replanting ensure the soil remains moist but not waterlogged.
The roots of my sisal look damaged. Can I still transplant it?
Yes! Trim away the damaged roots with a sterile, sharp instrument before relocating. This encourages the sisal plant to develop new, healthier roots.
What kind of soil does my sisal require after transplanting?
Sisal prefers well-drained soil, enriched with organic matter. Adding compost or well-rotted manure to the planting hole can aid its healthy growth.
What care should I take immediately after transplanting sisal?
After relocating sisal, provide ample water and keep it shaded for the initial few days to help it adjust. Gradually expose it to sunlight.
How deep should I dig the hole for transplanting sisal?
Dig a hole twice as wide and as deep as the container your sisal is currently in. This ensures roots can spread and establish easily.
My transplanted sisal appears droopy. What do I do?
Don't worry, some drooping is normal after relocation. Keep the soil moist and provide adequate shade. If the issue persists, check for pests or diseases.


