How to Propagate Sisal?
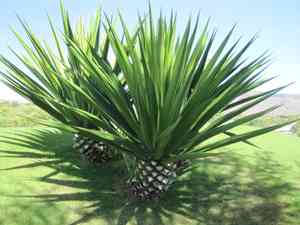
A succulent recognized for its sturdy fibers, sisal flourishes in warmer environments with soil that drains effectively. To multiply sisal, the primary technique is division, involving the careful separation and replanting of offsets, also known as 'pups', which emerge around the parent plant's base. These pups ought to be permitted to air-dry for several days prior to planting to avert decay. Exposure to direct sunlight and infrequent irrigation encourage the development of these young plants, guaranteeing they too can cultivate the resilient, fibrous foliage characteristic of sisal.
What Is the Best Time To Propagate Sisal?
Propagation Type
Division
Propagation Season
Spring,Autumn
What Tools Are Used in Sisal Propagation?
Sharp Knife or Pruning Shears
A clean, sharp knife or pruning shears are vital for sisal propagation via division. These tools enable precise, clean cuts, minimizing harm to the parent plant and pups during separation. Cleaner cuts reduce sisal stress, lowering infection risk and promoting faster healing.
Gardening Gloves
Wearing sturdy gardening gloves is essential when handling sisal due to its fibrous, potentially abrasive leaves. Gloves protect hands from injury during division and ensure safe handling of sharp-edged foliage. This protective gear is crucial for the gardener's health and safety.
Spade or Garden Fork
A spade or garden fork is necessary to carefully lift sisal from the ground without unduly harming its root system. This tool is especially useful when sisal has developed a large, dense root network. It helps gently loosen soil and extract the plant with adequate root portions attached, vital for successful reestablishment.
Rooting Hormone (Optional)
While not strictly required, applying rooting hormone to sisal's cut root areas can enhance root development in new divisions. This hormone stimulates root growth, helping new plants establish more quickly and effectively, which benefits their health and vigor.
Watering Can with a Fine Rose
After division and replanting, gentle watering is crucial to help sisal settle into its new environment. A watering can with a fine rose attachment provides soft, even water distribution, minimizing soil displacement and supplying necessary moisture without overwatering newly planted divisions.
How to Propagate Sisal?
Propagation Type
Easy
How to Care for Your Newly Propagated Sisal?
How to Care for Your Newly Propagated Sisal?
Post-propagation, water sisal sparingly, allowing soil to dry between waterings, to mimic its arid habitat. Provide ample sunlight, shield from freezing temperatures, and fertilize minimally to maintain sisal's health. Monitor for pests or diseases, treating promptly if necessary.
Common Mistakes to Avoid When Propagating Sisal
Overwatering
Excessive watering can cause root rot in sisal, which is detrimental to its propagation as the plant thrives in dry, well-draining conditions.
Using the wrong soil mix
A soil mixture that retains too much moisture can negatively impact sisal's roots. It requires a well-draining mix to prevent waterlogging.
Ignoring natural offsets
Neglecting to utilize the offsets sisal naturally produces is a missed opportunity, as these are the simplest means of propagation.
Improper cutting technique
Incorrectly taking cuttings can harm sisal and impede rooting, as a precise cut is necessary to ensure the parent plant remains healthy and the cutting can root.
Tips For Propagating Sisal
Use proper substrate
Employ a well-draining substrate like a cactus mix to encourage healthy root growth and prevent rot in sisal.
Let cuttings dry
Before potting, allow sisal cuttings to dry and form a callus for a few days to prevent rot and promote better rooting.
Propagate natural offsets
Take advantage of the natural offsets sisal produces, separating them carefully to encourage successful new plants.
Avoid deep planting
Plant sisal offsets and cuttings shallowly to prevent excessive moisture around the base and promote quicker root establishment.


