How to Transplant Wingleaf soapberry?
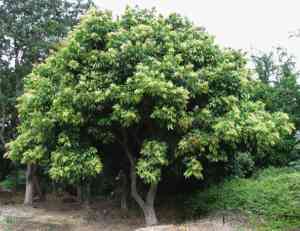
Wingleaf soapberry flourishes most effectively when relocated between mid-spring and mid-summer, or from late autumn to late winter, since environmental factors assist in root development. Select sites with good drainage that receive abundant sunlight or some shade. Bear in mind that careful manipulation during transplantation preserves the roots' integrity and health.
What Preparations are Necessary Before Relocating Wingleaf Soapberry?
What is the Optimal Period for Relocating Wingleaf Soapberry?
The best times for moving wingleaf soapberry are from mid-spring through mid-summer or from late autumn until late winter. These intervals allow the plant to establish a robust root structure prior to harsh weather. Relocating wingleaf soapberry during these periods supports its development and vitality, leading to a more resilient plant. Remember, a thriving wingleaf soapberry is a content wingleaf soapberry!
How Much Distance Should You Maintain Between Wingleaf Soapberry Plants?
When relocating your wingleaf soapberry, aim for an optimal spacing of 15-30 feet (4.5-9 meters) between them. This will provide ample room for growth and facilitate proper air circulation and sun exposure.
What is the Best Soil Blend for Wingleaf Soapberry Relocation?
Prepare a well-draining soil rich in organic material for your wingleaf soapberry. Incorporate a generous amount of compost or aged manure into the existing soil; you can also use a general-purpose granular fertilizer for an extra nutrient boost.
Where Should You Replant Your Wingleaf Soapberry?
Select a location that receives full sun or partial shade for your wingleaf soapberry. This plant thrives in areas that get approximately 6-8 hours of sunlight daily. Ensure the site offers sufficient space for healthy development.
What Tools Should You Prepare Before Relocating Wingleaf Soapberry?
Gardening Gloves
To safeguard your hands from soil and potential irritants when handling the plant and earth.
Gardening Spade or Shovel
This tool is used to excavate the hole for relocation and to assist in removing the plant from its original spot.
Pruning Shears
Essential for trimming away any dead or diseased portions of the wingleaf soapberry plant.
Bucket or Wheelbarrow
Useful for moving the wingleaf soapberry plant from its initial location to the new planting site.
Watering Can/Hose
Required to hydrate the wingleaf soapberry plant both before and after relocation.
How Do You Extract Wingleaf Soapberry from the Soil?
How Do You Extract Wingleaf Soapberry from the Soil?
From Ground: Begin by watering the wingleaf soapberry plant to moisten the surrounding soil. Then, using your spade or shovel, carefully dig a wide trench around the plant, ensuring the root ball remains intact. Gently work the spade beneath the root ball and lift the plant carefully from its spot. Avoid severing roots as they are vital for the plant's survival.From Pot: If your wingleaf soapberry plant is in a container, the first step is to water it thoroughly. Next, turn the pot sideways, hold the plant gently by its stem, and tap the bottom of the pot to encourage it to slide out. Avoid harsh pulling or tugging on the plant.From Seedling Tray: If lifting seedlings, water them first so they can be removed more easily. Pinch them out by their leaves rather than their stem, using a dibber or pencil to help ease out the root ball if needed.
Step-by-Step Guide for Relocating Wingleaf Soapberry
Preparation
Initiate your relocation process by watering the wingleaf soapberry plant in its original spot a few hours before you plan to move it. This makes the soil damp and easier to work with, and it lessens the shock to the plant during the move.
Dig a Hole
At the new site, excavate a hole that is twice as wide and the same depth as the root ball of your wingleaf soapberry plant. This generously sized hole will accommodate the roots without crowding.
Positioning
Now place the wingleaf soapberry plant into the hole. Ensure the plant is standing upright.
Filling in the Hole
Backfill the excavated hole with soil, making sure the top of the root ball is level with the ground surface. Gently firm the soil around the root ball.
Watering
Thoroughly water the plant after relocation. This will help the soil settle around the roots and reduce air pockets in the soil.
How Do You Care For Wingleaf Soapberry After Relocation?
Watering
It's crucial to ensure adequate moisture levels post-relocation. Keep the soil around the wingleaf soapberry plant damp, especially for the initial few weeks. However, excessively waterlogged soil is equally detrimental, so avoid overwatering.
Pruning
Initially, if you observe any leaves or branches wilting after relocation, promptly trim them away as this will allow the plant to direct its energy towards establishing new roots.
Regular Inspection
Periodically check the wingleaf soapberry plant for any indications of stress or illness. If you notice any leaves turning yellow or brown, it might signal a potential issue that requires attention.
Fertilization
Wait for a few weeks before you begin fertilizing. Early fertilization might lead to excessive growth and can stress the newly relocated plant.
Troubleshooting Common Issues with Wingleaf Soapberry Relocation.
When is the best time to relocate wingleaf soapberry?
For optimal outcomes, relocate wingleaf soapberry from mid-spring to mid-summer or late fall to late winter. These seasons offer ideal conditions for wingleaf soapberry to establish itself.
What's the ideal planting distance for wingleaf soapberry?
Each wingleaf soapberry requires space to grow and thrive! Ensure to position plants approximately 15-30 feet (4.5 - 9 meters) apart. This guarantees each one receives sufficient sunlight and nutrients.
What size hole should I dig when relocating wingleaf soapberry?
When relocating wingleaf soapberry, excavate a hole twice as wide and as deep as the root ball. This provides room for the roots to spread out and settle.
How deep should I plant the wingleaf soapberry?
Plant wingleaf soapberry at the same level it was growing in its previous spot. Planting too deeply might cause the stem to rot, while planting too shallow can dry out roots.
Why are my newly relocated wingleaf soapberry leaves turning yellow?
Transplant shock could be the cause. Ensure that wingleaf soapberry is adequately watered and is planted in well-drained soil. Provide shade if the plant is exposed to too much sun.
Why is the wingleaf soapberry not growing after I relocated it?
Don't worry! The wingleaf soapberry might be prioritizing the development of its root system first. Ensure it's receiving enough water and sunlight. If it persists, consider potential soil nutrient deficiencies.
What's the preferable soil pH for wingleaf soapberry relocation?
The wingleaf soapberry prefers a pH between 6.0-7.5. It's always wise to test your soil pH before planting and amend the soil if necessary. Happy planting!
How do I ensure successful relocation of wingleaf soapberry?
Provide consistent care including regular watering, ample sunlight, and suitable soil. Always handle wingleaf soapberry carefully during relocation to prevent root damage. Remember, patience is crucial!
What is the watering requirement for newly relocated wingleaf soapberry?
The wingleaf soapberry prefers moist, but well-drained soil. Avoid overwatering, but maintain consistent moisture especially in the first few weeks after relocation for optimal growth.
What should I do if the relocated wingleaf soapberry is wilting?
Review the watering routine and ensure the plant isn't waterlogged or dried out. Adequate watering and perhaps some shade can help it recover.



