How to Propagate Hyssop?
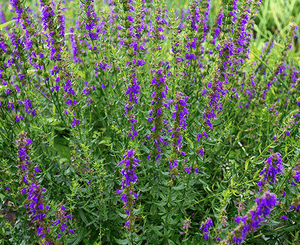
Hyssop flourishes when reproduced via stem sections. For optimal root formation, choose a robust, non-blooming stalk and sever it directly beneath a leaf joint. Submerge the severed tip in rooting compound prior to embedding it in a porous potting blend. Verify that the cuttings remain damp and are situated in an area receiving diffused light to stimulate development.
Optimal Period for Hyssop Propagation
Propagation Type
Cutting
Propagation Season
Spring,Summer
Tools for Hyssop Propagation
Sharp Pruning Shears
These are vital for obtaining clean, precise hyssop cuttings. Sharp blades ensure a smooth cut, minimizing harm to the parent plant and boosting successful rooting. Clean cuts deter infection and promote quicker healing.
Rooting Hormone
This compound stimulates root development from hyssop cuttings. Applying rooting hormone to the stem's cut end before planting enhances the likelihood of successful root formation, which is key for hyssop propagation.
Sterile Potting Mix
A sterile potting mix is crucial for planting cuttings, as it lacks pathogens that could harm hyssop's delicate new roots. This medium offers an ideal environment supporting drainage and aeration, essential for root growth.
Small Pots or Trays
Suitable for housing individual cuttings. Small pots or trays help maintain necessary humidity and temperature, allowing hyssop cuttings to root effectively without the soil drying out too quickly.
Plastic Covers or Humidity Domes
These aids create a high-humidity micro-environment, vital for hyssop cuttings to prevent leaf moisture loss. This setting improves the chances of cuttings rooting by maintaining optimal humidity levels.
Labels and Markers
Useful for tracking propagation batches, especially when propagating various plant types like hyssop. Proper labeling assists in monitoring growth and organizing the propagation area efficiently.
Hyssop Propagation Method
Propagation Type
Easy
Post-Propagation Care for Hyssop
How to Care for Your Newly Propagated Hyssop?
Once hyssop cuttings have rooted, typically in 2-4 weeks, gradually introduce them to less humid conditions before moving them to their permanent spot. Ensure well-draining soil with moderate fertility. Water consistently, allowing the soil to dry slightly between waterings. Full sun to partial shade is best for strong growth. Regular pruning helps maintain a bushy form and encourages new, flavorful leaves.
Common Errors to Avoid When Propagating Hyssop
Overwatering
Excessive watering of hyssop can cause root rot, a condition that damages the plant's roots and hinders its ability to absorb nutrients and water, ultimately impeding growth.
Too deep planting
Planting hyssop seeds too deeply can prevent them from getting enough light for proper germination, leading to poor or failed seedling development.
Neglecting to prune
Failing to prune hyssop after propagation can result in leggy plants with weak stems, as pruning encourages a denser, more robust form.
Using poor quality cuttings
Using old or diseased hyssop cuttings for propagation risks transferring diseases to new plants and generally leads to lower viability and growth rates.
Advice for Hyssop Propagation
Softwood cuttings
Taking softwood cuttings from hyssop during the growing season ensures higher success rates, as these cuttings tend to root more easily and retain vigor.
Well-draining soil
Using well-draining soil for hyssop prevents waterlogging, which is crucial to avoid root rot and other water-related diseases.
Light exposure
Ensuring adequate light when seeding hyssop is paramount; light stimulates germination, so seeds should not be buried too deeply.
Regular pruning
Regularly pruning hyssop post-propagation promotes healthier, bushier growth by encouraging the plant to develop more side shoots, enhancing overall plant vigor and aesthetic appeal.



