How to Transplant Scarlet hedgenettle?
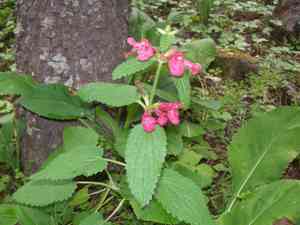
The optimal period for relocating scarlet hedgenettle is from the mild warmth of mid to late spring or the commencement of early summer, allowing roots to settle in favorable conditions. Choose a brightly lit location with effective drainage for superior development. Careful manipulation is crucial to prevent root trauma.
What Preparations are Needed Before Transplanting Scarlet Hedgenettle?
What is the Ideal Time for Transplanting Scarlet Hedgenettle?
The optimal period for moving scarlet hedgenettle extends from the refreshing mid-spring to the gentle start of early summer. This timeframe provides prime growing conditions, ensuring scarlet hedgenettle's roots firmly establish themselves prior to the intense heat of summer. Relocating scarlet hedgenettle during this interval capitalizes on the mild temperatures and increasing daylight, fostering robust growth and blooming potential. This also allows the soil to be sufficiently warm for root development, yet the weather isn't so hot as to stress the newly planted specimens. Undertaking this gardening task in these favorable months sets the stage for a vibrant display of scarlet hedgenettle's lively color and form.
How Much Space Should You Leave Between Scarlet Hedgenettle Plants?
Begin your gardening endeavor with scarlet hedgenettle by ensuring adequate room for each plant. A spacing of approximately 1-2 feet (30-60 cm) between individual plants is a good starting point. This guarantees that each scarlet hedgenettle receives ample sunlight and nutrients without competing with its neighbors. Let's get spacing!
What is the Best Soil Mix for Scarlet Hedgenettle Transplanting?
Prepare the appropriate growing medium for scarlet hedgenettle. Select well-draining soil that is rich in organic matter. Initiate your gardening project by enriching the ground with a foundational fertilizer. An organic or slow-release fertilizer works effectively. This nourishes the soil and provides scarlet hedgenettle with a healthy beginning.
Where Should You Relocate Your Scarlet Hedgenettle?
Sunlight is vital for scarlet hedgenettle's development. Choose a spot that receives full sun or partial shade. Even if your garden only gets a few hours of sunlight, scarlet hedgenettle can still flourish. Remember, proper placement is key! Good luck with your planting.
What Equipments Should You Prepare Before Transplantation Scarlet Hedgenettle?
Gardening Gloves
These are absolutely crucial for protecting your hands while handling soil and plants.
Shovel or Spade
A sharp-edged shovel or spade is ideal for excavating the plant from its original spot.
Pruning Shears
To trim the roots and branches of scarlet hedgenettle as necessary.
Garden Trowel
This tool will assist you in digging a precise hole when you are ready to move scarlet hedgenettle to its new home.
Watering Can
For hydrating scarlet hedgenettle immediately after transplanting to help minimize shock.
Wheelbarrow or Container
You'll need something to move scarlet hedgenettle from its initial location to its new site.
How Do You Remove Scarlet Hedgenettle from the Soil?
How Do You Remove Scarlet Hedgenettle from the Soil?
From Ground: If you're transferring scarlet hedgenettle from one part of your garden to another, begin by watering the plant a day beforehand to moisten the soil. Softer earth makes it easier to use your shovel or spade and extract the plant without causing damage. Carefully dig a wide circle around the plant, ensuring the root ball remains intact. Next, work the spade beneath the root ball and gently lift scarlet hedgenettle. Keep as much soil around the roots as possible to lessen transplant stress.From Pot: If scarlet hedgenettle is in a container, ensure the soil is moderately damp, then tilt it sideways and carefully slide out the plant while supporting its base. Be careful not to forcefully pull scarlet hedgenettle out as this could harm the roots.From Seedling Tray: If you're moving scarlet hedgenettle from a seedling tray, the process is quite straightforward. Once the seedlings are robust enough to handle, gently push them from beneath their cell until you can comfortably grasp the leaves and pull them out. Minimize direct handling of the roots to reduce transplant shock.
Step-by-Step Guide for Transplanting Scarlet Hedgenettle
Preparation
Prepare the new planting site before extracting scarlet hedgenettle from its initial position. The hole should be twice the width and roughly the same depth as the root ball of scarlet hedgenettle.
Root Pruning
Use your pruning shears to trim any roots that appear excessively long or damaged. This can encourage root growth once scarlet hedgenettle has been relocated.
Placement
Position scarlet hedgenettle into the pre-dug hole, ensuring it sits at the same depth as it was in its original spot. The top of the root ball should be level with the ground.
Backfill
Begin refilling the hole with soil, gently firming it around scarlet hedgenettle's root base. Be careful to ensure no air pockets remain, as these can dry out the roots.
Watering
Once scarlet hedgenettle is securely in place, water it thoroughly to settle the soil around the roots and help alleviate transplant shock.
How Do You Care For Scarlet Hedgenettle After Transplanting?
Watering
Ensure scarlet hedgenettle is kept well-watered but not waterlogged. This means the soil should remain consistently moist until scarlet hedgenettle is established and showing signs of new growth.
Pruning
Any dead or dying foliage should be removed post-transplant to help direct scarlet hedgenettle's energy into new development.
Observation
Regularly monitor scarlet hedgenettle to confirm it is adapting well to its new environment. Watch for any indications of transplant shock, such as yellowing leaves or wilting, and address them appropriately.
Troubleshooting Common Issues with Scarlet Hedgenettle Transplantation.
During which seasons should I transplant scarlet hedgenettle?
Ideally, scarlet hedgenettle should be moved during late spring to early fall for optimal results.
What spacing should I maintain while transplanting scarlet hedgenettle?
When relocating scarlet hedgenettle, maintain at least 1-2 feet (30-60 cm) distance between each plant. This provides sufficient room for growth.
Is it normal for scarlet hedgenettle to wilt after transplantation?
Absolutely, it's not unusual. Scarlet hedgenettle may temporarily droop due to transplant shock, but with proper care, they'll recover quickly.
What kind of sunlight exposure does scarlet hedgenettle require post-transplant?
Scarlet hedgenettle thrives in full sun to partial shade after transplant. Ensure it receives a good balance for healthy development.
How often should I water scarlet hedgenettle after transplantation?
Scarlet hedgenettle generally needs watering every 1-2 days following transplantation. Adjust based on weather and soil moisture.
Any specific soil type for scarlet hedgenettle after transplantation?
Scarlet hedgenettle prefers well-draining soil to prevent root rot. A blend of sand, silt, and a little clay would be suitable.
What should I do if scarlet hedgenettle is not showing any growth after transplantation?
Allow it some time. If no new growth appears after 3-4 weeks, check soil nutrients, water supply, and light conditions.
Why are my transplanted scarlet hedgenettle leaves turning yellow?
Overwatering or inadequate drainage can cause leaves to yellow. Also, inspect for pests as they can produce similar symptoms.
Is there a preferred time of day for transplanting scarlet hedgenettle?
Moving scarlet hedgenettle during the cooler hours of early morning or late evening helps prevent shock and wilting.
What to do if thereâs insect infestation on my transplanted scarlet hedgenettle?
For insect infestations on scarlet hedgenettle, use organic pesticides or beneficial insects. Be sure to identify the insect type before treatment.



