How to Transplant Arborvitae fern?
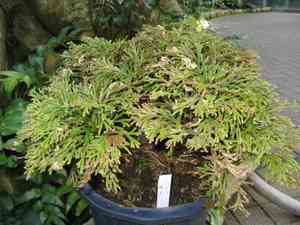
Arborvitae fern transplantation is most successful when performed in the serene period of late spring to early summer, leveraging peak growth circumstances. Choose a site offering partial shade and adequately draining earth to facilitate a smooth adjustment.
Necessary Preparations Before Relocating Arborvitae Fern?
Optimal Period for Transplanting Arborvitae Fern?
The ideal window for moving arborvitae fern spans from late spring's bloom to early summer's start, enriching your garden with lively growth. Shifting arborvitae fern during this time imbues your landscape with robust vigor, as the balanced climate promotes strong root development without the extremes of colder or hotter periods. Relocation within this nurturing timeframe encourages hearty resilience for year-round flourishing.
Required Spacing Between Arborvitae Fern Plants?
First, let's give your arborvitae ferns ample room to thrive! Position these small plants 6-8 inches (15-20 cm) apart. This provides each fern sufficient area to expand and grow without competing for nutrients or light.
Best Soil Blend for Arborvitae Fern Relocation?
Next, let's prepare the perfect bed for your arborvitae ferns! They flourish in fertile, well-draining soil enriched with abundant organic matter. Prior to planting, incorporate a balanced, slow-release fertilizer to give them a healthy start.
Optimal Location for Your Arborvitae Fern?
For the perfect spot, select an area receiving filtered sunlight or partial shade. Excessive sun can dehydrate your arborvitae ferns, while insufficient light may hinder their development. Aim for a location that emulates the dappled light of their natural, woodland environment.
Equipment to Prepare Before Transplanting Arborvitae Fern?
Gardening Gloves
To safeguard your hands while handling soil and plants.
Spade or Shovel
For excavating the plant and preparing the new planting site.
Garden Fork
To loosen the soil surrounding the plant's root system.
Watering Can or Hose
For hydrating the plant before and after its relocation.
Wheelbarrow or Plant Dolly
To move the plant from one spot to another if it is large.
Pruning Shears
To trim any damaged roots or foliage.
Tarp or Burlap
To secure the soil around the root ball during transportation.
How to Extract Arborvitae Fern from the Soil?
How to Extract Arborvitae Fern from the Soil?
From Ground: First, moisten the arborvitae fern plant to dampen the soil. Then, use a spade or shovel to dig a wide perimeter around the plant, being careful not to harm the root ball. Gently lift the plant by sliding the spade underneath the root ball.From Pot: Water the arborvitae fern thoroughly beforehand, to make the roots more flexible. Tilt the pot sideways and gently tap it to dislodge the plant. Grasp the plant's base and carefully ease it out while supporting the root ball.From Seedling Tray: Water the seedling tray to soften the soil, facilitating easier removal of seedlings without root damage. Use a small tool or your fingers to gently lift each arborvitae fern seedling by its leaves, avoiding the delicate stem.
Step-by-Step Guide for Relocating Arborvitae Fern
Excavating the Hole
Dig a hole in the ground that is twice the width of the arborvitae fern's root ball and equally deep. This will provide ample space for the roots to spread.
Root Examination
Before placing the arborvitae fern into the new hole, inspect the root ball. Gently untangle any circling roots to encourage outward growth.
Plant Placement
Position the arborvitae fern in the center of the hole, ensuring it is upright and at the same depth it was previously growing. The top of the root ball should be level with the surrounding soil.
Backfilling the Hole
Gently refill the hole with native soil, adding layers and lightly compacting to remove air pockets. Avoid excessive compression as this can harm the roots.
Post-Planting Watering
Thoroughly water the arborvitae fern after planting to settle the soil and hydrate the roots. This will also help eliminate any remaining air pockets.
How to Care for Arborvitae Fern After Relocation?
Monitoring Moisture Levels
Regularly check the soil moisture to ensure the arborvitae fern does not dry out. Water when the top inch of soil feels dry to the touch.
Mulching
Apply a 2-3 inch layer of mulch around the base of the arborvitae fern, keeping it a few inches away from the stem to prevent rot and maintain soil moisture.
Pruning
Trim any damaged or dead foliage to help the arborvitae fern redirect energy towards root establishment and new growth.
Protecting
During the initial weeks, shield the arborvitae fern from harsh conditions, such as extreme heat or cold, to aid its recovery from transplant shock.
Addressing Common Issues with Arborvitae Fern Relocation.
What's the best time to transplant arborvitae fern?
Relocate arborvitae fern during the milder days from late spring to early summer for optimal adjustment.
How far apart should I space arborvitae fern when transplanting?
Position arborvitae fern at intervals of approximately 6-8 inches (15-20 cm) to ensure sufficient growth space.
Why is my arborvitae fern wilting after transplant?
Wilting may be due to shock. Keep the soil moist and avoid direct sun for a few days.
Should I fertilize arborvitae fern right after transplanting?
Wait 4-6 weeks before applying fertilizer to allow arborvitae fern to establish in its new location first.
How much should I water arborvitae fern post-transplant?
Provide a thorough watering immediately after transplanting, then maintain consistently moist but not waterlogged soil.
What soil conditions favor arborvitae fern after transplanting?
Ensure rich, well-draining soil for arborvitae fern to thrive after transplanting.
What should I do if arborvitae fern shows yellowing leaves after transplant?
Yellowing might indicate overwatering. Allow the topsoil to dry slightly between waterings.
How deep should I plant arborvitae fern during transplant?
Transplant arborvitae fern so the root ball is level with the soil surface, neither deeper nor higher.
Can arborvitae fern be transplanted in dense shade?
Arborvitae fern prefers bright, indirect light. Dense shade might hinder its growth post-transplant.
How do I prepare arborvitae fern's root ball for transplanting?
Gently loosen the root ball without causing damage to encourage outward growth in the new environment.



