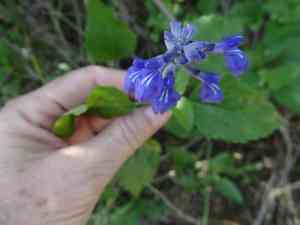
How to Transplant Shrubby blue sage?
Shrubby blue sage flourishes when relocated during the pleasant temperatures of mid-season, specifically from the bloom of late spring through the diminishing warmth of late summer. Providing a sunny, adequately drained location will result in vigorous development.
What Preparations are Needed Before Transplanting Shrubby Blue Sage?
What is the Ideal Time for Transplanting Shrubby Blue Sage?
The optimal period for relocating shrubby blue sage spans from the warmth of late spring through early autumn. This timeframe offers shrubby blue sage an excellent growth opportunity, as stable temperatures and extended daylight hours facilitate root development prior to colder weather. Seize this chance to help shrubby blue sage flourish in your garden; successful transplantation during this season ensures vigorous growth and a head start for the upcoming year. Consider this the prime gardening window, allowing shrubby blue sage to easily extend its roots and thrive under your care.
How Much Space Should You Leave Between Shrubby Blue Sage Plants?
When getting ready to plant your shrubby blue sage, aim for a comfortable distance between each specimen. An optimal spacing of approximately 18-24 inches (45-60 cm) will enable them to thrive without overcrowding, providing ample room for root expansion!
What is the Best Soil Mix for Shrubby Blue Sage Transplanting?
For your beautiful shrubby blue sage, prepare a welcoming environment with well-draining, loamy soil. A small amount of balanced granular fertilizer will provide a good start and a boost of energy in their new home!
Where Should You Relocate Your Shrubby Blue Sage?
Choose a sunny location for your shrubby blue sage! They adore sunlight, so a spot bathed in full sun will keep them vibrant and happy. If possible, find a place where they can absorb those rays for most of the day!
What Equipments Should You Prepare Before Transplantation Shrubby Blue Sage?
Gardening Gloves
To safeguard your hands while handling soil and plants.
Shovel or Spade
For excavating the plant and preparing the new planting site.
Garden Fork
To loosen the soil around the plant's root system if necessary.
Watering Can or Hose
To hydrate the plant before and after the relocation process.
Wheelbarrow or Plant Dolly
To move the shrubby blue sage if it is large or heavy.
Pruning Shears
To trim any damaged roots or branches prior to transplanting.
Mulch
To help maintain soil moisture and regulate temperature around the new planting area.
How Do You Remove Shrubby Blue Sage from the Soil?
How Do You Remove Shrubby Blue Sage from the Soil?
From Ground: Water the shrubby blue sage thoroughly beforehand to ensure the soil is damp. Carefully dig a circular trench around the plant, wider than the estimated root ball, using a shovel or spade. Gently pry underneath with your spade to lift the plant, aiming to keep the root ball intact.From Pot: Begin by watering the shrubby blue sage to make the soil pliable. Invert the pot and gently tap the base to dislodge the plant. If it doesn't slide out, you may need to squeeze the pot or run a garden knife along the rim to help separate the plant from its container.From Seedling Tray: Gently push from the bottom of the tray to loosen individual shrubby blue sage seedlings. Use a small tool like a dibber or even a pencil to lift the seedling without harming the roots.
Step-by-Step Guide for Transplanting Shrubby Blue Sage
Plant Removal
Start by extracting the shrubby blue sage from its current spot, following the instructions outlined in the removal process section.
Prepare the New Site
Excavate a hole in the ground that is twice as wide and equally as deep as the shrubby blue sage's root ball. If you are transplanting multiple plants, ensure adequate spacing between each hole.
Inspect the Roots
Examine the shrubby blue sage's root ball for any compromised or dead roots and trim them using pruning shears. If the roots are tightly bound, gently separate them with your fingers.
Plant Placement
Position the shrubby blue sage in the center of the newly dug hole. Adjust the depth so that the top of the root ball is flush with the surrounding soil surface.
Backfill the Hole
Carefully refill the hole with soil around the root ball, gently tamping down to eliminate air pockets. Ensure the shrubby blue sage stands upright and stable.
Water Thoroughly
Immediately after transplanting, generously water the shrubby blue sage to settle the soil and provide moisture to its roots.
Add Mulch
Apply a layer of mulch around the base of the shrubby blue sage, keeping it away from the stems to prevent rot. Mulch will help maintain soil moisture and temperature.
How Do You Care For Shrubby Blue Sage After Transplanting?
Initial Watering
After transplanting, water the shrubby blue sage thoroughly and continue to provide deep watering every few days to encourage root establishment in its new location.
Checking for Stability
Observe the shrubby blue sage for the first few days to ensure it remains upright and secure. If needed, stake the plant for additional support until it is firmly established.
Trimming
Prune any leaves or stems that were damaged during the transplanting process to stimulate new growth and help the shrubby blue sage focus its energy on root development.
Monitoring for Stress
Keep an eye on the shrubby blue sage for indications of transplant shock, such as wilting, yellowing, or dropping leaves. If symptoms appear, provide extra care with watering and shading if necessary.
Troubleshooting Common Issues with Shrubby Blue Sage Transplantation.
When is the best time to transplant shrubby blue sage?
Relocate shrubby blue sage during the warmer months, from late spring through late summer, to allow roots sufficient time to establish.
How far apart should I space shrubby blue sage when transplanting?
Space shrubby blue sage approximately 18-24 inches (45-60 cm) apart to accommodate mature growth and adequate air circulation.
Why are my transplanted shrubby blue sage plants wilting?
Wilting after transplant often signals shock. Ensure consistent watering and shield from intense sun until recovery.
How deep should the hole be for transplanting shrubby blue sage?
Dig a hole twice the width and the same depth as the root ball to prevent planting too deeply.
Can I transplant shrubby blue sage during a hot day?
Avoid transplanting during peak heat. Aim for a cooler day or transplant in the late afternoon or evening.
How much should I water shrubby blue sage after transplanting?
Water thoroughly after transplanting and keep the soil moist until shrubby blue sage is well-established and shows new growth.
Should I fertilize shrubby blue sage immediately after transplanting?
Wait a few weeks before fertilizing. Allow shrubby blue sage to prioritize root growth over leaf production initially.
How do I prepare the soil before transplanting shrubby blue sage?
Prepare soil with organic matter to enhance drainage and nutrient content. Ensure it's loose and aerated for optimal results.
Can shrubby blue sage be transplanted in clay soil?
Yes, but amend heavy clay soil with compost to improve drainage and prevent root rot.
My shrubby blue sage isn't thriving post-transplant, what could be wrong?
Potential issues: root damage during transplant, insufficient water, excessive sun exposure, or nutrient-deficient soil. Evaluate and adjust care.


