How to Transplant Chaparral currant?
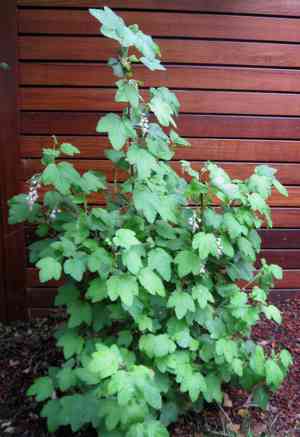
For chaparral currant, the peaceful dormancy of winter provides an ideal period for relocation, allowing roots to settle during a mild inactive phase. Choose a bright location with soil that drains effectively and carefully encourage the root system to spread into its new environment.
Essential Preparations Before Relocating Chaparral Currant?
Optimal Timing for Relocating Chaparral Currant?
Choose the cooler, dormant period, typically winter, for moving chaparral currant. The mild conditions of this season facilitate comfortable establishment, allowing roots to develop without heat stress. Relocating chaparral currant during this restful phase leverages the plant's natural cycle, encouraging better adaptation and vigorous blooms in subsequent seasons. Seize this opportunity to give chaparral currant a fresh start; its appreciation will manifest in lush, vibrant growth.
Required Spacing Between Chaparral Currant Plants?
When introducing chaparral currant to your garden, ensure a spacing of approximately 3-6 feet (1-2 meters) between them. This guarantees each plant ample room to grow and thrive without competing for resources. Happy planting!
Ideal Soil Blend for Chaparral Currant Relocation?
The best soil for chaparral currant is loose and drains well, with a small amount of compost mixed in for added benefit. Begin by incorporating some base fertilizer. This will help supply the plant with vital nutrients for a strong start.
Recommended Location for Your Chaparral Currant?
Chaparral currant thrives in a sunny spot or even an area with partial shade. Be aware that excessive direct sunlight might not be ideal. Aim for a balanced environment to allow your chaparral currant to flourish.
Equipment Needed Before Relocating Chaparral Currant?
Gardening gloves
To shield your hands from soil and any sharp objects when handling the chaparral currant plant.
Shovel or Spade
For digging up the chaparral currant plant from its original spot.
Garden Fork
To gently lift the plant and its root system from the ground.
Pruners
For trimming any damaged roots or branches.
Bucket or Wheelbarrow
To move the chaparral currant from its initial location to the new planting site.
Hose or Watering Can
To hydrate the chaparral currant in its new position.
How to Extract Chaparral Currant from the Soil?
How to Extract Chaparral Currant from the Soil?
From Ground: Prepare the chaparral currant plant for removal by thoroughly watering the soil, which will simplify digging up the root ball. Carefully dig around the roots, starting several inches from the plant's base with a shovel or spade. As you dig, slightly lift the plant to check for remaining attached roots. If the plant feels loose, you can use a garden fork to gently lift it from the ground. Afterward, trim any damaged roots with pruners and place the plant in a bucket or wheelbarrow for transfer to a new location.From Pot: Water the chaparral currant sufficiently before removal. Gently turn the pot on its side. Tap the pot's sides to loosen the soil and roots. Hold the base of the chaparral currant and carefully pull the plant out, sliding the root ball from the pot. If the plant is stuck, you might need to run a knife or thin object along the pot's inner edge to loosen the soil.From Seedling Tray: If the chaparral currant is a seedling, water well before moving, then lift gently by its leaves. Never pull on the stem. Loosen the soil with a dibber or pencil, and lift seedlings out, holding onto their leaves rather than the stem.
Step-by-Step Guide for Relocating Chaparral Currant
Hole Preparation
Excavate a hole in the chosen spot that is two to three times the width of the chaparral currant's root ball and equally deep. The wide hole provides ample room for roots to spread and establish.
Plant Placement
Carefully position the chaparral currant in the center of the hole. Ensure the plant is situated so the top of the root ball is level with the ground. This allows for proper air circulation around the roots.
Backfilling
Carefully refill the hole with the original soil. Gently firm the soil around the base of the chaparral currant to provide stability, but avoid compacting it tightly.
Watering
Thoroughly water the chaparral currant after planting. This will settle the soil and eliminate any air pockets around the roots.
Post-Relocation Care for Chaparral Currant.
Watering
Water the chaparral currant deeply and slowly. Maintain a consistent watering schedule until the plant shows signs of new growth, indicating successful establishment.
Pruning
You may need to trim any damaged branches or dead growth resulting from transplant shock. Monitor your chaparral currant and only cut back parts of the plant that have actually died off.
Mulching
Applying mulch around the base of the chaparral currant will help retain moisture and regulate soil temperatures. It also aids in suppressing weed growth that could compete with the chaparral currant for resources.
Resolving Common Issues with Chaparral Currant Relocation.
When is the best time to relocate chaparral currant?
The optimal period to relocate chaparral currant is during its dormant phase, typically occurring from the 10th to 12th week of the year.
What soil type is suitable for relocating chaparral currant?
Chaparral currant prefers well-drained, sandy, and loamy soil. Avoid relocating it into heavy clay or excessively soggy soils, as this can lead to root rot.
How deep should I plant chaparral currant during relocation?
The hole for chaparral currant should be twice as wide as the root ball, and the same depth. Ensure the top of the root ball is level with the ground once positioned.
What spacing should I maintain between chaparral currant plants during relocation?
Maintain a distance of 3 to 6 feet (90 - 180 cm) between each chaparral currant plant during relocation. This allows for adequate growth without overcrowding.
What should I do if the leaves of my relocated chaparral currant begin to wilt?
If chaparral currant's leaves wilt after relocation, chaparral currant could be experiencing transplant shock. Consistent watering and avoiding direct sunlight can aid its recovery.
How should I water my newly relocated chaparral currant?
Chaparral currant prefers moderate watering. Do not overwater, as it can cause root rot. Ensure the soil drains well after each watering.
Is fertilization necessary after relocating chaparral currant?
After relocating chaparral currant, you can use slow-release fertilizer to encourage healthy growth. However, it's not essential if the soil is already nutrient-rich.
How should I manage pests after relocating chaparral currant?
If you observe pests on your relocated chaparral currant, use organic insecticides or introduce beneficial insects. Regularly inspect and remove any damaged leaves.
Can I relocate chaparral currant into a pot instead of the ground?
Yes, chaparral currant can be relocated into a pot with sufficient depth for root growth. Ensure proper drainage and place it in a location with filtered sunlight.
How do I protect my relocated chaparral currant from harsh weather conditions?
Chaparral currant can withstand various weather, but for extremely cold temperatures, consider covering it with a frost blanket. During heatwaves, ensure it receives ample water.



