How to Prune Chaparral currant?
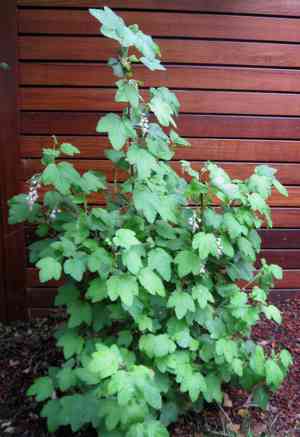
This indigenous shrub, celebrated for its winter blossoms and ability to withstand dry conditions, flourishes with judicious trimming. To ensure peak vitality and structure, perform pruning right after its blooming period in late spring or early summer. Eliminate any lifeless or ailing wood, reduce congested branches to improve air circulation, and gently sculpt to stimulate fresh development. Pruning while the plant is dormant reduces sap leakage and fosters abundant flowers. Regular, thoughtful pruning boosts the chaparral currant's hardiness and aesthetic value.
Advantages of Trimming Chaparral Currant
Advantages of Trimming Chaparral Currant
Trimming chaparral currant promotes abundant flowering and enhances its resistance to pests and illnesses. Consistent shaping keeps a compact structure, stimulating robust development and contributing to the plant's overall vitality.
Optimal Period for Pruning Chaparral Currant
Optimal Period for Pruning Chaparral Currant
The designated periods of late spring to early summer are ideal for pruning chaparral currant as this timeframe follows the plant's primary flowering cycle. Pruning at this point allows the gardener to sculpt the plant and remove any spent blossoms without hindering the emergence of new flowers. This timing also provides chaparral currant an opportunity to recover and produce fresh foliage, vital for photosynthesis and general well-being, before the dormant phase in colder months. Furthermore, since chaparral currant has just completed a growth surge, the plant's energy reserves are directed towards healing and regeneration. Trimming during this interval minimizes the risk of disease and pest infestation, which are more probable if pruning occurs during wetter or cooler seasons. By pruning in late spring to early summer, gardeners ensure the best possible conditions for chaparral currant to flourish and maximize subsequent blooming and fruiting.
Necessary Tools for Pruning Chaparral Currant
Hand Pruners
Crucial for making clean cuts on smaller stems and branches, hand pruners, or secateurs, should be sharp and ideally of the bypass type to encourage healthy regrowth and prevent disease. They are suitable for stems up to approximately 1/2 inch in diameter.
Loppers
These resemble hand pruners but feature longer handles for increased leverage, enabling you to trim thicker branches, typically up to 1 and 1/2 inches in diameter. Given chaparral currant's mature size, loppers facilitate reaching into dense growth without harming the rest of the plant.
Pruning Saw
For mature chaparral currant that have developed even thicker branches, a pruning saw is essential. This tool will allow for clean cuts on branches exceeding 1 and 1/2 inches in diameter.
Gloves
Protective gloves are necessary to guard against thorns and scratches that may occur while pruning chaparral currant.
How to Prune Chaparral Currant
Sanitizing tools
Before beginning, clean and sterilize all pruning implements to prevent the spread of illness to chaparral currant.
Removing diseased sections
Carefully eliminate any diseased leaves or branches from chaparral currant, ensuring to make precise cuts just above a healthy leaf node or lateral bud to promote proper healing.
Clearing dead material
Trim away dead branches and withered leaves by cutting them at their point of origin to maintain the natural form of chaparral currant and enhance air circulation within the plant.
Thinning flowers
Remove spent flowers from chaparral currant by snipping them off at their base to redirect energy to the healthy parts of the plant and potentially encourage further blooming.
Managing growth
Cut back overgrown branches on chaparral currant, focusing on maintaining the desired shape and size of the plant. Make cuts at a 45-degree angle just above a leaf node to stimulate new growth.
Common Pruning Errors with Chaparral Currant
Excessive pruning
Removing too much growth at once can stress chaparral currant and hinder its natural shape and flowering potential. It is crucial not to cut back more than a third of the growth in a single pruning session.
Incorrect cut placements
Making cuts too far from a bud or on the wrong side can lead to undesirable new growth. Cuts should be made just above outward-facing buds to direct new growth outward and prevent overcrowding the center.
Using dull implements
Dull pruning tools can damage chaparral currant's branches, creating jagged cuts that make chaparral currant more vulnerable to disease. Sharp, clean tools ensure precise cuts and faster healing.
Ignoring diseased material
Failing to remove all diseased, dead, or damaged wood can lead to further spread of disease and weaken chaparral currant. It's vital to cut back to healthy tissue.
Inadequate disinfection
Not disinfecting tools between cuts, especially when dealing with infected plants, may spread pathogens. Disinfect tools between cuts if disease is present.
General Pruning Advice for Chaparral Currant
Selective trimming
Chaparral currant benefits from selective trimming to maintain its natural form. Thin out crowded areas by removing specific branches at their base to improve air circulation and light penetration.
Shaping
Prune for shape during the early years of chaparral currant's growth to establish a strong framework. Remove crossing or inward-growing branches to maintain an open, vase-like shape.
Rejuvenation pruning
For an older chaparral currant, perform rejuvenation pruning by removing older stems at ground level to stimulate vigorous new growth. This should be done over several years, not all at once.
Promote blooming
To encourage abundant flowering, prune chaparral currant after it finishes blooming by shortening the stems that have flowered. This will promote new growth where flowers will develop.
Maintain health
Regularly inspect chaparral currant for signs of disease or pest infestation. Prune away affected areas promptly to maintain the overall health of the plant.



