How to Transplant Mexican plum?
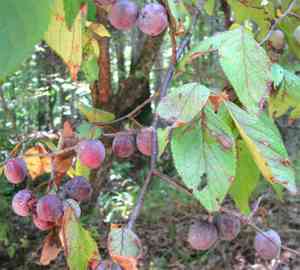
The optimal period for relocating mexican plum is during the pleasant temperatures of late spring through early summer, which facilitates robust root development. Select a site that receives full sun to partial shade and possesses soil with good drainage. When transplanting mexican plum, it is crucial to preserve a substantial root mass.
What Preparations are Needed Before Transplanting Mexican Plum?
What is the Ideal Time for Transplanting Mexican Plum?
The optimal period for relocating mexican plum is during the transition from late spring to early summer. This timing allows mexican plum to benefit from the warm growing season, ensuring strong root establishment before the cooler autumn. Gently encouraging mexican plum to adapt to its new environment during this revitalizing season enhances its growth potential and survival rate. With longer days ahead, mexican plum has the entire summer to flourish, supported by ideal temperatures and soil conditions, promoting vigorous growth and robust health.
How Much Space Should You Leave Between Mexican Plum Plants?
When transplanting mexican plum, remember to space your plants. Maintain approximately 5-6 feet (1.5-1.8 meters) between each transplant. This will provide them with ample room to grow and spread, ensuring healthy development.
What is the Best Soil Mix for Mexican Plum Transplanting?
Mexican plum truly thrives in well-draining, loamy soil. Before planting, incorporate compost or other organic matter into the existing soil. A beneficial addition would be a good base fertilizer, such as a slow-release granular option.
Where Should You Relocate Your Mexican Plum?
Now, let's discuss placement. Mexican plum prefers a location that receives full sun exposure, meaning at least 6 hours of sunlight daily. Therefore, seek out a sunny spot in your garden to help your mexican plum flourish beautifully!
What Equipments Should You Prepare Before Transplantation Mexican Plum?
Shovel or Spade
Necessary for digging an appropriate hole in the ground and for removing the plant from its original spot.
Gardening Gloves
To safeguard your hands while working with the soil and mexican plum.
Gardening Trowel
A useful tool for loosening the soil around the roots during extraction.
Watering Can
Required for thoroughly moistening the newly transplanted plant's root ball.
Burlap or Plastic
Needed for wrapping the root balls during transport, preventing root dehydration.
Garden Cart or Wheelbarrow
Helpful for moving the mexican plum if it is large or heavy.
A piece of string
To assist in ensuring the planting hole is straight and level.
How Do You Remove Mexican Plum from the Soil?
How Do You Remove Mexican Plum from the Soil?
From Ground: First, water the mexican plum plant to moisten the soil. Then use your shovel or spade to dig a wide trench around the plant, taking great care to ensure the root ball remains undamaged. Gradually work the spade beneath the root ball and gently lift the plant from its original location. Be careful not to harm the roots. Wrap the root ball in burlap or plastic to keep it moist during transportation.From Pot: Begin by watering the mexican plum thoroughly. Turn the pot sideways, hold gently but firmly around the plant's base, and ease it out of the pot. Avoid pulling it out by the stem.From Seedling Tray: Water the mexican plum seedlings, then use a narrow trowel to loosen the soil around each seedling. Gently hold the leaves, not the stem, and lift out. Handle with care to prevent damage to the delicate roots and stem.
Step-by-Step Guide for Transplanting Mexican Plum
Preparation
Mark the north-facing side of the mexican plum with a piece of string. Then dig a hole in the desired location, approximately twice as wide and the same depth as the root ball of your mexican plum.
Placement
Position the mexican plum in the center of the hole, ensuring it is neither too high nor too low. The string-marked side should face north to aid the plant in adjusting to its new orientation.
Backfill
Refill the hole with the original soil, gently firming it around the roots.
Watering
Water the mexican plum thoroughly with a watering can, saturating the root ball.
Monitoring
Keep a close watch on the plant for the initial few weeks after transplanting. Water as needed, ensuring it doesn't dry out between waterings.
How Do You Care For Mexican Plum After Transplanting?
Mulching
By adding a layer of mulch around the base of the mexican plum, you can help retain moisture, regulate soil temperature, and suppress weed growth. This should be done after transplanting during the early establishment stages.
Pruning
Prune only the damaged or dead branches after transplanting; avoid heavy pruning immediately after planting to prevent stressing the mexican plum. Wait at least until the next season.
Protecting
Use plant stakes or a windbreak to reduce transpiration and provide support to the mexican plum if it is young or newly planted.
Monitoring
Keep a keen eye on the mexican plum for pest infestations and diseases, both of which are more probable on stressed plants like freshly transplanted ones.
Re-watering
Aside from regular watering during the initial days, re-water only when the soil feels dry to the touch.
Troubleshooting Common Issues with Mexican Plum Transplantation.
When's the best time to transplant mexican plum?
The ideal period to relocate mexican plum is in late summer to early fall (S3-S4). This will allow the plant sufficient time to establish its roots before the onset of cold weather.
What's the appropriate distance between two mexican plum plants during transplantation?
When planting multiple mexican plums, maintain a distance of approximately 5-6 feet (1.5-1.8 meters) between each. This spacing will accommodate growth and ensure their healthy development.
How deep should I plant mexican plum seedlings?
The planting hole should be twice as wide and the same depth as the root ball. Ensure the root flare (where the roots meet the stem) is level with the ground.
Does mexican plum require heavy watering post-transplant?
Yes, immediately after transplanting, give mexican plum a thorough soaking. Continue to water deeply for the first few weeks until it's well established, then maintain normal watering practices.
Why are the leaves on my transplanted mexican plum turning yellow?
Yellowing leaves could indicate overwatering, poor drainage, or a nutrient deficiency. Consider adjusting your watering schedule, improving soil conditions, or using a balanced fertilizer.
My newly transplanted mexican plum appears droopy, what's wrong?
Mexican plum's droopiness post-transplant can result from transplant shock. Ensure it is well-watered and situated in appropriate light conditions. Avoid excessive root disturbance during transplanting.
How can I assure my transplanted mexican plum won't face transplant shock?
Minimize root disturbance during transplanting, water generously, and protect from strong winds and intense sunlight for a few days. This helps alleviate transplant shock.
Should I prune mexican plum after transplanting?
Pruning immediately after transplanting is not recommended. Wait until the next dormant period. Pruning too soon may hinder establishment by reducing photosynthetic potential.
Should I fertilize mexican plum right after transplanting?
Not immediately. Allow mexican plum to establish in its new location before fertilizing. Feed it a balanced fertilizer once new growth is observed, typically in the next growing season.
Can mexican plum be transplanted into any type of soil?
Mexican plum thrives best in fertile, well-draining soil. Very heavy clay, waterlogged, or excessively sandy soils are not ideal and may require amendment before the mexican plum is transplanted.



