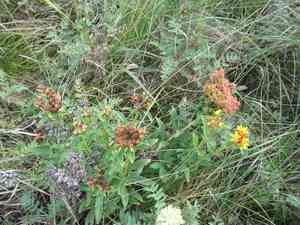
How to Transplant Aizoon stonecrop?
Relocating aizoon stonecrop is most effective from late spring through early summer, a period when the plant exhibits vigorous development. Select a bright spot featuring soil that drains efficiently for optimal outcomes. Be sure to manage the fragile root system with care throughout the procedure to guarantee a successful transfer.
Necessary Preparations Before Relocating Aizoon Stonecrop?
Optimal Period for Aizoon Stonecrop Relocation?
The prime window for moving your aizoon stonecrop spans from late spring to early summer. This timeframe offers an ideal mix of mild temperatures and increasing daylight, allowing the aizoon stonecrop to establish itself before the peak heat. Transplanting your aizoon stonecrop during this period also provides ample time for recovery and robust growth prior to winter, preventing stunted development or even plant loss. Your aizoon stonecrop will certainly benefit from this early start!
Recommended Spacing Between Aizoon Stonecrop Plants?
When transplanting aizoon stonecrop, position them approximately 12-18 inches (30-45 cm) apart. This spacing provides sufficient room for growth and spreading, preventing overcrowding which can impede development.
Ideal Soil Blend for Aizoon Stonecrop Transplantation?
For aizoon stonecrop, prepare a well-draining soil mixture with a slightly acidic to neutral pH (6.0-7.0). A suitable option is a blend of loamy or sandy soil, enriched with compost or aged manure. Incorporate a balanced, slow-release fertilizer at the time of transplanting.
Preferred Location for Your Aizoon Stonecrop?
Select a site that receives full sun to light shade for transplanting aizoon stonecrop. At least 6 hours of direct sunlight daily is optimal for vigorous growth and abundant blooms. Partial shade is tolerable, but may result in fewer flowers.
Equipment Required Before Transplanting Aizoon Stonecrop?
Gardening Gloves
To safeguard your hands while handling soil and plants.
Trowel or Shovel
For excavating holes and extracting the plant from its original spot.
Hand Pruner
For trimming any damaged or dead plant parts before relocation.
Watering Can or Hose
To hydrate the plant before and after the transplanting process.
Measuring Tape or Ruler
For accurately determining distances between plants during transplantation.
Stakes and Twine
To offer support to the plants if necessary.
Organic Compost or Fertilizer
To enrich the planting hole during transplantation.
How to Extract Aizoon Stonecrop from the Soil?
How to Extract Aizoon Stonecrop from the Soil?
From Ground: First, water the aizoon stonecrop to moisten the soil. Then, dig a wide trench around the plant using a shovel or spade, ensuring the root ball remains intact. Carefully work the spade beneath the root ball to lift the plant from its original position.From Pot: Water the plant and allow it to sit for a few minutes to slightly dampen the roots. Gently invert the pot while supporting the plant's base, and lightly tap the pot's edges to release the root ball. Remove the plant without harming its roots.From Seedling Tray: Water the seedlings and carefully separate them using your fingers or a fork. Hold the seedlings by their leaves, not their stems, and gently lift them from the tray.
Step-by-Step Guide for Transplanting Aizoon Stonecrop
Site Preparation
Remove any weeds or debris from the transplant location, ensuring the area is clean and ready for your aizoon stonecrop.
Dig Holes
Use the trowel or shovel to create holes at each transplant site, making them slightly wider and deeper than the plant's root ball.
Enrich Soil
Incorporate organic compost or a slow-release fertilizer into the excavated soil to create a nutrient-rich mixture for planting.
Plant Placement
Position the aizoon stonecrop into the hole, with the top of the root ball level with the surrounding soil. Ensure the plant is upright and adjust as needed.
Backfill Soil
Gently refill the hole with the enriched soil mixture, firming the soil around the plant without compacting it excessively.
Watering
Thoroughly water the plant, ensuring the soil is uniformly moist but not waterlogged.
Mulch
Apply a layer of organic mulch around the plant, leaving a small gap around the stem to prevent rot.
Provide Support
If required, use stakes and twine to offer support and help the plant maintain its structure.
Post-Transplantation Care for Aizoon Stonecrop?
Watering
Keep the soil around the aizoon stonecrop consistently moist, but not saturated, for the initial weeks after transplanting to aid in root establishment.
Pruning
Regularly remove dead or dying leaves and branches to encourage healthy growth and prevent disease spread.
Pest Control
Inspect your aizoon stonecrop regularly for pests, and treat with an appropriate organic solution if necessary.
Fertilization
Once established, apply a balanced, slow-release fertilizer according to package directions to support the plant's continued growth.
Addressing Common Issues with Aizoon Stonecrop Transplantation.
When is the optimal time to transplant aizoon stonecrop?
The best time to transplant aizoon stonecrop is from late spring to early summer. The mild temperatures during this period encourage optimal growth.
What distance should be maintained between aizoon stonecrop plants during transplantation?
A distance of approximately 12-18 inches (30-45 cm) should be kept between each aizoon stonecrop plant. This provides ample room for them to spread and grow.
What if the aizoon stonecrop wilts after transplanting?
Do not be concerned if your aizoon stonecrop initially wilts; it is adapting to its new environment. Keep it well-watered, and it should recover within a week.
How should I prepare the soil for transplanting aizoon stonecrop?
The soil should drain well. Before transplanting, incorporate some compost or organic matter to enhance its fertility.
What should I do if my transplanted aizoon stonecrop is not growing?
Check its sunlight exposure and watering routine. Aizoon stonecrop prefers full sun to light shade and moderate watering. Any significant change could stress the plant.
How deep should I plant the aizoon stonecrop?
The root ball of aizoon stonecrop should be level with the soil surface. Dig a hole that is the same depth but twice as wide as the current pot.
Why are the leaves of my transplanted aizoon stonecrop turning yellow?
Yellowing leaves might indicate overwatering. Aizoon stonecrop prefers drier conditions, so adjust watering to only when the top layer of soil feels dry.
How should I water a newly transplanted aizoon stonecrop?
Water generously after transplanting. Once established, reduce watering and allow the top layer of the soil to dry out before watering again.
Can I transplant aizoon stonecrop in an area with partial shade?
Aizoon stonecrop is adaptable and can tolerate light shade. However, for optimal growth, it thrives in a sunny location.
Can aizoon stonecrop be transplanted into a pot?
Absolutely! Just ensure the pot is large enough to accommodate future growth and has sufficient drainage holes.


