How to Transplant Woodbine?
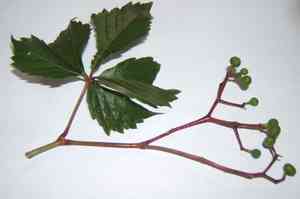
The ideal period for relocating woodbine is during the onset of spring, when mild temperatures and renewed development are present. Select a site that receives filtered sunlight, avoiding intense, direct exposure. Verify that the soil exhibits excellent drainage to properly accommodate its developing root system.
What Preparations are Needed Before Transplanting Woodbine?
What is the Ideal Time for Transplanting Woodbine?
Moving woodbine in early spring is perfect, providing a gentle environment for root establishment. The mild temperatures and increasing daylight hours create an optimal setting for woodbine to thrive before summer's heat. This period allows woodbine to adjust and strengthen, ensuring a vigorous growth season ahead. Seize this opportunity to give your woodbine a head start, fostering its development before the peak of garden activity!
How Much Space Should You Leave Between Woodbine Plants?
Prepare to give your woodbine ample room to expand! Ideally, position each transplant approximately 5-10 feet (1.5-3 meters) apart. This spacing will allow them to flourish without competing for essential resources.
What is the Best Soil Mix for Woodbine Transplanting?
Prepare your garden bed with loamy soil for your woodbine, as it prefers well-drained conditions. Enhance the soil with a balanced, slow-release granular fertilizer to ensure a nutrient-rich foundation for your woodbine transplants.
Where Should You Relocate Your Woodbine?
Select a site that offers full sun to partial shade for your woodbine. This plant is quite adaptable and can tolerate varying light levels. However, abundant light will promote the best foliage and support healthier growth.
What Equipments Should You Prepare Before Transplantation Woodbine?
Gardening Gloves
To safeguard your hands from scrapes and dirt when handling the woodbine plant and working with the soil.
Spade or Shovel
For excavating the woodbine from its original spot and preparing the new planting hole.
Gardening Trowel
To precisely adjust the planting hole's dimensions and comfortably position your woodbine.
Watering Can
Needed to hydrate the plant both before digging it up and after replanting.
Garden Pruner
For trimming any unhealthy roots prior to transplanting.
Wheelbarrow
Excellent for transporting your woodbine and any soil amendments.
Support Stakes
If your woodbine is mature and requires stabilization during and after relocation.
How Do You Remove Woodbine from the Soil?
How Do You Remove Woodbine from the Soil?
From Ground: First, water the woodbine plant to moisten the soil. Then, dig a wide trench around the plant using your spade or shovel, ensuring you are well beyond the plant's widest branches. This will help preserve as much of the root system as possible. Carefully work the spade beneath the root ball to lift the plant from its initial location.From Pot: Water the woodbine plant thoroughly until water exits the drainage hole; this simplifies the process. Invert the pot and support the plant's base, avoiding pulling on the stem or foliage. Gently tap the pot's edge, and the woodbine should slide out. Do not force it, as this could damage the roots.From Seedling Tray: It's best to transplant when the woodbine seedlings have developed two sets of true leaves. Use your fingertips or a small trowel to loosen the soil around the seedling, then carefully lift it out, ensuring you include the roots and some surrounding soil.
Step-by-Step Guide for Transplanting Woodbine
Digging
Use your spade or shovel to excavate a hole in the prepared site. It should be twice as wide and slightly deeper than the woodbine's root ball. Keep the excavated soil nearby in your wheelbarrow.
Preparing the Plant
Gently remove any dead or broken roots using your garden pruner.
Planting
Place your woodbine in the hole you dug. The top of the root ball should be level with or slightly above the surrounding soil surface to allow for settling and prevent water accumulation. Backfill the hole with the soil you removed.
Watering
Water your woodbine thoroughly immediately after planting, using your watering can. Direct the water to the base of the plant, and avoid wetting the foliage.
Staking (if required)
If your woodbine is a mature specimen or appears unstable, provide support using a stake.
How Do You Care For Woodbine After Transplanting?
Watering
After transplanting, ensure the soil around your woodbine remains consistently moist but not waterlogged. Typically, deep watering once a week should suffice, but adjust based on weather conditions.
Pruning
Lightly trim the plant to reduce its size and thus the demand on the roots, encouraging recovery and growth.
Monitoring
Watch for signs of transplant shock, such as yellowing or wilting. This is a common stress response, but with proper care, your woodbine should recover and flourish.
Temporary Shade (if required)
If your transplanted woodbine receives excessive sunlight and appears to be struggling, consider providing temporary shade for one to two weeks until it is more established.
Troubleshooting Common Issues with Woodbine Transplantation.
What's the perfect time of the year to transplant woodbine?
The ideal period for transplanting woodbine is between late spring and early summer, or 'S1-S2'. This allows the plant to establish itself before the colder months.
What are the ideal spacing guidelines for woodbine?
To allow woodbine ample room to spread and grow healthily, plant it 5-10 feet (1.5-3 meters) apart. This is the optimal practice for maximum growth and vitality.
Do I need to prune woodbine before transplantation?
Yes, reducing woodbine's size by a third can alleviate shock. Ensure to make clean, precise cuts to prevent disease entry.
How do I prepare the new location for woodbine transplantation?
Prepare a hole twice as wide and the same depth as woodbine's root ball. Consider soil quality, drainage, and sun exposure before selecting the site.
How to water woodbine after transplanting?
Water woodbine thoroughly after transplanting, ensuring the soil is moist but not saturated. Regular watering for a few weeks aids in its establishment.
What should I do if the leaves of woodbine are looking wilted after transplanting?
Slight wilting is common due to transplant shock. Ensure consistent watering and await recovery. If wilting persists, examine the soil and light conditions.
How deep should I plant woodbine during transplantation?
When transplanting woodbine, it should be at the same depth as in its previous location. Planting too deep can lead to rot, while not deep enough can dry out the roots.
Can I transplant woodbine in direct full sun?
Woodbine can adapt to various light conditions, including full sun. However, a spot with partial shade to full sun is most favorable.
Do I need to use fertilizer immediately after transplanting woodbine?
Avoid fertilizing immediately after transplanting as it can stress woodbine. Allow the plant to settle for a few weeks, then consider a slow-release, low-nitrogen fertilizer.
Is it normal for woodbine to not grow fast immediately after transplantation?
Absolutely, it's typical for woodbine to prioritize root development first after transplantation. If it's properly watered and in suitable conditions, above-ground growth will follow.



