How to Transplant Yellow puff?
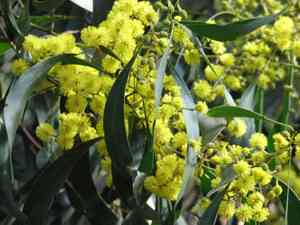
For yellow puff, the ideal period for relocation spans from the revitalizing days of mid-spring through the onset of early summer. Select a bright spot that offers effective water runoff. A crucial tip: ensure consistent soil hydration when settling yellow puff into its new environment.
What Preparations are Needed Before Transplanting Yellow Puff?
What is the Ideal Time for Transplanting Yellow Puff?
Relocate yellow puff once spring rains subside, giving way to consistent warmth. This period promotes strong root development, lessening climate stress. Adopt this timing for a flourishing, vibrant yellow puff.
How Much Space Should You Leave Between Yellow Puff Plants?
When preparing to rehouse yellow puff, ensure they are spaced approximately 24-36 inches (60-90 cm) apart. This provides ample room for each plant to expand and thrive without competing for resources.
What is the Best Soil Mix for Yellow Puff Transplanting?
For your yellow puff, combine well-draining soil with a slow-release balanced fertilizer to ensure a robust beginning. Envision a comfortable foundation for roots; they will appreciate a loamy, organic-rich mixture!
Where Should You Relocate Your Yellow Puff?
Select a sunny location where your yellow puff can enjoy full sun for the majority of the day. They love sunlightâconsider it their daily source of joy. Ensure at least 6 hours of direct sun to keep them radiant!
What Equipments Should You Prepare Before Transplantation Yellow Puff?
Gardening Gloves
To safeguard your hands while handling soil and the plant.
Trowel or Shovel
For excavating the yellow puff plant from its current spot and creating a new planting hole.
Watering Can or Hose
To hydrate the yellow puff plant both before and after its relocation.
Pruning Shears
To trim any damaged roots or foliage during the transplanting process.
Wheelbarrow
To move the yellow puff plant and soil if required.
Measuring Tape
To guarantee appropriate spacing between transplanted yellow puff plants.
How Do You Remove Yellow Puff from the Soil?
How Do You Remove Yellow Puff from the Soil?
From Ground: First, moisten the soil around the yellow puff plant. Then, dig a wide trench around the plant using a shovel or spade, ensuring the root ball stays intact. Carefully work the spade beneath the root ball to lift the yellow puff plant from its original position.From Pot: Start by watering the yellow puff plant to facilitate the move. Place your hand at the plant's base, turn the pot on its side or upside down, and gently tap to loosen the plant while easing it out.From Seedling Tray: Water the seedlings initially, then use a trowel or a specialized dibbler tool to carefully lift each yellow puff plant from its cell, taking care not to harm the delicate roots.
Step-by-Step Guide for Transplanting Yellow Puff
Prepare New Site
Ensure the new planting area is free of weeds and debris. Loosen the soil to a depth of at least 6-8 inches to provide a welcoming environment for the yellow puff roots.
Dig Hole
Use a trowel or shovel to dig a hole that is twice as wide as the root ball but of the same depth, to avoid burying the plant too deeply.
Plant Placement
Place the yellow puff plant in the center of the new hole. The top of the root ball should be level with the soil surface.
Fill Hole
Backfill the hole gently with the excavated soil. Tamp the soil lightly around the yellow puff plant to remove air pockets but avoid compacting the soil too much.
Water Thoroughly
After planting, water the yellow puff thoroughly to settle the soil around the roots and to help alleviate transplant shock.
Mulching
Apply a layer of mulch around the base of the yellow puff without touching the stem to conserve moisture and regulate soil temperature.
How Do You Care For Yellow Puff After Transplanting?
Monitoring
Regularly inspect the yellow puff plant for indications of stress such as wilting or discolored leaves and take appropriate measures if needed.
Support
If the yellow puff plant is tall or top-heavy, provide stakes or cage supports to keep it upright while new roots are forming.
Pruning
Trim any damaged or dead foliage to direct the yellow puff's energy towards establishing new roots.
Protection
Shield the yellow puff from strong winds and intense sun for a few days post-transplant, if feasible, to lessen stress.
Consistent Care
Maintain a regular watering schedule, keeping the soil moist but not waterlogged, and adjust care as the yellow puff becomes more established.
Troubleshooting Common Issues with Yellow Puff Transplantation.
When is the best time to transplant yellow puff?
The optimal period for relocating yellow puff is from mid-spring to early summer, when temperatures are moderate.
How far apart should I space yellow puff when transplanting?
Ensure to provide yellow puff ample room to thrive by spacing them 24-36 inches (60-90 cm) apart.
What kind of sunlight does yellow puff need after transplanting?
After relocation, yellow puff flourishes in full sunlight to partial shade for healthy development.
Why is my yellow puff wilting after transplanting?
Wilting may occur if yellow puff has not received sufficient water or if it is experiencing transplant shock. Consistent moisture aids recovery.
How do I prepare the soil for transplanting yellow puff?
Prepare a welcoming bed for yellow puff with rich, well-drained soil and compost for nutrients.
Should I prune yellow puff before or after transplanting?
It is best to prune yellow puff after transplanting to shape and remove any damaged foliage, encouraging new growth.
Can yellow puff be transplanted in rainy weather?
Relocating yellow puff during a light rain can be beneficial, providing natural hydration, but avoid heavy downpours that might harm the plant.
How deep should I plant yellow puff during transplanting?
Plant yellow puff with its root ball at the same depth it was in its previous container or location to prevent stem rot.
What is the best way to water yellow puff after transplanting?
Provide yellow puff with a deep watering at the base to encourage root development without overwhelming the plant.
How do I protect yellow puff after transplanting from pests?
Monitor yellow puff for pests and consider organic solutions like neem oil to safeguard your newly relocated plant.



