How to Transplant Spring madia?
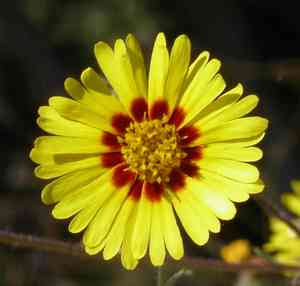
When the growing season commences in the early months, spring madia flourishes after being transplanted. Select bright locations featuring soil that drains effectively. If required, enrich the soil to enhance its prosperity. Consistently provide a supportive botanical environment for spring madia's optimal development.
What Preparations are Needed Before Transplanting Spring Madia?
What is the Ideal Time for Transplanting Spring Madia?
Initiate the relocation of spring madia at the start of its active growth period, providing it with a strong foundation. This timing allows roots to establish before the peak of summer. By moving spring madia as frost recedes and the ground becomes workable, you'll encourage vigorous development. The mild weather during this phase is less stressful for spring madia, fostering better root growth. Embracing the gentle warmth and moist soil of early growth months creates optimal transplant conditions. Furthermore, the season's occasional rainfall assists spring madia's root settling with minimal extra watering.
How Much Space Should You Leave Between Spring Madia Plants?
When preparing to transplant your spring madia, remember to provide ample room for each specimen! It's advisable to maintain a spacing of approximately 1-2 feet (30-60 cm) between individual plants. This not only ensures sufficient growth area but also helps prevent the potential spread of diseases.
What is the Best Soil Mix for Spring Madia Transplanting?
For successful spring madia growth, prepare a soil that drains well and is rich in organic material. Loosen the earth and incorporate a foundational fertilizer to supply essential nutrients. Be sure to complete this a week prior to transplanting, allowing nutrients to integrate into the soil.
Where Should You Relocate Your Spring Madia?
Spring madia thrives with ample sunlight, so selecting a garden spot where it can receive full sun exposure for 6-8 hours daily is crucial. Remember, adequate sunlight not only supports growth but also enhances blooming.
What Equipments Should You Prepare Before Transplantation Spring Madia?
Potting Trowel
This small hand tool is vital for excavating the hole when relocating spring madia.
Gardening Gloves
To safeguard your hands from harm while handling soil and plants.
Watering Can
Useful for hydrating the plant both before and after its relocation.
Gardening Scissors or Pruners
Perfect for trimming any damaged or dead parts of the plant prior to transplantation.
Wheelbarrow or Bucket
Essential for moving the plant from its current spot to the new planting area.
Compost
To enrich the soil with nutrients at the new planting location.
How Do You Remove Spring Madia from the Soil?
How Do You Remove Spring Madia from the Soil?
From Ground: Start by irrigating the spring madia plant to moisten the earth, which will facilitate its removal. Use a potting trowel to dig around the plant, taking care not to harm the roots. Gradually deepen your excavation, steadily working beneath the root ball. Once sufficient soil has been cleared, gently lift the plant.From Pot: Begin by watering the plant, as moist soil will adhere to the roots, helping to protect them during the transition. Turn the container on its side, then grasp the plant at its base near the soil line and gently pull. If the plant resists, tap the bottom of the pot to loosen it.From Seedling Tray: Ensure the spring madia plant has developed enough to withstand transplanting, typically when it possesses two sets of true leaves. Water the seedlings, then use a spoon or a small trowel to extract the seedling. Handle by the leaves to prevent damage to the stem and roots.
Step-by-Step Guide for Transplanting Spring Madia
Preparation
After gathering all necessary tools and supplies, prepare the transplant location. Dig a hole approximately twice the width of your spring madia plant's root ball and of similar depth.
Place and Fill
Position the spring madia plant in the center of the hole, then backfill with soil to the same level it was in its original container. Gently firm the soil around the root ball to eliminate any air pockets.
Compost
Apply a thin layer of compost around the plant, ensuring it doesn't touch the stem. This provides essential nutrients for the plant's development.
Watering
Immediately after transplanting, thoroughly water the spring madia plant to settle the soil around its roots. This helps reduce shock and allows the spring madia plant to acclimate to its new environment more quickly.
How Do You Care For Spring Madia After Transplanting?
Watering
Do not allow the soil to become completely dry. Keep the soil consistently moist but avoid waterlogging. The newly transplanted spring madia plant will require a steady water supply until it establishes itself.
Pruning
Remove any dead or dying foliage. This redirects the spring madia plant's energy towards new growth.
Observation
Monitor your spring madia plant closely. It's common for some plants to wilt immediately after being transplanted, but they should recover with proper care. If your plant continues to appear unhealthy, consult a local nursery or extension service.
Troubleshooting Common Issues with Spring Madia Transplantation.
What's the best time to transplant spring madia?
The optimal period to transplant spring madia is during Season 1. This allows the plant sufficient time for ideal growth.
How far apart should I space spring madia when transplanting?
Maintain approximately 1-2 feet (30-60 cm) of distance between each spring madia. This provides them adequate room to grow without overcrowding.
What should I do if the leaves of spring madia start wilting after transplanting?
Wilting might indicate transplant shock. Minimize this by thoroughly watering the plant post-transplant and maintaining consistent moisture levels.
How deeply should spring madia be transplanted?
The hole should be deep enough to cover the roots of spring madia. Planting too deep or too shallow could hinder the plant's growth.
The spring madia is not growing as expected after transplanting. Any solutions?
Ensure spring madia receives full sunlight and check the soil pH. Additional watering and a mild liquid fertilizer application can provide a boost.
After transplanting, why is the growth of spring madia stunted?
Transplanting can stress spring madia, leading to inhibited growth. Providing good care such as regular watering, sunlight, and proper spacing can help overcome this.
What could be the cause if spring madia lacks vigor after transplanting?
This could be due to insufficient nutrients, water, or sunlight. Provide your spring madia with a balanced plant food and ensure it receives enough sunlight.
What type of soil should I use when transplanting spring madia?
Spring madia thrives in well-draining soil. Incorporating compost or organic matter can enhance soil structure and supply nutrients.
How much sunlight does spring madia need after transplanting?
Spring madia requires full sunlight. Ensure it gets around 6-8 hours of direct sunlight daily for robust growth and development.
What steps can I take when the roots of spring madia start rotting after the transplant?
Root rot results from overwatering or poor drainage. Adjust your watering practices and ensure the soil drains effectively to prevent such problems.



