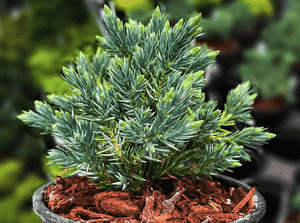
How to Transplant Flaky juniper?
For Juniperus squamata, the ideal period for relocation is the transition from late spring to early summer, providing warmer ground for root development while avoiding intense midsummer temperatures. Select a bright location with soil that drains effectively and handle the root system carefully to minimize post-transplant stress.
Essential Preparations Before Relocating Flaky Juniper
When is the Best Time to Move Flaky Juniper?
The perfect period to move flaky juniper is during the gentle warmth of late spring to early summer. This ensures mild temperatures and stable weather, fostering root establishment and allowing flaky juniper to adapt before intense summer heat. Transplanting then leverages the season's natural growth cycle, promoting robust development and minimizing shock. It's a strategic choice for flaky juniper's successful growth, supported by the season's nurturing conditions.
What is the Recommended Spacing Between Flaky Juniper Plants?
For flaky juniper, ensure ample room for growth. Aim for a separation of approximately 6-10 feet (1.8-3 meters) from other plants. This provides sufficient space for it to expand and develop vigorously and healthily!
Which Soil Mixture is Ideal for Flaky Juniper Transplanting?
Flaky juniper thrives in well-draining soil, ideally sandy loam, to prevent root saturation. Prior to transplanting, enrich the soil with a foundational application of slow-release granular fertilizer. This supplies vital nutrients and gives your plant an excellent start!
Where Should You Replant Your Flaky Juniper?
Regarding placement, flaky juniper enjoys abundant sunlight but also benefits from some shade during the day's hottest hours. Select a spot that receives morning sun and afternoon shade, providing optimal conditions for your plant's development.
Equipment Needed Before Transplanting Flaky Juniper
Shovel
To excavate the flaky juniper from its original spot and prepare the new planting site.
Gardening Gloves
To safeguard your hands while handling soil and the plant.
Watering Can or Hose
For hydrating flaky juniper before removal, after planting, and for ongoing maintenance.
Mulch
It aids in retaining soil moisture.
Pruning Shears
For any necessary trimming of flaky juniper's branches or roots during the relocation process.
How to Extract Flaky Juniper from the Ground?
How to Extract Flaky Juniper from the Ground?
From Ground: First, hydrate the flaky juniper plant to moisten the soil. Then, using a shovel, dig a wide circle around the plant. Ensure the circle is broad and deep enough to encompass most of the roots. Carefully insert the shovel beneath the root ball and lift the plant from the ground.From Pot: If flaky juniper is in a container, water it and gently tilt the pot on its side. Tap the edges to loosen the soil and carefully slide the plant out, keeping the root ball intact.Seedling Tray: Initially, water the seedling tray. Then gently push the flaky juniper from below the tray or use a spoon or small tool to scoop it out with minimal root disturbance.
Step-by-Step Guide for Relocating Flaky Juniper
Preparation
Start by choosing a cool, overcast day to minimize transplant shock. Next, prepare the new planting hole – it should be twice the width of the root ball and of equal depth.
Placement
Carefully position the flaky juniper in the hole. The top of the root ball should be level with the surrounding soil surface.
Backfilling
Refill the hole with the excavated soil, gently pressing around the base of the flaky juniper to ensure stability.
Watering
Thoroughly water the flaky juniper plant to settle the soil around it.
Mulching
Apply mulch around the base of flaky juniper, leaving some space clear near the stem to prevent rot.
Post-Transplant Care for Flaky Juniper
Watering
Keep the soil around the flaky juniper consistently moist, but not waterlogged, for the initial weeks after transplanting to aid in strong root establishment.
Pruning
If the flaky juniper exhibits signs of stress, such as drooping or yellowing leaves, consider trimming back the foliage to lessen strain on the roots.
Monitoring
Closely observe the flaky juniper for several weeks to ensure it adapts to its new environment. If you notice wilting or discoloration, it may indicate issues with water levels, disease, or pests.
Addressing Common Issues with Flaky Juniper Transplantation.
What is the optimal period for transplanting flaky juniper?
The best time to transplant flaky juniper is during its mid-growth phase, typically between the third and fifth season.
What distance should I maintain between transplanted flaky juniper plants?
When planting flaky juniper, ensure a minimum of 6-10 feet (1.83-3.05 meters) of space between each plant. This allows them ample room to grow.
How should I prepare the ground for transplanting flaky juniper?
First, clear the area of any weeds or grass. Then, dig a hole twice the width and the same depth as flaky juniper's root ball.
Why are my transplanted flaky juniper showing yellow needles?
This could indicate water stress or shock. Keep the soil moist, but avoid over-watering. Flaky juniper prefers well-drained soil.
How deep should I plant flaky juniper after transplanting?
Flaky juniper should be planted at the same depth as they were in their previous location. This helps them acclimate better to their new environment.
What should I do if flaky juniper isn't growing after transplantation?
Ensure flaky juniper is adequately watered and receives sufficient sunlight. If growth remains stagnant, consult a horticulturist.
What type of soil does flaky juniper prefer for transplantation?
Flaky juniper thrives in well-drained, acidic to neutral soil. Ensure the soil is enriched with organic matter for optimal growth.
Can I transplant flaky juniper in the first season?
Flaky juniper is best transplanted during its mid-growth phase, between the third and fifth season. This gives the plant a better chance to thrive.
What's the best way to water flaky juniper after transplanting?
Water flaky juniper thoroughly after transplanting. Afterward, maintain moist but not waterlogged soil to prevent root rot.
How do I care for flaky juniper post-transplant?
Protect your newly transplanted flaky juniper from extreme weather, maintain moist soil, ensure it gets enough sunlight, and regularly check for signs of disease or pests.


