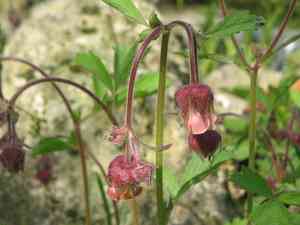
How to Transplant Water avens?
The ideal period for relocating water avens is in the initial phase of spring. This facilitates a seamless shift into its active growth cycle. It is essential to transplant it into a partially shaded spot featuring damp, adequately draining soil. Ensure consistent soil hydration following transplantation to foster robust development.
What Preparations are Needed Before Transplanting Water Avens?
What is the Ideal Time for Transplanting Water Avens?
The optimal period for relocating water avens occurs at the start of spring or from early to late summer. This timeframe also extends favorably to mid-to-late autumn. Spring transplantation allows water avens the entire growing season to establish and thrive. Summer to fall transplantation safeguards plants from intense summer heat and provides a head start for the subsequent spring. Therefore, scheduling your transplanting during these periods guarantees flourishing water avens for future seasons!
How Much Space Should You Leave Between Water Avens Plants?
To provide your water avens ample room for development, position your transplants approximately 12-18 inches (30-45 cm) apart. This spacing will ensure they have sufficient area to flourish and produce their beautiful flowers.
What is the Best Soil Mix for Water Avens Transplanting?
For a robust water avens plant, select a well-draining soil mixture and incorporate organic compost or a slow-release fertilizer as the base. This will supply essential nutrients and ensure the plant has the necessary foundation to grow strong.
Where Should You Relocate Your Water Avens?
For optimal growth, transplant your water avens to a location that receives partial shade or filtered sunlight throughout the day. This will help shield the plant from harsh, direct sun exposure, ensuring a healthy and thriving water avens.
What Equipments Should You Prepare Before Transplantation Water Avens?
Gardening Gloves
To safeguard your hands while handling soil and plants.
Shovel or Spade
Crucial for excavating the plant from its original spot and preparing the new planting hole.
Garden Hoe
To assist in breaking up soil clumps during the transplanting process.
Hand Pruners
Useful for trimming back the plant to minimize shock during relocation.
Watering Can or Hose
Necessary to keep the plant adequately hydrated before, during, and after transplantation.
Garden Trowel
Helpful for precise digging in smaller areas.
How Do You Remove Water Avens from the Soil?
How Do You Remove Water Avens from the Soil?
From Ground: First, thoroughly water the water avens plant to loosen the surrounding soil. Then, carefully dig around the plant with a spade or shovel (approximately a foot or more, depending on the plant's size), ensuring the root ball remains as intact as possible. Once the plant is separated from the surrounding soil, gently lift it from the ground.From Pot: Begin by watering the potted plant to loosen the soil and facilitate removal. Next, gently tap the pot's sides to loosen the plant and soil, carefully inverting the pot while supporting the soil's surface with your other hand. Gently ease the plant and root ball out of the pot. Avoid pulling on the plant, as this could damage the roots.From Seedling Tray: After thoroughly watering the tray, gently extract each seedling, taking care not to harm the delicate roots. It's best to lift each water avens plant by its leaves, not the stem or roots.
Step-by-Step Guide for Transplanting Water Avens
Preparation
Ensure the new planting site is ready before you start removing the water avens from its current spot. The hole should be roughly twice as wide and the same depth as the root ball.
Removal
Follow the appropriate extraction steps detailed above, based on your specific situation. Always handle the water avens plant with care to reduce stress and potential harm.
Pre-transplant Pruning
Gently trim excessive foliage with hand pruners. This will help the water avens plant direct energy towards establishing new roots.
Transplant
Place the water avens plant into the hole, ensuring it is level with the ground. Backfill the hole with the previously removed soil, gently firming around the plant's base.
Watering
After transplanting, thoroughly water the water avens, making sure the water reaches the new root zone.
How Do You Care For Water Avens After Transplanting?
Monitoring
Observe the water avens for any indications of stress such as wilting, yellowing, or dropped leaves.
Watering
For the initial few weeks, ensure the water avens plant receives ample water. Once established, you can decrease the frequency but ensure deep watering for the plant's health.
Pruning
Pruning is not necessary until your water avens plant begins active growth, as too many leaves might divert energy from root development. So, be patient and let your water avens focus on establishing its roots before it starts branching out.
Mulching
A thin layer of mulch around the water avens, but not touching the stem, can help retain moisture and suppress weeds.
Feeding
Wait until the water avens plant shows signs of new growth before applying a balanced, slow-release fertilizer.
Troubleshooting Common Issues with Water Avens Transplantation.
When is it best to transplant water avens?
Optimal periods for relocating water avens are the beginning of spring, from early to late summer, and from mid-to-late autumn.
What spacing should I maintain when transplanting water avens?
To promote healthy growth and prevent overcrowding, maintain a distance of approximately 12-18 inches (30-45 cm) between each water avens plant during transplantation.
Why is my transplanted water avens wilting?
Wilting can be caused by insufficient watering or transplant shock. Ensure the plant is watered regularly during the first few weeks after transplantation.
Why are the leaves of my transplanted water avens turning yellow?
Yellow leaves may indicate overwatering or a nutrient deficiency. Ensure water avens receives adequate moisture but is not waterlogged, and use a balanced fertilizer.
Why are the leaves of my transplanted water avens are not growing?
Inadequate sunlight or insufficient nutrients could lead to stunted growth. Ensure your water avens is in a location with plenty of light and that you are using nourishing soil.
How often should I water a newly transplanted water avens?
Water your water avens thoroughly immediately after transplanting, then ensure the soil remains consistently moist but not overly saturated.
How can I ensure successful transplantation of water avens?
Prepare the planting area well in advance, maintain appropriate spacing, water sufficiently soon after transplantation, and carefully monitor the plant's health.
What type of soil is best for transplanting water avens?
Water avens prefers well-drained, rich soil. If your soil is clay-like or sandy, improve its structure with organic matter before planting.
Can I transplant water avens in a pot?
Yes, water avens can be transplanted into pots. Ensure the pot has adequate drainage and is large enough to accommodate the plant's root system.
Why is the water avens not blooming after transplantation?
Lack of blooming can be due to transplant stress, insufficient sunlight, or a lack of nutrients. Make sure the plant is well-cared for in its new location.


