How to Transplant Garberia?
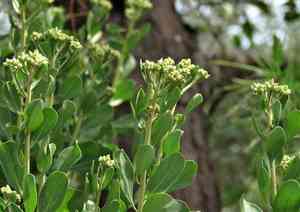
Relocate garberia during the warmest period, from late spring to early summer, to guarantee robust development. Select a location with good drainage and ample sunlight, replicating its natural habitat. A helpful tip: Maintain steady hydration after transplanting to facilitate root establishment!
What Preparations are Needed Before Transplanting Garberia?
What is the Ideal Time for Transplanting Garberia?
The perfect time for relocating garberia is from late spring to early summer. This period offers garberia moderate temperatures and stable conditions necessary for root establishment before the peak summer heat. Moving garberia during this season allows it to benefit from longer daylight hours and ample growth time, ensuring strong development. This favorable season provides garberia with a balanced environment of cooler nights and warm days, aiding its transition with gentle precision.
How Much Space Should You Leave Between Garberia Plants?
When preparing to rehome your garberia, ensure they are spaced approximately 24-36 inches (61-91 cm) apart. This provides them with sufficient room to thrive without becoming overcrowded.
What is the Best Soil Mix for Garberia Transplanting?
Before your garberia can flourish, prepare the soil to be well-draining and nutrient-rich. Incorporate a balanced slow-release fertilizer to supply garberia with essential nutrients. A blend of loam and sand with some organic compost works exceptionally well!
Where Should You Relocate Your Garberia?
Select a sunny location for your garberia as they enjoy ample sunlight! A spot receiving full to partial sun will ensure your garberia obtains the energy needed for vigorous and healthy growth.
What Equipments Should You Prepare Before Transplantation Garberia?
Shovel or Trowel
For excavating the hole and lifting the plant.
Gardening Gloves
To safeguard your hands while handling soil and plants.
Watering Can or Hose
To hydrate the garberia both before and after its relocation.
Garden Fork
To loosen the soil and assist with root separation if necessary.
Wheelbarrow or Garden Cart
For moving the garberia and soil amendments, especially for larger plants.
Pruning Shears
For trimming any damaged or excessively long roots prior to transplanting.
Mulch
To help maintain soil moisture and reduce weed growth around the garberia post-planting.
Stakes or Supports
To stabilize the garberia if it is top-heavy or susceptible to wind damage after planting.
How Do You Remove Garberia from the Soil?
How Do You Remove Garberia from the Soil?
From Ground: First, water the garberia to moisten the soil, making it easier to manage. Next, dig a wide circle around the plant, extending beyond the leaf spread to protect the root ball. Use a shovel or spade to carefully loosen the soil surrounding the plant and gently lift it out.From Pot: Water the garberia and allow it to drain before beginning. Hold the pot with one hand and the plant's stem with the other. Gently tap the pot's sides and carefully slide the garberia out. If it doesn't release, use a garden fork to loosen the soil along the pot's edges.From Seedling Tray: Water the tray to hydrate the soil, facilitating seedling removal. Use a trowel or fork to gently lift the garberia from the tray, taking care to support the soil and roots to keep them intact.
Step-by-Step Guide for Transplanting Garberia
Prepare the New Location
Excavate a hole that is twice as wide and equally deep as the garberia's root ball. Loosen the soil at the base of the hole with a garden fork.
Inspect and Prune Roots
Carefully remove any diseased or broken roots using your pruning shears. If the roots are tightly packed, gently separate them with your fingers or a fork.
Positioning
Place the garberia in the center of the hole, ensuring it sits at the same soil level as before, neither too deep nor too shallow.
Fill the Hole
Carefully backfill the hole with soil, periodically tamping it down to eliminate air pockets without compacting it excessively.
Water Thoroughly
Immediately after planting, deeply water the garberia to settle the soil and help remove air pockets around the roots.
Mulching
Apply a layer of mulch around the base of the garberia, leaving some space around the stem to prevent rot.
How Do You Care For Garberia After Transplanting?
Stabilizing
If the garberia appears unstable, provide temporary supports like stakes, especially if the location is exposed to wind.
Monitoring for Pests and Diseases
Observe the garberia for indications of stress, such as discolored leaves or pest damage, and take appropriate measures when necessary.
Watering
Monitor the soil moisture around the garberia, ensuring it remains hydrated but not waterlogged. Over the next few weeks, more frequent watering may be needed to help the plant establish itself.
Adjusting
If you notice the garberia's leaves becoming discolored or the plant isn't thriving, adjust care as needed. This might involve more or less water or relocating the plant if feasible.
Troubleshooting Common Issues with Garberia Transplantation.
When's the ideal time to transplant garberia for best results?
The optimal period is during the active growth phase from late spring to early summer.
How far apart should I space garberia when transplanting?
Ensure proper development by spacing them 24-36 inches (61-91 cm) apart.
What soil conditions favor garberia after transplanting?
Plant garberia in well-draining soil rich in organic matter for peak health.
How deep should I dig for transplanting garberia?
Excavate a hole that is just deep and wide enough to comfortably accommodate the root ball.
How do I water garberia right after transplanting?
Water generously to settle the soil around the roots, preventing waterlogged conditions.
Can I transplant garberia on a sunny day?
Transplant on an overcast day or in the evening to minimize transplant shock from sun exposure.
What's the sign of transplant shock in garberia?
Wilting or yellowing leaves after transplanting may indicate shock; consistent care usually aids recovery.
How can I ensure garberia roots well in its new location?
Keep the soil moist and refrain from fertilizing until stable growth is apparent.
Why are my transplanted garberia plants drooping?
Drooping could be due to root damage, insufficient watering, or transplant shock; adjust care accordingly.
Should I prune garberia when transplanting?
Only prune dead or damaged branches to direct the plant's energy towards root establishment.



