How to Transplant White twinevine?
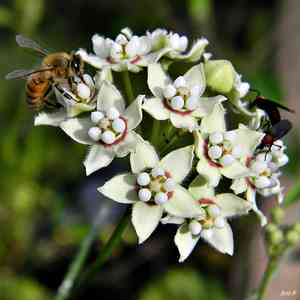
The optimal period for transplanting white twinevine extends from the revitalizing warmth of early spring to the subtle commencement of development in late spring, covering the entire energetic phase of spring. Select a brightly lit location featuring soil that drains effectively. Offer your white twinevine a fresh sanctuary resembling its native environment for effortless adaptation.
What Preparations are Needed Before Transplanting White Twinevine?
What is the Ideal Time for Transplanting White Twinevine?
The best time to move white twinevine is from early spring to just before summer. This period offers mild temperatures and stable conditions, which are perfect for roots to take hold and recover. Moving white twinevine during this window allows roots to adjust without extreme heat or cold stress. Placing white twinevine in its new spot during gentle weather reduces transplant shock, leading to strong, flourishing growth. With warmer soil and longer daylight, white twinevine has a much better chance of successfully transitioning and thriving.
How Much Space Should You Leave Between White Twinevine Plants?
When relocating white twinevine, ensure each plant has ample room to flourish. Position them approximately 2-3 feet (60-90 cm) apart. This spacing will allow them sufficient area to develop and enhance your garden's aesthetic.
What is the Best Soil Mix for White Twinevine Transplanting?
For your lovely white twinevines, a well-draining soil is preferred. You should incorporate a balanced slow-release fertilizer to give them an excellent start. Imagine preparing a comfortable bed with just the right amount of nourishment!
Where Should You Relocate Your White Twinevine?
Your white twinevines thrive in sunlight, my dear. Select a location where they will receive full sun to partial shade. Ensuring they get those golden rays will help them flourish and bring joy to your garden.
What Equipments Should You Prepare Before Transplantation White Twinevine?
Gardening Gloves
To safeguard your hands while handling soil and plants.
Trowel
For digging small holes and precisely positioning the plant.
Shovel or Spade
For excavating the transplant hole and lifting the plant from the ground.
Pruning Shears
To trim any damaged roots or excess foliage prior to transplanting.
Watering Can or Hose
To hydrate the plant before and after its relocation.
Wheelbarrow or Garden Cart
For moving the plant and soil if necessary.
Rooting Hormone (optional)
To stimulate root development after transplanting.
Mulch
To help maintain soil moisture around the new planting site.
Support Stakes
To provide stability for the white twinevine if needed.
How Do You Remove White Twinevine from the Soil?
How Do You Remove White Twinevine from the Soil?
From Ground: First, water the white twinevine plant to moisten the soil. Then, dig a wide trench around the plant using a shovel or spade, ensuring the plant's root ball remains intact. Carefully work the spade under the root ball to lift the plant from its original location.From Pot: Begin by watering the white twinevine thoroughly to facilitate its removal from the pot. Turn the pot sideways and gently tap or squeeze it to loosen the soil and root ball. Slowly and gently ease the plant out, supporting the root ball as you do so.From Seedling Tray: Water the seedlings to ensure the soil is moist, which will help in keeping the roots intact during the removal. Gently ease each seedling out using a trowel or by carefully pushing from the bottom of the cell, taking care to preserve the delicate root system.
Step-by-Step Guide for Transplanting White Twinevine
Prepare the New Site
Dig a hole twice as wide and as deep as the white twinevine's root ball to provide ample space for root establishment.
Remove the Plant
Depending on its original location, follow the appropriate 'removal process' to carefully extract the white twinevine, minimizing root disturbance.
Inspect Roots
Examine the extracted root ball for any signs of disease or damage. Trim any broken or unhealthy roots with pruning shears.
Place the Plant
Position the white twinevine in the center of the prepared hole. Gently spread out any bunched roots. Ensure the plant is at the same depth as it was previously growing.
Refill the Hole
Backfill the hole with the excavated soil, gently firming it around the root ball to eliminate air pockets. Avoid excessive pressure, which can harm the roots.
Watering
Thoroughly water the white twinevine immediately after planting to help settle the soil and hydrate the roots.
Add Mulch
Apply a layer of mulch around the base of the white twinevine to retain moisture and regulate soil temperature, but keep it away from the stem to prevent rot.
Support the Plant
If the white twinevine appears unstable in its new location, loosely tie it to support stakes to help it remain upright while its roots establish.
How Do You Care For White Twinevine After Transplanting?
Initial Watering
Keep the soil around the white twinevine consistently moist, but not waterlogged, for the first few weeks post-transplant to encourage strong root development.
Monitoring
Regularly check the white twinevine for indications of stress, such as wilting or discolored leaves, and adjust care as needed.
Staking
If you've used stakes, monitor the ties to ensure they are not too tight as the white twinevine grows. Adjust them to prevent stem damage.
Pruning
Snip off any dead or yellowing leaves to direct the white twinevine's energy towards healthy growth and to prevent potential disease spread.
Troubleshooting Common Issues with White Twinevine Transplantation.
When is the best time for transplanting white twinevine?
Relocate white twinevine during early to late spring, which is the optimal period for fostering its growth.
How deep should I plant white twinevine's root ball?
Plant the white twinevine's root ball slightly deeper than its previous depth, but no more than 2 inches (5 cm).
How far apart should I space white twinevine transplants?
Allow space for growth by positioning white twinevine 2-3 feet (60-90 cm) apart, promoting good air circulation.
What soil type is best for white twinevine after transplanting?
Utilize well-draining soil enriched with organic matter to provide white twinevine with a thriving new environment.
Why is my white twinevine wilting after transplanting?
Wilting may indicate shock. Keep the soil moist and provide shade for a few days to aid its recovery.
How much water does white twinevine need post-transplant?
Water thoroughly after transplanting and then regularly, maintaining consistently moist soil without waterlogging.
Should I fertilize white twinevine immediately after transplanting?
Wait 4-6 weeks before applying fertilizer to allow white twinevine to settle and prevent root burn.
Can I transplant white twinevine during a hot day?
It's best to avoid high temperatures. Transplant during a cooler part of the day or when it's overcast.
How can I tell if white twinevine is root-bound post-transplant?
If growth is stunted or roots emerge from drainage holes, it might be root-bound. Consider a larger container.
How to protect white twinevine transplants from pests?
Regularly inspect and maintain proper spacing. Employ organic pest control methods if necessary.



