How to Propagate Sea daffodil?
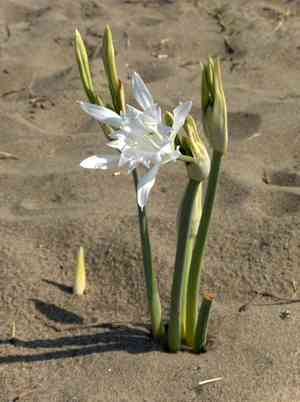
Pancratium maritimum, a resilient and unique bulbous perennial, flourishes predominantly in sandy seaside environments. To achieve successful propagation, cultivators ought to focus on employing its inherent tubers. Gently separate these tubers from the mature specimen, making certain that each segment possesses a part of the bulb and some root system. Promptly embed them in porous soil, replicating their indigenous sandy conditions to foster vigorous development.
Optimal Time for Sea Daffodil Propagation
Propagation Method
Utilize The Tubers
Propagation Period
Spring
Tools Required for Sea Daffodil Propagation
Trowel
A trowel is crucial for carefully digging and lifting sea daffodil tubers from the soil, minimizing damage. Its slender blade is perfect for navigating tight root spaces, allowing precise handling and reducing harm to nearby tubers.
Garden Fork
A garden fork is beneficial for loosening the soil around sea daffodil before tuber extraction. This tool assists in aerating the soil and simplifying tuber removal without excessive disturbance to the plant's root system.
Pruning Shears
Sharp, clean pruning shears are essential for dividing sea daffodil tubers when necessary. They enable precise cuts that encourage better healing and lower the risk of disease. Sterilizing shears between cuts prevents pathogen spread.
Planting Pots
After tuber extraction and potential division, smaller pots filled with appropriate potting mix offer an ideal environment for sea daffodil to establish roots. Pots allow for easy control of soil conditions and moisture levels, vital for initial growth.
Misting Bottle
A misting bottle aids in maintaining optimal humidity for sea daffodil during the early stages of tuber rooting. Adequate moisture is critical for tuber development, and misting can replicate the naturally humid conditions sea daffodil prefers.
Label and Marker
Accurate labeling ensures proper tracking of propagation stages and varieties, especially when propagating multiple sea daffodil tubers. Labels help monitor growth progress and care requirements efficiently.
Post-Propagation Care for Your Sea Daffodil
How to Care for Your Newly Propagated Sea Daffodil?
Following germination, continue to monitor moisture levels, ensuring the soil isn't overly saturated. As sea daffodil grows more vigorously, gradually increase sun exposure but shield from intense midday sun. Support growth with a balanced liquid fertilizer monthly during the active season. Flowering typically occurs after the first set of leaves fully develops. Remove spent blooms to encourage further flowering and prevent unnecessary energy expenditure on seed production.
Common Errors to Avoid When Propagating Sea Daffodil
Overwatering
Watering sea daffodil too often can lead to root rot, as its bulbs are adapted to dry, sandy environments. Excessive watering can reduce oxygen availability to the roots, hindering proper growth and potentially killing the plant.
Deep planting
Planting sea daffodil bulbs too deeply can impede their ability to sprout. This species requires light exposure and fluctuating temperatures, which stimulate germination and growth.
Using dense soil
Employing dense or clay-heavy soil can obstruct the drainage and aeration necessary for sea daffodil bulbs. Poorly drained soil can contribute to fungal diseases and root rot.
Tips for Propagating Sea Daffodil
Sandy soil mix
Using a well-draining sandy soil mix helps replicate the natural habitat of sea daffodil, ensuring better growth conditions. This promotes drainage and prevents water accumulation around the bulbs.
Bulb surface exposure
Partially exposing the sea daffodil bulb to the surface when planting helps stimulate the necessary light exposure for sprouting. Ensure at least one-third of the bulb remains above the soil surface.
Water management
Water sea daffodil moderately, allowing the soil to dry slightly between waterings. Especially avoid overwatering during dormancy, as the bulbs are less active and susceptible to rot in soggy soil.



