
Indian aster (Aster indicus)
Also known as: Indian Aster, Aster Inamicus
Indian aster, a plant closely related to the daisy and featuring similar flowers, frequently serves as ground cover along forest floors and field edges. In various East Asian countries, its young leaves are prized as a delicacy and are often prepared with tofu. Known as 'malantou' in southern China, it is both farmed and foraged for culinary uses, and its dried form is available as a food ingredient. Additionally, Indian aster is cultivated as an ornamental plant.
In This Article
Attributes of Indian aster
Lifespan
Perennial
Plant Type
Herb
Plant Height
30 cm to 70 cm
Spread
Varies but typically around 50 cm
Leaf Color
Green
Flower Size
2-5 cm
Flower Color
White Pink Purple
Images of Indian aster
Quickly Identify Indian aster
1
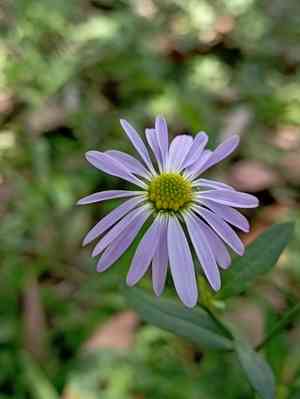
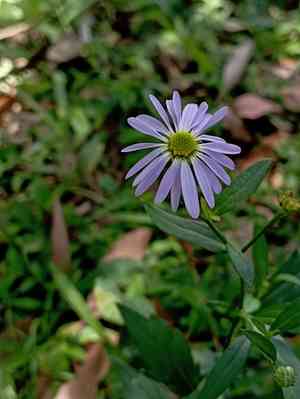
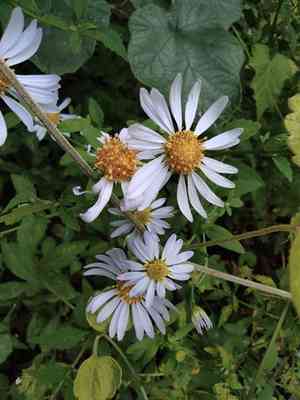
Aster indicus can be identified by its star-shaped flowers with numerous petals and a yellow central disc. The leaves are lanceolate to ovate, and the plant often has a bushy appearance with multiple flowering heads.
Scientific Classification of Indian aster
Phylum
Vascular plants
Class
Dicotyledons
Order
Asters bellflowers fanflowers and allies
Family
Daisy
Genus
Asters
Species
Indian aster
Planting and Growing of Indian aster
Care Difficulty
Easy
Watering Schedule
Every 5 days
Sunlight Requirements
Full sun
Sunshine Duration
6-10 hours
Ideal Temperature
68-77℉
Soil Type
Potting Mix, Peat Mix
Soil pH
6.5-7.5
Fertilizer Type
Balanced
Pruning Season
Spring, Summer
Pruning Area
Branches, Leaves
Pruning Frequency
2 times a year
Repotting Season
Spring
Pot Type
Plastic, Ceramic
 How to Water Indian aster?
Aster indicus requires consistent moisture, but it's essential not to let the soil become waterlogged. The rule of thumb is to provide about 250 ml of water per session, ensuring that the top 1-2 inches of soil remain slightly damp but never soggy.
What are the symptoms of an underwatered Indian aster?
›
What should I do if my Indian aster is not getting enough water?
›
What are the symptoms of an overwatered Indian aster?
›
How to save an overwatered Indian aster?
›
 What Are the Sunlight Requirements for Indian aster?
Aster indicus grows best in partial to full sun conditions, ideally with 6 to 8 hours of direct sunlight. This ample light ensures vigorous growth and plentiful blooms, enhancing the plant's health and ornamental value.
More About Sunlight Requirements Techniques→
How much sunlight does Aster indicus need?
›
What is the best location for planting or placing Aster indicus?
›
How to achieve ideal light conditions indoors for Aster indicus?
›
 What Is the Ideal Temperature Range for Indian aster?
The ideal temperature range for cultivating Aster indicus is between 68°F to 77°F. This range allows the plant to engage in optimal photosynthesis, leading to healthy growth and vibrant blooming.
 What Soil is Best for Indian aster?
Aster indicus thrives best in well-drained soil that prevents water from sitting around the roots. This ensures that the plant avoids root rot and other water-related issues, promoting healthy growth and vibrant blooming. The plant benefits greatly from soil that's rich in nutrients, contributing to lush foliage and robust flowering. Incorporating organic matter like compost can enhance the nutrient profile of the soil. Maintaining consistent moisture levels without waterlogging is crucial for Aster indicus. The soil should remain damp but not overly wet, helping the plant to absorb nutrients effectively while supporting growth.
 How to Fertilize Indian aster?
Aster indicus, commonly known as the Indian Aster, requires a balanced application of nutrients. For liquid fertilizer, a solution of 10-10-10 NPK ratio is ideal. Use approximately 1 tablespoon of liquid fertilizer per gallon of water. This ensures the plant receives adequate nutrients without risking over-fertilization.
 How to Prune Indian aster?
Begin your pruning process by removing any fading or dead flowers. This encourages new blooms and prevents the plant from wasting energy on seed production. Delicately cut the spent blooms at a 45-degree angle just above the nearest leaf. Inspect the plant for any long, leggy stems and cut them back to promote bushy, compact growth. Prune these stems just above a leaf node to encourage new branches to form from that point. Using pruning shears, reduce excessive growth around the plant to maintain a tidy and attractive shape. This is especially important if the plant is overshadowing nearby plants or encroaching on walkways.
More About Pruning Techniques→
 How to Propagate Indian aster plant?
1
Fill a seed tray with a high-quality seed-starting mix. Gently press the seeds into the soil, ensuring they are covered lightly. Maintain consistent moisture until germination occurs.
2
Use sterilized pruning shears to cut 6-8 inch stems from healthy plants. Remove the lower leaves and dip the cut end in rooting hormone before placing it in a container filled with moistened potting mix.
3
Carefully dig up the mature plant using a garden spade. Shake off excess soil and gently separate the roots to create several new plants, ensuring each division has ample roots attached.
 How to Repot Indian aster plant?
1
You should consider repotting Aster indicus when you notice roots coming out of the drainage holes, the soil drying out quickly, or stunted growth. These are signs that the plant has outgrown its current pot and needs more space to thrive.
2
Select a pot that is only slightly larger than the current one, ideally one size up. This prevents excessive water retention, which can lead to root rot. Additionally, ensure it has good drainage holes to prevent overflow during watering.
3
Opt for a well-draining loamy soil mix, which balances moisture retention and aeration. This type of soil supports healthy root growth and helps protect the plant from waterlogged conditions, enhancing overall plant vigor.


