How to Transplant Culver's root?
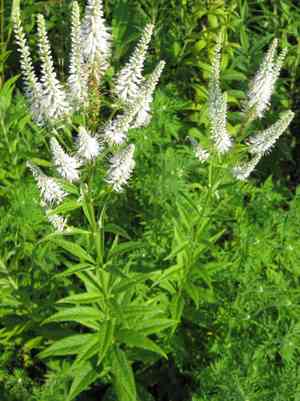
The optimal period for relocating culver's root spans from the beginning of summer to its conclusion, and also from the end of autumn into the early winter. Select a site with partial shade and soil that drains effectively. Handle the root system delicately to lessen the plant's distress.
Essential Preparations Before Relocating Culver's Root?
Optimal Period for Moving Culver's Root?
The best time to move culver's root is from mid-summer through late summer, or from late fall into early winter. These periods offer moderate weather, encouraging successful establishment. This practice allows culver's root ample time to settle, ensuring robust flowering in the subsequent season. Following this advice will lead to a vibrant culver's root display.
Required Spacing Between Culver's Root Plants?
When relocating culver's root, ensure a 2-3 feet (60-90 cm) separation. This provides ample room for development and prevents root competition for nutrients.
Ideal Soil Blend for Culver's Root Relocation?
For culver's root, select a soil that drains well with a pH range of 5.5-6.5. To give them a head start, incorporate organic compost or aged manure into the planting site, supplying vital nutrients.
Optimal Location for Your Culver's Root?
Culver's root flourishes in full sun to partial shade. Choose a spot that receives at least 4-6 hours of direct sunlight daily. This promotes vigorous growth and abundant blooms.
Necessary Tools for Culver's Root Relocation?
Shovel or Garden Spade
For excavating holes and carefully extracting plants.
Watering Can
To hydrate the culver's root plant both prior to and following its relocation.
Gardening Gloves
To safeguard hands while handling the plant and working with soil.
Wheelbarrow or Plant Pot
For moving the plant and its root ball from one spot to another.
Mulch
To shield the culver's root plant from external threats post-relocation.
Method for Extracting Culver's Root from the Soil?
Method for Extracting Culver's Root from the Soil?
From Ground: Begin by moistening the soil around the culver's root to facilitate digging and minimize root damage. Use your shovel to create a wide trench around the culver's root, being careful not to sever the root system. Position your spade or shovel beneath the root ball and gently lift the plant along with its root ball.From Pot: If the culver's root is potted, watering beforehand will ease its removal. Tilt the pot sideways and gently ease the plant and its root ball out by tapping the sides. Avoid pulling the plant forcefully, as this can harm the roots.From Seedling Tray: Carefully remove the culver's root seedling by pushing up from the bottom of its cell. Handle the seedling by its leaves to prevent stem damage. If roots have grown through the cell's bottom, snip them carefully before transplanting.
Step-by-Step Guide for Relocating Culver's Root
Preparation
Prepare the new location for your culver's root. Dig a hole twice the width of the root ball and of equal depth. Fill it with water to moisten the area.
Planting
Position your culver's root plant centrally in the hole. The top of the root ball should align with the soil surface.
Backfill
Refill with soil, gently firming it around the base of the culver's root to ensure it stands upright. Avoid excessive pressure, which can compact the soil and hinder root growth.
Watering
Thoroughly water your culver's root plant with a watering can, ensuring the soil is damp but not waterlogged.
Mulch
Apply a layer of mulch around the plant, taking care not to pile it against the stem, which could lead to rot.
Post-Relocation Care for Culver's Root?
Monitoring
Inspect the culver's root plant daily for signs of dehydration. Wilting leaves may indicate thirst, signaling a need for water.
Protection
Shield your newly relocated plant from strong winds and intense sun for several days after moving. An old umbrella or temporary shade can be used.
Weed control
Remove any weeds that emerge around the culver's root in its new spot. Weeds can deplete essential nutrients from your planting area.
Addressing Common Issues with Culver's Root Relocation.
When is the optimal time to move culver's root?
The best period to relocate culver's root is from early to late summer or late fall to early winter.
What is the recommended spacing for culver's root?
The ideal distance for proper growth of culver's root is between 2-3 feet (approximately 60-90 cm).
What if my relocated culver's root appears droopy?
Do not worry! Wilting can be a sign of transplant shock. Maintain consistent watering and ensure the plant receives indirect sunlight.
Should I trim culver's root before moving it?
Yes, a light trim can be beneficial. Remove any dead or diseased parts of the plant. This encourages healthier growth after relocation.
My culver's root is very tall. Can I bury part of its stem during relocation?
No, burying the stem could cause rot. Ensure only the roots are underground and the foliage remains above soil level.
What type of soil is suitable for culver's root relocation?
Culver's root prefers well-drained soil. For clay soils, improve drainage by adding compost or grit.
Why are the leaves of my relocated culver's root yellow?
Yellow leaves might indicate over-watering or poor drainage. Ensure the plant is adequately watered and the soil drains effectively.
Why are there pests on my culver's root after relocation?
Insects may be drawn to the plant after its environment is disturbed. Regular checks and natural insecticides can help manage them.
What care should culver's root receive after relocation?
Ensure culver's root is placed in a location with partial sun. Water consistently, and avoid excessive fertilization to promote healthy regrowth.
Can I use mulch after relocating culver's root?
Yes, applying a layer of mulch around the plant, keeping it away from the stem, can help retain soil moisture and prevent weeds.



