How to Transplant Greene's mountain ash?
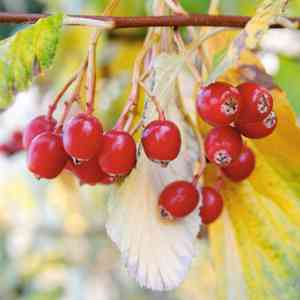
The ideal period for relocating greene's mountain ash is during nature's reawakening, providing gentle temperatures and perfect circumstances for root expansion. Select a site featuring soil that drains effectively, partial afternoon shade, and sufficient room for its full growth. Bear in mind, consistent hydration assists in its successful settling.
Preparations Required Before Relocating Greene's Mountain Ash
Optimal Period for Transplanting Greene's Mountain Ash?
Spring, a season of rebirth and development, is perfect for moving greene's mountain ash. During this time, mild temperatures and increased humidity aid root establishment, boosting greene's mountain ash's vigor. Utilizing this season leverages nature's supportive conditions, offering greene's mountain ash an ideal setting to flourish post-relocation.
Recommended Spacing Between Greene's Mountain Ash Plants?
When preparing your garden for greene's mountain ash, ensure each plant is positioned approximately 4-6 feet (1.2-1.8 meters) apart. This provides ample room for growth and expansion without overcrowding.
Best Soil Blend for Greene's Mountain Ash Transplantation?
The appropriate soil type is crucial. Greene's mountain ash thrives in well-draining soil, preferably loamy or sandy. Begin by incorporating a base fertilizer rich in organic matter to nourish your plants and stimulate their growth.
Where to Replant Your Greene's Mountain Ash?
Does your garden receive abundant sunlight? Excellent! Greene's mountain ash enjoys spending its day in the sun. Select a spot that gets full-day sun exposure to ensure your plant remains healthy and develops properly.
Equipment Needed Before Transplanting Greene's Mountain Ash?
Gardening Gloves
To safeguard your hands while working with soil and plants.
Shovel
Essential for extracting greene's mountain ash from its current spot, whether a container or the ground.
Trowel
Smaller than a shovel, useful for digging a new hole in the ground for replanting.
Bucket or Wheelbarrow
Needed to move the plant from its original location to its new home.
Watering Can
Designed for gentle plant irrigation, vital for immediate watering after transplanting.
How to Extract Greene's Mountain Ash from the Soil?
How to Extract Greene's Mountain Ash from the Soil?
From Ground: Carefully begin digging around the greene's mountain ash plant with your shovel. Gently excavate around the plant's base in a wide circle to get beneath the root system. Dig as deep as possible to capture most roots, ensuring no damage to the plant. Then, carefully work the shovel under the root ball to lift the plant.From Pot: If your greene's mountain ash is in a pot, turn it sideways and tap the sides until the plant slides out. Remember to remove the plant by the root ball and never yank the stem.From Seedling Tray: When greene's mountain ash is ready to move from a seedling tray, pinch off the upper set of leaves to encourage stronger growth post-transplantation. Gently hold the seedling by its leaves and carefully free it from the tray. It's important to handle the root ball delicately to avoid harming the young roots.
Step-by-Step Guide for Relocating Greene's Mountain Ash
Excavating a New Hole
Use your trowel to dig a new hole for greene's mountain ash. The hole should be approximately twice as wide as the root ball and equally deep. Ensure the hole is spacious enough to accommodate the plant's roots without compression.
Positioning the Plant
Place greene's mountain ash into the hole. The top of the root ball should be level with the soil surface. Orient the plant in your desired direction, considering its future growth pattern.
Backfilling the Hole
Use the excavated soil to refill the hole around the root ball. Gently but firmly pat down the soil.
Watering
Water greene's mountain ash generously after planting. This helps consolidate the soil, provides moisture for the plant, and eliminates any potential air pockets.
Post-Transplantation Care for Greene's Mountain Ash
Watering
Water consistently, keeping the soil around greene's mountain ash uniformly moist, but not waterlogged. Young plants require more water than mature ones as they establish their roots.
Mulching
Apply mulch to the base of greene's mountain ash after transplanting. This aids in retaining soil moisture, suppressing weed growth, and moderating soil temperature.
Pest/Disease Inspection
Monitor for signs of pests or diseases. These can stress greene's mountain ash and impede its development. If uncertain, consult your local nursery with photos for guidance.
Resolving Common Issues with Greene's Mountain Ash Transplantation.
When is the best season to transplant greene's mountain ash?
The optimal period to transplant greene's mountain ash is during the first to third season (S1-S3). This timeframe allows the plant ample opportunity to settle and grow in its new environment.
How much space should I allow for greene's mountain ash during transplantation?
Provide each plant with adequate room. Ideally, maintain a distance of 4-6 feet (1.2-1.8m) between transplanted individuals. This ensures sufficient space for growth and reduces competition for nutrients.
What preliminary steps should I take before transplanting greene's mountain ash?
Prepare the new site by loosening the soil and incorporating compost. Ensure the planting hole is twice as wide and the same depth as the root ball of greene's mountain ash.
What precautions should I observe when removing greene's mountain ash from its original spot?
Dig around the drip line to prevent root damage. Lift the plant carefully to avoid breaking any roots. Retain as much original soil around the root ball as possible.
How deep should I plant the greene's mountain ash sapling in its new location?
Plant the greene's mountain ash sapling at the identical depth it was growing in its previous location. Ensure the top of the root ball is level with or slightly above the soil surface.
What care is necessary for greene's mountain ash after transplantation?
Water greene's mountain ash thoroughly immediately after transplantation and regularly thereafter. Apply mulch around the base to conserve moisture and use a balanced fertilizer according to product directions.
How do I manage transplant shock in greene's mountain ash?
Transplant shock can be mitigated by watering and providing shade immediately after transplantation. If leaves wilt or drop, do not be alarmed â allow greene's mountain ash some time to adapt.
What if greene's mountain ash does not grow as expected after transplantation?
Greene's mountain ash may require time to establish itself in its new location. If growth is significantly stunted or the plant appears unhealthy, investigate for potential disease, pests, nutrient deficiencies, or water issues.
If my greene's mountain ash fails to stand upright after transplanting, what action should I take?
If greene's mountain ash does not stand erect, stake it. Place two stakes on opposing sides of the plant, and loosely tie the plant to the stakes. Remove the stakes once greene's mountain ash can support itself.
Is it acceptable to transplant greene's mountain ash during hot and sunny weather?
Ideally, transplant greene's mountain ash on an overcast day, in the early morning, or in the evening to prevent immediate water loss and allow the plant time to adjust before the day's heat.



