How to Transplant Necklacepod?
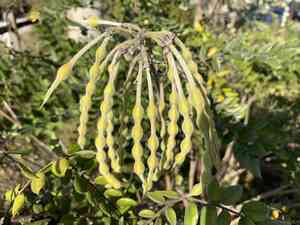
The optimal period for relocating necklacepod is during the mild warmth of early to mid-spring, as the ground becomes active. Select a brightly lit location featuring soil that drains effectively. Provide sufficient room for development to preserve its elegant structure.
What Preparations are Needed Before Transplanting Necklacepod?
What is the Ideal Time for Transplanting Necklacepod?
Early to mid-spring marks the prime period for relocating necklacepod. During this season, mild temperatures and increasing daylight foster an ideal environment for root establishment, aiding better acclimation. Transplanting within this window leverages the plant's natural growth cycle, providing a strong foundation before summer's heat. This timing promotes robust development, giving necklacepod the best chance to flourish in its new spot.
How Much Space Should You Leave Between Necklacepod Plants?
When moving your necklacepod, ensure a generous area! These attractive perennials require approximately 6-8 feet (1.8-2.4 meters) of space between each plant to develop healthily and extend their branches widely.
What is the Best Soil Mix for Necklacepod Transplanting?
Properly prepare your soil before introducing necklacepod. It thrives in sandy, well-drained soil. Enhance your plot with compost or organic material, and for an excellent start, incorporate a slow-release, balanced fertilizer.
Where Should You Relocate Your Necklacepod?
Your necklacepod loves sunlight! Select a garden spot that receives ample sun exposure throughout the day. A south-facing location is an excellent option for this sun-loving perennial, if available.
What Equipments Should You Prepare Before Transplantation Necklacepod?
Gardening Gloves
To safeguard your hands while handling soil and the necklacepod.
Garden Trowel
For digging the hole for the necklacepod and gently loosening the plant's root ball.
Shovel
If the necklacepod is large, a shovel might be necessary to excavate the ground hole.
Watering Can
To thoroughly hydrate the plant both before and after its relocation.
Mulch
A layer of mulch can assist the necklacepod in retaining moisture post-transplant.
Plant Marker
To indicate the precise spot where the necklacepod has been planted.
How Do You Remove Necklacepod from the Soil?
How Do You Remove Necklacepod from the Soil?
From Ground: If the necklacepod is currently in the ground, begin by watering it thoroughly a few hours prior to transplanting. This makes the soil more workable. Dig a wide circle around the plant using a garden trowel or shovel, then carefully lift the plant from the ground with its root ball intact. Be gentle to prevent root damage.From Pot: If the necklacepod is in a pot, water it well, then turn the pot on its side. Gently slide the plant and root ball out. If it's stuck, you might need to tap the pot's sides to loosen it.From Seedling Tray: If the necklacepod is in a seedling tray, water it thoroughly then carefully remove it, ensuring the soil around the roots remains undisturbed.
Step-by-Step Guide for Transplanting Necklacepod
Preparation
Begin your transplanting process by getting the new site ready for the necklacepod. Dig a hole deep enough to cover the plant's root ball and twice its width.
Transplanting
Place the necklacepod into its hole, making sure the top of the root ball is level with or slightly below the surrounding soil surface.
Backfilling
Refill the hole with the excavated soil. Gently firm the soil around the base of the necklacepod, but avoid compacting it too much, as this could suffocate the roots.
Watering
Water the necklacepod thoroughly immediately after transplanting to help settle the soil around the roots and aid its establishment in the new location.
Mulching
Apply a layer of mulch around the base of the necklacepod to help retain moisture and keep the roots cool.
How Do You Care For Necklacepod After Transplanting?
Regular Watering
Necklacepod should be watered thoroughly right after transplanting, and then consistently afterward. Keep the soil moist but ensure you don't over-water, which could lead to root rot.
Protection
Depending on your climate, necklacepod might need protection from extreme weather like heavy rain, intense heat, or frost during its initial weeks.
Checking Growth
Monitor the necklacepod for any indications of transplant shock, such as wilting or yellowing leaves. If these symptoms appear, the plant may require additional care or a change in its environment.
Troubleshooting Common Issues with Necklacepod Transplantation.
When's the best time to transplant necklacepod?
The most favorable periods to transplant necklacepod are S1 and S2, offering it the best opportunity to develop strong root systems before harsh weather arrives.
Is it important to prep the soil before transplanting necklacepod?
Absolutely! Before transplanting, enrich the soil with organic material. This will boost its nutrient content, promoting healthier growth for necklacepod.
What's the ideal distance between two necklacepod when transplanting?
Provide each necklacepod ample room by maintaining a distance of 6-8 feet (approx. 1.8-2.4 meters) between them. This allows sufficient space for growth and air circulation.
What signs of stress should I look out for after transplanting necklacepod?
Wilted or discolored foliage indicates stress. If necklacepod exhibits these symptoms post-transplantation, consider adjusting watering practices or checking the soil's nutrient balance.
Is it necessary to water necklacepod right after transplanting?
Yes! This helps settle the soil around the root ball. Immediate hydration means necklacepod can begin absorbing vital nutrients without delay.
How deep should the hole be when transplanting necklacepod?
The hole should be about as deep as the root ball, but twice as wide. This provides the roots ample space to spread and grow, optimizing necklacepod's development.
What if necklacepod fails to thrive after transplanting?
Necklacepod could be suffering from transplant shock. You might consider adding nutrients to the soil, adjusting your watering routine, or even moving the plant to a more suitable location.
Can I fertilize necklacepod soon after transplanting?
Wait a few weeks before fertilizing. Necklacepod needs time to adapt to its new surroundings. The initial focus should be on watering and soil stabilization.
Does necklacepod need any specific soil type for efficient transplantation?
Necklacepod isn't overly particular about soil type, but it performs better in well-drained soil. A soil mix rich in organic matter can lead to optimal growth.
What's the ideal watering schedule for necklacepod after transplantation?
Necklacepod prefers a moderate watering routine, ensuring its soil remains moist but not waterlogged. Adjust the watering schedule based on the season and your necklacepod's moisture requirements.



