How to Transplant Common fleabane?
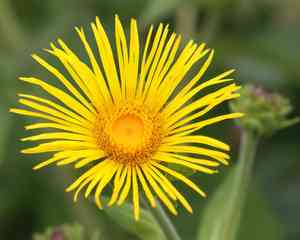
For common fleabane, the ideal period for relocation is the transition from late spring to early summer, allowing it to fully benefit from the active growth phase. Ensure its placement in a location with good drainage and supply infrequent irrigation after transplanting to facilitate proper rooting.
What Preparations are Needed Before Transplanting Common Fleabane?
What is the Ideal Time for Transplanting Common Fleabane?
The optimal period for moving common fleabane is at the onset of warmer weather, when spring's chill recedes but summer's full intensity has not yet arrived. This timeframe provides a mild environment that eases common fleabane's adjustment, offering an ideal mix of cool evenings and progressively warmer days for it to establish itself. Furthermore, the soil is typically warm and workable, perfect for roots to expand and take hold. Undertaking this task now sets common fleabane up for vigorous development and thriving health, laying a strong foundation for future seasons.
How Much Space Should You Leave Between Common Fleabane Plants?
When getting ready to move your common fleabane, ensure each plant has ample room to thrive. Aim for a separation of approximately 12-18 inches (30-45 cm) between them. This will provide sufficient air circulation and growing area, allowing your common fleabane to reach its full potential!
What is the Best Soil Mix for Common Fleabane Transplanting?
For your common fleabane, a well-draining loam or sandy soil works exceptionally well! Prior to transplanting, enrich the soil with a balanced, slow-release fertilizer to give your common fleabane a beneficial boost. Gently mix it into the top layer of soil to create a nutrient-rich base for your perennials.
Where Should You Relocate Your Common Fleabane?
Your common fleabane thrives in sunlight! Select a sunny location in your garden that receives at least 6 hours of direct sun daily. If feasible, choose an area with afternoon shade to shield your common fleabane from the day's hottest period, ensuring healthy and vigorous growth.
What Equipments Should You Prepare Before Transplantation Common Fleabane?
Gardening Gloves
To safeguard your hands while handling soil and plants.
Shovel or Garden Spade
To extract the common fleabane from its current spot and excavate a new planting hole.
Watering Can or Hose
To hydrate the plant before and after its relocation.
Trowel
For lifting small plants or refining the planting cavity.
Garden Fork
To loosen the soil around the common fleabane without harming its root system.
Wheelbarrow or Garden Cart
To move the common fleabane and soil if necessary.
Secateurs
To trim any dead or damaged roots or leaves before replanting.
How Do You Remove Common Fleabane from the Soil?
How Do You Remove Common Fleabane from the Soil?
From Ground: First, moisten the common fleabane plant's soil to facilitate removal. Using a shovel or spade, dig a wide circle around the plant, being careful of its root ball. Gently slide the tool beneath to lift the plant, preserving as much of the root structure as possible.From Pot: Water the potted common fleabane until the soil is damp. Turn the pot sideways, tap the bottom, and carefully slide the plant out. Support the plant by its base and gently untangle any circling roots at the bottom.From Seedling Tray: Dampen the seedling tray's soil to aid removal. Use a trowel or your fingers to lift each common fleabane seedling by its leaves, not the stem, to prevent damage, ensuring a generous amount of soil remains around the roots.
Step-by-Step Guide for Transplanting Common Fleabane
Prepare the New Site
Ensure the transplant location has ample room for growth, considering the common fleabane's mature size. Loosen the soil in the new planting area with a garden fork.
Digging the Hole
Excavate a hole that is twice as wide and equal in depth to the common fleabane's root ball. This provides sufficient space for roots to spread easily.
Plant Removal
Following the 'removal process' instructions above, carefully extract the common fleabane from its previous location while preserving its root structure.
Placing the Plant
Position the common fleabane in the center of the new hole. The top of the root ball should be level with the surrounding ground to ensure proper establishment.
Filling the Hole
Backfill the hole with the excavated soil, gently tamping it down around the common fleabane's root ball to eliminate air pockets.
Watering
Thoroughly water the common fleabane after planting to settle the soil and provide essential moisture for root recovery.
Stabilizing
If the common fleabane is large or in a windy spot, temporarily stake the plant to prevent wind rock and ensure upright growth.
How Do You Care For Common Fleabane After Transplanting?
Checking for Pests
Regularly inspect the common fleabane for signs of pests or disease, as the plant may be more vulnerable immediately after relocation.
Mulching
Apply mulch around the base of the common fleabane to retain soil moisture and moderate temperature fluctuations, keeping it away from the stem to prevent rot.
Staking
If the common fleabane has been staked, monitor and adjust as needed to ensure it does not harm or constrict the developing plant.
Pruning
Trim any damaged or dead foliage to direct the common fleabane's energy towards establishing its roots and new growth.
Troubleshooting Common Issues with Common Fleabane Transplantation.
What's the best time of year to transplant common fleabane?
The ideal period for transplanting common fleabane is during the mild transition from late spring to early summer.
How much space does common fleabane need between plants when transplanting?
Allow each common fleabane ample room to thrive, spacing them approximately 12-18 inches (30-45 cm) apart.
How deep should the hole be for transplanting common fleabane?
Dig a hole about the same depth as the root ball, but twice as wide to encourage growth.
What if my common fleabane wilts after transplanting?
Maintain hope and water it consistently. Wilting can indicate transplant shock; patience and proper care often lead to recovery.
Should I fertilize common fleabane right after transplanting?
Refrain from fertilizing. Allow common fleabane to settle for a few weeks, then introduce a mild, balanced feed.
What's the ideal watering routine for common fleabane post-transplant?
Water your common fleabane generously after transplanting, then keep the soil moist without over-saturating it.
Why are the leaves of my common fleabane turning yellow after transplanting?
Yellowing could indicate stress or excessive watering. Ensure proper drainage and avoid soaking the foliage.
Can common fleabane handle full sunshine right after transplanting?
Newly transplanted common fleabane might benefit from some shade. Gradually expose it to full sun over about a week.
What's the maximum wind exposure for newly transplanted common fleabane?
Initially protect your transplanted common fleabane from strong winds. A sheltered location allows roots to establish without stress.
Is mulching beneficial for common fleabane after transplanting?
Absolutely! Mulch helps retain moisture, regulates soil temperature, and suppresses weeds, giving your common fleabane a favorable start.



