How to Transplant Palmer's penstemon?
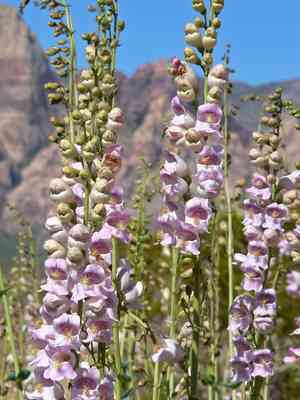
The most suitable period for relocating palmer's penstemon is in mid-spring, as environmental factors are conducive to root development. Select a location offering excellent drainage and ample sunlight, which facilitates palmer's penstemon's adaptation and boosts its vitality.
What Preparations are Needed Before Transplanting Palmer's Penstemon?
What is the Ideal Time for Transplanting Palmer's Penstemon?
The best period to move palmer's penstemon is in mid-spring. The revitalizing warmth and moderate weather conditions during this time create perfect conditions for root establishment, allowing palmer's penstemon to flourish. Relocating palmer's penstemon during this window capitalizes on its natural growth cycle, fostering robust development before summer's heat. This strategic timing sets young plants up for success, ensuring your garden is adorned with their beauty for seasons to come.
How Much Space Should You Leave Between Palmer's Penstemon Plants?
Begin by carefully spacing the palmer's penstemon plants. Remember, providing them ample room to expand is crucial! Ideally, maintain a distance of approximately 1-2 feet (30-60 cm) between each plant during the transplanting process.
What is the Best Soil Mix for Palmer's Penstemon Transplanting?
The palmer's penstemon plant prefers soil that drains well. Start by preparing the ground with a blend of compost and garden soil to enrich it. Also, incorporate a base fertilizer – a granular or slow-release option is suitable for novices.
Where Should You Relocate Your Palmer's Penstemon?
Palmer's penstemon thrives in areas with abundant sunlight but can endure some partial shade. Select a spot in your garden where they will receive plenty of sun, yet also some shade during the hottest part of the day.
What Equipments Should You Prepare Before Transplantation Palmer's Penstemon?
Hand Trowel
To excavate the palmer's penstemon plant without harming its roots.
Gardening Gloves
To safeguard your hands while handling soil and plants.
Watering Can
To hydrate the plant before and after its relocation.
Garden Spade
Useful when moving a larger specimen from the ground.
Gardening Fork
Helps to loosen the soil without damaging the root system.
How Do You Remove Palmer's Penstemon from the Soil?
How Do You Remove Palmer's Penstemon from the Soil?
From a Pot: First, water the palmer's penstemon plant to moisten the soil. Ensure your fingers are on top of the soil, with the stem between them to support the plant. Invert the pot and gently tap its sides and bottom. The plant should slide out with its soil and roots intact. If not, the plant might be root-bound, requiring you to cut the pot away. From Ground: If the plant is already in the ground, water the soil around it. Once damp, use the garden spade to dig a deep circle around the palmer's penstemon, ensuring it's wide enough to keep the root ball whole. Carefully loosen and lift the plant from its original spot. From Seedling Tray: Water the tray to dampen the soil. Use the hand trowel to gently loosen the soil around the seedling. Support the seedling by its root ball and carefully lift it from the tray.
Step-by-Step Guide for Transplanting Palmer's Penstemon
Preparation
Once your palmer's penstemon plant is ready for transplanting, water the chosen area. The soil should be damp for easy relocation.
Planting Hole
Using your hand trowel or garden spade, dig a hole twice as wide and deep as the plant's root ball.
Placement
Gently position the palmer's penstemon into the planting hole. The top of the root ball should be level with the soil surface.
Backfill the Hole
Carefully refill the hole, ensuring all roots are covered but not the stem's base. Gently firm the soil around the plant with your hands.
Water
Water the plant thoroughly after transplanting. The soil should be moist, but not waterlogged.
How Do You Care For Palmer's Penstemon After Transplanting?
Mulching
Apply a layer of mulch around the base of the palmer's penstemon, avoiding contact with the stem. This helps retain soil moisture, suppress weeds, and regulate soil temperature.
Pruning
Remove any dead or damaged foliage to encourage new growth. Prune up to one-third of the plant after planting to reduce its water and nutrient demands.
Initial Care
Closely monitor your palmer's penstemon for the first few weeks, ensuring it's adequately watered and the site is well-ventilated. Protect the newly transplanted plant from strong winds and extreme temperatures for the initial weeks.
Pests and Diseases
Regularly inspect for and address any signs of pests or diseases. Healthy, established palmer's penstemon plants possess good disease and insect resistance, but a stressed plant, such as a recently transplanted one, can be more vulnerable.
Troubleshooting Common Issues with Palmer's Penstemon Transplantation.
When's the most suitable time to transplant palmer's penstemon?
The optimal period for relocating palmer's penstemon is between late spring and early summer.
How should I position palmer's penstemon during the transplantation?
Ensure palmer's penstemon is upright, neither too deep nor too shallow. It should match its original planting depth.
What's the recommended distance between palmer's penstemon plants when transplanting?
You should maintain a gap of approximately 1-2 feet (30-60 cm) between each palmer's penstemon. This provides ample space for growth.
Why are my transplanted palmer's penstemon looking withered?
This could be due to insufficient watering or transplant shock. Ensure proper watering and allow it time to recover.
What kind of soil does palmer's penstemon prefer when transplanting?
Palmer's penstemon thrives in well-drained soil. A blend of garden soil, compost, and sand works best.
What quantity of water does a transplanted palmer's penstemon need?
The soil should remain consistently moist, but avoid waterlogging. Do not allow the soil to dry out completely.
Do I need to add any special fertilizer when transplanting palmer's penstemon?
Generally, palmer's penstemon does not require specialized fertilizers. Compost mixed into the soil should provide sufficient nutrients.
What sunlight requirements does a transplanted palmer's penstemon have?
Palmer's penstemon prefers full to partial sunlight. Ensure it receives at least 6 hours of sun daily for optimal growth.
What if my transplanted palmer's penstemon shows no growth?
Remember, it may take some time for palmer's penstemon to adjust and begin growing after transplantation. Be patient.
What to do if my palmer's penstemon's leaves turn yellow post-transplant?
Yellow leaves could indicate overwatering, underwatering, or a nutrient deficiency. Adjust watering and fertilization as needed.



