How to Transplant Spatterdock?
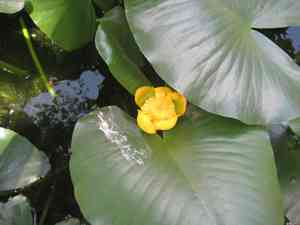
Relocate spatterdock during the balmy period of late spring through mid-summer to ensure the best root development. Select an aquatic setting that receives full sun to partial shade. Should it be necessary, carefully separate the rhizomes, being mindful to avoid harming the root structures.
What Preparations are Needed Before Transplanting Spatterdock?
What is the Ideal Time for Transplanting Spatterdock?
The perfect time for moving spatterdock is from the gentle warmth of late spring through the vibrant period of mid-summer. This timeframe offers spatterdock stable temperatures and increasing daylight, fostering strong root development and successful adaptation. Relocating spatterdock during this window maximizes growth and vigor, as roots establish comfortably before the intense heat of late summer. A helpful hint: this season's mild warmth and moderate rainfall create an inviting environment for spatterdock to flourish in its new spot!
How Much Space Should You Leave Between Spatterdock Plants?
When you're preparing a new home for your spatterdock, remember to provide ample room for growth! Aim for a spacing of approximately 24-36 inches (61-91 cm) between plants. This ensures each spatterdock has sufficient area to develop and thrive without competing for nutrients or sunlight.
What is the Best Soil Mix for Spatterdock Transplanting?
To create an optimal bed for your spatterdock, blend rich, loamy soil with a bit of compost for a nutrient boost. Select a balanced, slow-release fertilizer to promote robust roots and healthy development. Ensure the soil drains well to keep your spatterdock's roots content!
Where Should You Relocate Your Spatterdock?
Your spatterdock loves to soak up the sun! Choose a bright location where it can receive at least 6 hours of direct sunlight daily. A spot that mimics its natural environment will help your spatterdock settle in quickly and begin to grow beautifully.
What Equipments Should You Prepare Before Transplantation Spatterdock?
Gardening Gloves
To safeguard your hands while handling soil and the plant.
Spade or Shovel
For digging up the plant and preparing the new planting site.
Wheelbarrow or Garden Cart
To move the spatterdock and soil.
Watering Can or Hose
For hydrating spatterdock before and after its relocation.
Pruning Shears
To trim any dead or excess parts of the spatterdock prior to transplanting.
Mulch
To help retain soil moisture and suppress weeds around the new location.
Measuring Tape
To ensure the new hole has the correct depth and width.
How Do You Remove Spatterdock from the Soil?
How Do You Remove Spatterdock from the Soil?
From Ground: First, water the spatterdock to moisten the soil. Next, dig a wide trench around the plant using a shovel or spade, being careful to avoid damaging the root ball. Gradually work the spade beneath the root ball to gently lift the spatterdock from its original spot.From Pot: Water the spatterdock to facilitate the removal process. Tilt the pot sideways and gently tap the sides to loosen the soil. Carefully slide the spatterdock out, supporting the root ball to prevent it from breaking apart.From Seedling Tray: Gently lift the spatterdock from the seedling tray using your fingers or a small tool, ensuring not to harm the delicate root system. Support the plant's base and roots during this process.
Step-by-Step Guide for Transplanting Spatterdock
Preparation
Familiarize yourself with the characteristics of spatterdock to ensure a smooth transplanting process. Wear your gardening gloves for protection and gather all necessary tools. Water the spatterdock thoroughly a few hours before transplanting to hydrate the roots and make extraction easier. Consider the time of day - early morning or late afternoon are ideal for transplanting to avoid midday heat stress on the spatterdock.
Root Ball Handling
After removing the spatterdock from its initial location, take care to handle the plant gently, focusing on keeping the root ball intact. This helps minimize stress on the plant and prevents root damage.
Hole Preparation
Dig a hole at the new location that is twice the width of the root ball and the same depth, ensuring the spatterdock is planted at the same level it was previously. Avoid adding fertilizer at this stage, as it's important for the spatterdock to establish itself with the native soil.
Planting
Position the spatterdock in the center of the new hole. Carefully spread the roots evenly and backfill the hole with soil, gently pressing down as you go to eliminate air pockets.
Watering
Once in place, water the spatterdock generously to help settle the soil around the roots and reduce transplant shock.
Mulching
Apply a layer of mulch around the base of the spatterdock, being careful not to pile it against the stem, to help maintain soil moisture and temperature, and to keep weeds at bay.
Observation
Monitor the spatterdock regularly, looking for signs of stress such as wilting or discolored leaves, which can indicate transplant shock or watering issues.
How Do You Care For Spatterdock After Transplanting?
Monitoring
Keep a close watch on your spatterdock for the first few weeks to observe for signs of transplant shock. It's normal for some leaves to yellow or drop – this is part of the adjustment process.
Watering
Ensure the soil around the spatterdock remains consistently moist for the first month after transplanting. Establishing a regular watering schedule in the early morning or late afternoon will support root growth without the risk of evaporation during the hottest part of the day.
Mulching
Maintain the layer of mulch around the spatterdock. This can help preserve moisture and keep the root environment stable, which is vital for the recovery and growth of the spatterdock.
Pruning
Remove any dead or fading foliage to direct the plant's energy towards establishing new growth and roots.
Protection
Depending on the season, consider protective measures such as shade netting if the post-transplant period coincides with particularly hot and sunny weather.
Troubleshooting Common Issues with Spatterdock Transplantation.
Why is my spatterdock not thriving after transplant?
Ensure spatterdock was transplanted during late spring to mid-summer, and that the root ball wasn't damaged.
What is the ideal distance between transplanted spatterdock plants?
To allow ample growth, space spatterdocks about 24-36 inches (61-91 cm) apart.
How deep should I plant spatterdock during transplant?
The top of the root ball should be level with the soil surface; avoid planting too deep.
Can I transplant spatterdock in the fall?
It's best to transplant spatterdock from late spring to mid-summer for optimum root establishment.
What signs indicate spatterdock needs water post-transplant?
Limp, yellowing leaves may suggest a need for more consistent moisture after transplanting spatterdock.
How do I choose a transplant site for spatterdock?
Select a sunny spot with wet soil or shallow water; spatterdock thrives in aquatic environments.
Why are my spatterdock leaves turning brown after transplant?
Browning leaves can signal transplant shock. Maintain moisture and avoid direct midday sunlight initially.
Should I fertilize spatterdock after transplanting?
Wait to fertilize until spatterdock has established; then apply a balanced aquatic plant fertilizer sparingly.
What soil type is ideal for transplanting spatterdock?
Use dense, loamy soil for transplanting spatterdock, as it retains moisture and provides stability.
How do I handle root rot in transplanted spatterdock?
Inspect roots for rot before transplanting. Plant in well-aerated soil and avoid overwatering.



