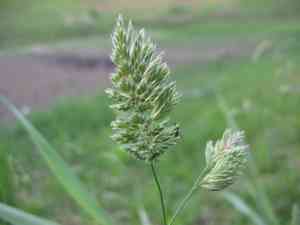
How to Transplant White wood-rush?
Relocate white wood-rush when temperatures are mild and consistent, from mid-spring through early summer, or from mid-autumn to early winter. Select a location offering full or partial shade, featuring soil that drains effectively, to guarantee successful rooting.
What Preparations are Needed Before Transplanting White Wood-rush?
What is the Ideal Time for Transplanting White Wood-rush?
White wood-rush, a perennial plant, thrives when relocated from early spring to late spring or mid-fall to early winter. These periods offer optimal soil moisture and milder temperatures, reducing transplant shock and promoting robust root development. Timing your transplant during these windows helps white wood-rush establish a strong foundation, ensuring healthy growth and longevity.
How Much Space Should You Leave Between White Wood-rush Plants?
To transplant white wood-rush, make sure to space each plant about 12-18 inches (30-45 cm) apart. This spacing allows enough room for healthy growth and airflow, helping prevent disease.
What is the Best Soil Mix for White Wood-rush Transplanting?
Prepare well-draining soil, ideally a mix of loamy and sandy soil for white wood-rush. Enrich the soil with a balanced, slow-release base fertilizer to ensure adequate nutrients.
Where Should You Relocate Your White Wood-rush?
Choose a location that receives partial sun to full shade for transplanting white wood-rush. Too much direct sunlight can stress the plant, while a shaded spot promotes lush growth.
What Equipments Should You Prepare Before Transplantation White Wood-rush?
Gardening Gloves
To protect your hands while working with the soil and plant.
Shovel or Spade
To dig around and lift the plant from its original location.
Watering Can
To moisten the soil before and after transplanting.
Garden Trowel
To dig smaller holes for transplanting.
Pruning Shears
For trimming damaged roots or foliage.
Compost or Mulch
To enrich the soil and help retain moisture.
How Do You Remove White Wood-rush from the Soil?
How Do You Remove White Wood-rush from the Soil?
From Ground: First, water the white wood-rush plant to dampen the soil. Then, dig a wide trench around the plant using a shovel or spade, ensuring the plant's root ball remains intact. Carefully work the spade under the root ball to lift the plant from its original location.From Pot: Water the white wood-rush plant thoroughly. Gently tap the sides of the pot to loosen the soil. Hold the plant at the base and carefully slide it out of the pot, keeping the root ball intact.From Seedling Tray: Water the seedlings in the tray. Gently use a garden trowel or your fingers to lift the seedlings from the tray, being cautious to avoid damage to their delicate roots.
Step-by-Step Guide for Transplanting White Wood-rush
Prepare the New Location
Clear the area of weeds and debris. Dig a hole that is twice as wide and the same depth as the root ball of the white wood-rush plant.
Check the Root Ball
Inspect the root ball for any damaged roots. Use pruning shears to trim any that appear unhealthy.
Transplant the Plant
Place the white wood-rush plant in the hole, ensuring that the top of the root ball is level with the ground. Fill the hole with soil, gently pressing it around the plant to remove air pockets.
Water the Plant
Thoroughly water the white wood-rush plant immediately after transplanting to help settle the soil around the roots.
How Do You Care For White Wood-rush After Transplanting?
Watering
Keep the soil around the white wood-rush consistently moist, but not soggy, for the first few weeks after transplanting to help establish strong roots.
Mulching
Apply a layer of mulch around the base of the white wood-rush to help retain moisture and suppress weeds.
Monitoring
Regularly check the plant for signs of stress, such as wilting or yellowing leaves, and adjust care accordingly.
Troubleshooting Common Issues with White Wood-rush Transplantation.
When is the best time to transplant white wood-rush?
The best time to transplant white wood-rush is from early spring to late spring or mid-fall to early winter.
How much space should be between transplanted white wood-rush plants?
Ensure 12-18 inches (30-45 cm) of space between each white wood-rush plant for optimal growth.
How do I prepare the soil for white wood-rush?
Loosen the soil to a depth of 8-10 inches (20-25 cm) and mix in compost for nutrients.
What should I do if white wood-rush wilts after transplanting?
Keep the soil consistently moist and avoid direct sunlight until white wood-rush establishes strong roots.
How can I prevent root damage when transplanting white wood-rush?
Carefully dig around white wood-rush to maintain a large root ball and handle gently to prevent damage.
Is it necessary to water white wood-rush immediately after transplanting?
Yes, water white wood-rush thoroughly right after transplanting to help settle the soil and reduce transplant shock.
What should I do if the leaves of white wood-rush turn yellow?
Yellow leaves can indicate overwatering. Ensure that the soil drains well to prevent root rot.
What type of mulch should be used around white wood-rush?
Apply organic mulch like leaf mold, wood chips, or straw to retain moisture and regulate soil temperature.
How do I know if white wood-rush is getting too much sunlight?
White wood-rush prefers partial shade. If the leaves start to burn or curl, provide more shade.
Can white wood-rush be divided during transplanting?
Yes, white wood-rush can be divided. Use a sharp spade to separate clumps and replant immediately.


