How to Transplant Hairy indigo?
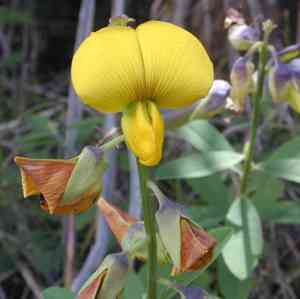
The most suitable period for relocating hairy indigo is as late winter's chill transitions into the mildness of spring, which aids in root development. Select a location that receives ample sunlight and drains effectively, and contemplate amending the soil if necessary to encourage vigorous growth.
What Preparations are Needed Before Transplanting Hairy Indigo?
What is the Ideal Time for Transplanting Hairy Indigo?
The best period for moving hairy indigo is from early spring's awakening until the season's full bloom. During this time, temperatures are mild, which helps roots establish and reduces transplant shock. Moving hairy indigo within this window ensures strong growth, as longer days offer ample sunlight, and cooler nights prevent stress. This smart timing aligns with nature's cycle, leading to a more vigorous and resilient hairy indigo.
How Much Space Should You Leave Between Hairy Indigo Plants?
When setting up a new spot for your hairy indigo, aim for approximately 18-24 inches (45-60 cm) between each plant. This provides sufficient room for them to thrive without competing for essential resources.
What is the Best Soil Mix for Hairy Indigo Transplanting?
Prepare a comfortable bed for your hairy indigo using well-draining soil, and incorporate a balanced, slow-release fertilizer to give them an excellent start. This plant isn't overly particular but benefits from a solid foundation.
Where Should You Relocate Your Hairy Indigo?
Choose a sunny location that receives direct sunlight for most of the day. Hairy indigo thrives in the sun, which promotes healthy and robust growth. Morning light with some afternoon shade is also acceptable.
What Equipments Should You Prepare Before Transplantation Hairy Indigo?
Gardening Gloves
To safeguard your hands while handling soil and hairy indigo.
Spade or Shovel
Used for excavating the hairy indigo from its initial position.
Trowel
For precise tasks or smaller relocation efforts.
Watering Can or Hose
To hydrate the plant before and after its relocation.
Wheelbarrow
For moving the hairy indigo if it is large.
Pruning Shears
To trim any dead or excessive growth prior to transplanting.
Measuring Tape
To assist in accurately spacing out the transplant holes.
Mulch
To help maintain soil moisture after transplanting.
Rooting Hormone (optional)
To stimulate root development following transplantation.
How Do You Remove Hairy Indigo from the Soil?
How Do You Remove Hairy Indigo from the Soil?
From Ground: Start by watering the hairy indigo to soften the surrounding soil. Next, create a circle with a diameter significantly wider than the plant's spread using a spade, ensuring ample distance to avoid damaging the root system. Carefully slide the spade beneath the root ball and gently lift the hairy indigo, striving to keep the root ball intact.From Pot: Water the hairy indigo thoroughly. Turn the pot on its side, tap the base, and carefully ease the plant out while supporting the root ball with your other hand. If the plant resists, roll the pot or press its sides to loosen the soil.From Seedling Tray: Water the seedlings and gently loosen the soil with a trowel. Carefully pull the hairy indigo seedlings out by their leaves, not stems, to prevent harm. If they are densely packed, use a spoon or a dibber to aid in their release.
Step-by-Step Guide for Transplanting Hairy Indigo
Preparation
Prepare the new site by loosening the soil with a spade to twice the width and the same depth as the hairy indigo's root ball.
Hole Digging
Use a trowel or shovel to excavate a hole that is as deep as the root ball and twice its width.
Plant Inspection
Examine the hairy indigo's roots, trimming any that are dead or damaged.
Positioning
Carefully place the hairy indigo into the hole, ensuring the top of the root ball is level with the surrounding soil surface.
Refilling
Gently backfill the hole with the excavated soil, patting it down around the hairy indigo without excessive compaction.
Watering
Water the hairy indigo generously to settle the soil and eliminate air pockets.
Mulching
Apply a layer of mulch around the hairy indigo to help retain moisture, being careful not to pile it against the stem or leaves.
Supporting (if necessary)
Provide stakes or other supports for the hairy indigo if it is a taller variety or to help it withstand strong winds.
How Do You Care For Hairy Indigo After Transplanting?
Monitoring
Keep a close watch on the hairy indigo, looking for signs of stress such as wilting or discolored foliage.
Watering Schedule
Maintain a consistent watering routine to keep the soil uniformly moist, especially during dry periods.
Weeding
Regularly remove weeds to prevent competition for nutrients and water.
Observing Growth
Monitor the hairy indigo's development, providing additional support structures if needed as it matures.
Pruning
Trim any dead or excessive growth to encourage healthy development and shape the hairy indigo.
Adjusting Mulch
Check and replenish the mulch layer to ensure it remains effective in moisture retention and weed prevention.
Troubleshooting Common Issues with Hairy Indigo Transplantation.
When is the best time to transplant hairy indigo?
Optimal transplanting for hairy indigo is during early to late spring, when temperatures are moderate.
How far apart should I space hairy indigo plants?
Give each hairy indigo about 18-24 inches (45-60 cm) of space to ensure proper growth and airflow.
Why are my hairy indigo seedlings wilting after transplant?
Wilting post-transplant could indicate shock. Keep soil moist and protect from strong sunlight until they recover.
Should I amend my soil before transplanting hairy indigo?
Yes, enrich your soil with compost to provide hairy indigo with a nutrient-rich environment for better establishment.
Can hairy indigo be transplanted on a cloudy day?
Yes, overcast conditions are ideal for transplanting hairy indigo as it reduces stress and prevents water loss.
How deep should the hole be for transplanting hairy indigo?
Dig a hole equally deep as the root ball but twice as wide, allowing roots to spread comfortably.
How do I know if hairy indigo is getting enough water after transplanting?
Soil should be kept consistently moist but not waterlogged. Check by feeling the soil a couple of inches deep.
What should I do if leaves turn yellow post-transplant?
Yellow leaves might indicate stress or overwatering. Ensure proper drainage and avoid water pooling around the base.
Can hairy indigo tolerate frost after transplanting?
Newly transplanted hairy indigo is sensitive to frost. Provide protection if unexpected frost is forecasted.
How can I protect my newly transplanted hairy indigo from pests?
Regularly inspect plants and use appropriate, non-invasive pest control methods to protect your hairy indigo during establishment.



