How to Transplant Bell heather?
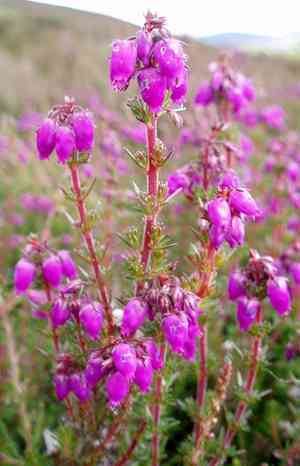
The optimal time for transplanting bell heather is during spring's awakening, which encourages vigorous development. Select a bright, adequately drained site to support its natural heathland characteristics. Carefully move the plant to preserve root structure, thereby improving its establishment and strength.
Preparations Required Before Relocating Bell Heather
Optimal Period for Bell Heather Relocation?
The prime time for moving bell heather is the spring season. During this period, mild temperatures and increased moisture create an ideal environment for root establishment. Transplanting at this time enhances the likelihood of vigorous growth, as weather conditions perfectly align with bell heather's requirements for a smooth transition and optimal root development. By selecting this favorable timeframe, bell heather benefits from spring's growth-promoting conditions, ensuring a strong start for the plant's future vitality.
Spacing Guidelines for Bell Heather Plants?
When transplanting bell heather, ensure a spacing of approximately 1-2 feet (30-60 cm) between each plant. This provides ample room for root expansion and unhindered growth, leading to healthier specimens.
Recommended Soil Blend for Bell Heather Transplanting?
Prepare the planting area with well-draining, slightly acidic soil for bell heather. Incorporate a generous amount of organic material, such as compost or aged manure, to serve as a foundational fertilizer that will nourish your plants.
Ideal Location for Bell Heather Relocation?
Select a site where your bell heather will receive full sunlight, as they thrive in bright conditions! However, light afternoon shade is acceptable. It may even be beneficial during the hottest summer months to prevent scorching of the plant.
Equipment Needed Before Transplanting Bell Heather
Gardening Gloves
To protect your hands from soil and potential skin irritants.
Trowel
For digging small holes, moving young plants, and removing weeds.
Spade or Shovel
Necessary for excavating larger holes and lifting plants from their original spots.
Gardening Fork
This tool assists in loosening, lifting, and turning over soil.
Bucket or Wheelbarrow
For transporting the bell heather plant and soil.
How to Extract Bell Heather from the Soil?
How to Extract Bell Heather from the Soil?
From Ground: Start by watering the bell heather plant to moisten the surrounding soil. This facilitates easier excavation. Using your spade or shovel, dig a wide circle around the plant to ensure the root ball remains intact. Insert the spade or shovel beneath the root ball and gently lift from the plant's base. From Pot: If removing bell heather from a pot, begin by watering the plant. Place one hand at the plant's base and invert the pot, tapping the bottom to release it. Be gentle and patient to avoid damaging the plant. From Seedling Tray: If your bell heather is in a seedling tray, moisten the soil first. Gently hold the seedling by its leaves (not the stem) and use a spoon or small tool to lift the seedling from underneath, ensuring to include as many roots as possible.
Step-by-Step Guide for Bell Heather Transplanting
Hole Preparation
Dig a hole in the chosen spot that is twice as wide and as deep as the bell heather's root ball. Improve the soil in the hole with organic compost if it is of poor quality.
Positioning
Place the bell heather in the hole with the top of the root ball at ground level. Backfill the hole with the previously excavated soil, ensuring the plant is neither too deep nor too shallow.
Thorough Watering
After planting, water the bell heather thoroughly to settle the soil around its roots.
Mulching
Apply a layer of mulch around the base of the bell heather. This helps to retain soil moisture and inhibit weed growth.
Post-Transplanting Care for Bell Heather
Mulching
Maintain a layer of mulch around the bell heather to help conserve water and suppress weeds. Replenish as needed.
Watering
Water the newly transplanted bell heather regularly, but be careful not to over-water. The soil should be kept moist, but not waterlogged. This encourages deep root growth. Do not allow the bell heather to dry out completely.
Monitoring
Observe the bell heather closely over the next few weeks for signs of stress. Yellowing leaves, wilting, or slow growth may indicate that your plant is not adapting well. If these signs appear, address potential issues such as over-watering, under-watering, or the need for pest control.
Addressing Common Bell Heather Transplantation Issues
What is the optimal time of year to transplant bell heather?
The best time to transplant bell heather is from spring through autumn. This period offers ideal conditions for root development.
What spacing should be maintained between bell heather plants during transplanting?
When transplanting bell heather, allow a generous space of approximately 1-2 feet (30-60cm). This ensures each plant has sufficient room to grow.
How to prepare the garden before transplanting bell heather?
Begin by digging holes about 1-2 feet apart. The holes should be deep enough to accommodate the bell heather's root ball. Amend the soil with compost if necessary.
Is immediate watering necessary after transplanting bell heather?
Yes, watering immediately after transplanting bell heather helps to settle the soil around its roots, reducing transplant shock and promoting quick recovery.
What if bell heather leaves turn yellow after transplantation?
Yellow leaves might indicate transplant shock. Ensure bell heather is adequately watered and not excessively exposed to sun. If the condition persists, consult a gardener.
How deep should bell heather be planted during transplantation?
The hole should be deep enough to cover the bell heather's root ball. It is crucial that the plant's crown (where roots and stem meet) is at surface level.
What if bell heather shows no growth after transplanting?
Do not be concerned! Bell heather may be prioritizing root development initially. Continue appropriate watering. If no growth occurs after 1-2 months, seek professional advice.
Should bell heather be fertilized after transplanting?
Fertilizing is not necessary immediately after transplanting; it can stress bell heather. Wait 2-4 weeks, then apply a balanced, slow-release fertilizer to encourage growth.
What light conditions does bell heather prefer after transplantation?
Bell heather thrives in bright, indirect sunlight. Too much direct sunlight could stress the plant. Choose a location where it receives ample diffused light.
Should I prune bell heather during the transplanting process?
Pruning is not required during transplanting. However, removing any wilted or dead parts helps bell heather direct its energy towards new growth and recovery.



