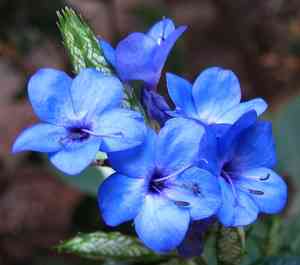
How to Transplant Blue-sage?
For Salvia azurea, the optimal period for relocation is during late spring or the onset of summer, which fosters vigorous development. Select locations with ample light and good air circulation, and when moving the plant, exercise care with its root system to facilitate a smooth adjustment.
What Preparations are Needed Before Transplanting Blue-sage?
What is the Ideal Time for Transplanting Blue-sage?
The perfect time to relocate blue-sage is from mid-spring to early summer. This period offers mild temperatures and consistent growth, crucial for blue-sage's roots to firmly establish in their new spot. Moving them during this gentle climate avoids harsh weather stress and aligns with blue-sage's natural growth surge, ensuring a smooth transition and vibrant blooms.
How Much Space Should You Leave Between Blue-sage Plants?
Allow blue-sage ample room to thrive. Position them approximately 2-4 feet (60-120 cm) apart. This provides sufficient space for growth without them competing for resources. Happy Planting!
What is the Best Soil Mix for Blue-sage Transplanting?
For blue-sage, rich, well-draining soil is essential! Improve your soil with compost or organic matter for enhanced fertility. Apply a layer of balanced, slow-release granular fertilizer to support their development. Create the optimal base for your planting endeavor!
Where Should You Relocate Your Blue-sage?
Blue-sage thrives in sunlight! Select a spot with full to partial sun exposure. Remember, at least 6 hours of morning sun will make them happiest. Keep in mind, more sunshine leads to more vibrant foliage!
What Equipments Should You Prepare Before Transplantation Blue-sage?
Gardening Gloves
To protect your hands from potential injury while working with soil and plants.
Trowel
For excavating the hole in the new site and moving the plant.
Watering Can
To hydrate the blue-sage before and after the move, ensuring consistent moisture levels.
Pruning Shears
To remove any damaged or diseased portions of the blue-sage prior to transplanting.
Wheelbarrow or Plant Dolly
For moving the blue-sage from its original spot to the new one with minimal root disturbance and physical effort.
How Do You Remove Blue-sage from the Soil?
How Do You Remove Blue-sage from the Soil?
From the Ground: Start by watering the blue-sage plant in its current location to thoroughly moisten the soil. Next, use a trowel or small shovel to dig a wide trench around the plant without harming its roots. Once a sufficient trench is made, gently slide the trowel beneath the plant's root ball and lift it from the ground.From a Pot: If your blue-sage is in a container, water it well, then invert the pot while supporting the soil surface with your hand, being careful not to crush the plant. Gently ease the plant out by tapping the bottom of the pot.From a Seedling Tray: For young plants in a seedling tray, lightly water the tray first. Gently press the soil under each seedling cell, lifting the young blue-sage along with its surrounding soil.
Step-by-Step Guide for Transplanting Blue-sage
Preparation
Ensure the intended planting hole is twice as wide and the same depth as the blue-sage's root ball. This allows the roots ample room to spread without constraint.
Positioning
Place the blue-sage in the hole, making sure the top of the root ball is level with the surrounding soil.
Backfilling
Return soil to the hole, gently firming it around the base of blue-sage. Avoid piling soil on top of the root ball as this can lead to stem rot.
Watering
Water your blue-sage deeply and thoroughly immediately after transplanting to help settle the soil and encourage root establishment.
How Do You Care For Blue-sage After Transplanting?
Care
Tend to your blue-sage by ensuring it receives adequate moisture, especially in the initial weeks post-transplantation. It's crucial to prevent it from drying out, but also to avoid waterlogging the soil. Proper hydration is vital for the plant to develop strong new roots.
Daily Check
Observe the condition of your blue-sage. Yellowing leaves or a lack of new growth after several weeks might indicate the plant hasn't adapted well to the transplant. Don't hesitate to consult a local nursery if this occurs.
Pruning
Pruning can be done to maintain its form, but excessive trimming can jeopardize blue-sage's ability to photosynthesize. Only prune what is necessary, and if possible, postpone significant shaping and aesthetic pruning until the plant has fully recovered.
Troubleshooting Common Issues with Blue-sage Transplantation.
When's the best period to transplant blue-sage?
The most opportune time to move blue-sage is during the period from late spring to early fall, approximately S2-S4.
What's the proper spacing for transplanting blue-sage?
Blue-sage should be positioned with sufficient room to grow. We recommend a spacing of 2-4 feet (61 - 122 cm) between each plant.
What should I check before transplanting blue-sage?
Confirm that blue-sage's rootball is firm and moist, but not waterlogged. The plant should appear healthy, without signs of disease or stress.
What step must I do first in transplanting blue-sage?
Begin by preparing the new location. The hole should be twice the size of blue-sage's rootball. This provides room for the roots to spread.
How do I put blue-sage in the ground correctly?
Place blue-sage in the hole, ensuring that the top of the rootball is level with the soil surface. Fill in around it, pressing lightly but firmly.
What aftercare does blue-sage need following transplanting?
Once transplanted, blue-sage requires consistent watering until it is well-established. For the first few weeks, monitor the plant closely for signs of distress.
What's the best method to water blue-sage after transplanting?
Water blue-sage deeply right after the transplant. Thereafter, keep the soil consistently moist but not waterlogged. Adjust watering based on weather conditions.
What signs show blue-sage is struggling after transplanting?
If leaves turn yellow or wilt, blue-sage may be stressed. Overwatering, under watering, or root damage during transplanting could be the cause.
How do I save blue-sage from transplant shock?
Minimize transplant shock by keeping the root system intact, avoiding exposure to temperature extremes, and keeping the soil adequately watered.
Why is blue-sage not blooming after being transplanted?
Blue-sage may take some time to adjust to its new environment. Ensure it's getting enough light, and the soil is well-drained and nutrient-rich.


