How to Transplant Cutleaf goosefoot?
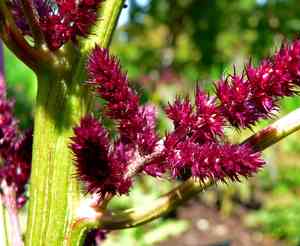
The most favorable time to transplant cutleaf goosefoot is in the revitalizing period of mid-to-late spring, which guarantees a welcoming establishment phase. To achieve successful adaptation, select a location that offers abundant light and soil that drains effectively. Careful manipulation aids in root development.
What Preparations are Needed Before Transplanting Cutleaf Goosefoot?
What is the Ideal Time for Transplanting Cutleaf Goosefoot?
The optimal period to relocate cutleaf goosefoot is during the latter part of spring's onset. This timeframe offers mild temperatures and consistent growing conditions, enabling cutleaf goosefoot to establish strongly before the peak of summer. Moving cutleaf goosefoot then aligns with its growth cycle, leveraging naturally damp soil and milder weather. This timing ensures a smooth transition for cutleaf goosefoot, promoting abundant growth while minimizing plant stress.
How Much Space Should You Leave Between Cutleaf Goosefoot Plants?
Hello, gardening enthusiast! For your cutleaf goosefoot's new spot, aim for ample room â approximately 6-12 inches (15-30 cm) apart. This spacing allows your cutleaf goosefoots plenty of area to thrive without competing for nutrients and sunlight.
What is the Best Soil Mix for Cutleaf Goosefoot Transplanting?
Let's prepare a comfortable bed for your cutleaf goosefoots! They will flourish in soil that drains well and is rich in organic material. Before planting, incorporate some compost or a balanced, slow-release fertilizer to provide your cutleaf goosefoots with a nourishing start.
Where Should You Relocate Your Cutleaf Goosefoot?
Sunlight is crucial for your cutleaf goosefoots! Locate a sunny area that receives full to partial sunlight. This generally means about 6 to 8 hours of daylight. Your cutleaf goosefoots will absorb the rays and reward you with vigorous growth.
What Equipments Should You Prepare Before Transplantation Cutleaf Goosefoot?
Gardening Gloves
To safeguard your hands while handling soil and the plant.
Shovel or Spade
For digging and moving soil during the transplanting process.
Watering Can or Hose
To hydrate cutleaf goosefoot before and after the transplantation procedure.
Garden Trowel
For managing smaller plants or working in confined areas.
Pruning Shears
To trim any dead or excess plant parts during transplanting.
Wheelbarrow or Bucket
To easily transport the plant and soil to the new location.
Stakes or Plant Supports
To help cutleaf goosefoot maintain its structure, if needed, post-transplanting.
How Do You Remove Cutleaf Goosefoot from the Soil?
How Do You Remove Cutleaf Goosefoot from the Soil?
From Ground: Start by thoroughly watering the cutleaf goosefoot to make the soil more pliable. Once the water has absorbed, use a shovel or spade to carefully dig around the plant, ensuring a wide perimeter to preserve the root ball. Gently slide the spade beneath the root ball and lift the plant from its spot.From Pot: Ensure cutleaf goosefoot is watered prior to beginning. Turn the pot on its side and hold the plant at its base. Gently tap the pot's edges and bottom to loosen the soil. Slide the plant out, taking care to support the soil and roots.From Seedling Tray: Moisten the soil in the tray for easier removal. Use a garden trowel or your fingers to gently extract the cutleaf goosefoot seedling from its cell, making sure to include as much of the root system and soil as possible.
Step-by-Step Guide for Transplanting Cutleaf Goosefoot
Pretransplant Watering
Water cutleaf goosefoot thoroughly before beginning the transplantation process to help reduce transplant shock and facilitate removal.
Digging New Hole
Excavate a hole at the new site that is twice as wide and the same depth as the root ball of cutleaf goosefoot.
Root Pruning
Inspect cutleaf goosefoot's root ball for any circling or girdling roots and trim them with pruning shears. This promotes healthy root development.
Placing the Plant
Carefully position cutleaf goosefoot into the center of the new hole. The top of the root ball should be level with the surrounding ground to encourage proper root expansion.
Refilling the Hole
Backfill the hole around cutleaf goosefoot with soil, gently tamping down to eliminate air pockets without overly compacting the soil, which could impede root growth.
Initial Watering
Water cutleaf goosefoot generously immediately after transplanting to settle the soil and hydrate the roots.
Staking
If cutleaf goosefoot is tall or top-heavy, provide stakes or plant supports to aid in stability until the roots become established.
How Do You Care For Cutleaf Goosefoot After Transplanting?
Mulching
Apply mulch around the base of cutleaf goosefoot to help retain moisture, regulate soil temperature, and reduce weed competition without covering the stem or trunk.
Monitoring Growth
Observe cutleaf goosefoot for signs of growth and health, such as new leaves or increased stem strength, which indicate successful transplantation.
Pruning
Prune any damaged or dead shoots and leaves to encourage cutleaf goosefoot to focus its energy on establishing new roots.
Continued Watering
Maintain consistent watering schedules to keep the soil around cutleaf goosefoot moist until the plant is well-established, then adjust to cutleaf goosefoot's normal watering needs.
Troubleshooting Common Issues with Cutleaf Goosefoot Transplantation.
When's the ideal time to transplant cutleaf goosefoot for best growth?
The perfect window for relocating cutleaf goosefoot is from mid to late spring, when the soil is warm.
How far apart should I space cutleaf goosefoot when transplanting?
Space cutleaf goosefoot ideally 6-12 inches (15-30 cm) apart to give them room to grow and thrive.
What's the best soil for transplanting cutleaf goosefoot?
Use well-draining soil with rich organic matter to ensure cutleaf goosefoot has a healthy start.
How deep should the hole be for cutleaf goosefoot transplants?
Dig a hole twice the size of the root ball, but no deeper than the plant's height.
Can I transplant cutleaf goosefoot on a hot, sunny day?
It's best to transplant cutleaf goosefoot on a cloudy day or in the evening to reduce stress from heat.
What's the proper watering technique post-transplant?
Water cutleaf goosefoot gently at the base immediately after transplanting, and keep the soil consistently moist.
How do I prepare cutleaf goosefoot's root ball for transplanting?
Carefully tease apart the roots if pot-bound, and trim any that are damaged or excessively long.
What are signs of transplant shock in cutleaf goosefoot?
Wilting, yellowing, or dropped leaves can indicate shock. Keep the soil moist and avoid fertilizers initially.
Should I apply fertilizer when transplanting cutleaf goosefoot?
Wait 4-6 weeks before fertilizing cutleaf goosefoot to prevent burning the roots and allow them to settle.
How do I protect newly transplanted cutleaf goosefoot from the cold?
Use a frost blanket or mulch to insulate cutleaf goosefoot if unexpected cold temperatures threaten after transplanting.



