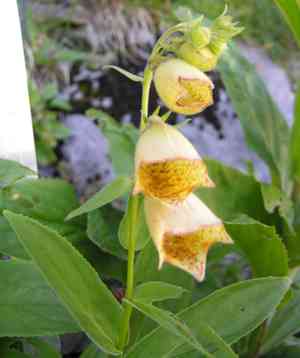
How to Transplant Yellow foxglove?
The optimal period for relocating yellow foxglove is during the peak of spring, providing temperate conditions conducive to root development. Select a location that receives filtered sunlight and possesses soil with good drainage. For yellow foxglove, verify the soil's fertility and ample room for expansion to facilitate its adjustment.
What Preparations are Needed Before Transplanting Yellow Foxglove?
What is the Ideal Time for Transplanting Yellow Foxglove?
The perfect time for moving yellow foxglove is during the lively middle to late spring. This period allows for optimal root development before the summer heat. Relocating yellow foxglove at this time ensures a smooth transition, utilizing mild temperatures for strong growth and reduced transplant stress, paving the way for vigorous perennial flourishing. Choose this season to give your yellow foxglove a welcoming start in its new home!
How Much Space Should You Leave Between Yellow Foxglove Plants?
When getting ready to transplant yellow foxglove, ensure you space the young plants approximately 1-2 feet (30-60 cm) apart. This spacing provides each plant ample room to grow and thrive!
What is the Best Soil Mix for Yellow Foxglove Transplanting?
For yellow foxglove, a well-draining soil rich in organic matter is ideal. Before transplanting, enrich the soil with a foundational fertilizer like compost or aged manure. This will supply essential nutrients and aid in moisture retention.
Where Should You Relocate Your Yellow Foxglove?
Choose a spot that receives partial shade, as yellow foxglove prefers protection from the afternoon sun. Monitor sunlight levels throughout the day to confirm your chosen location is suitable! Remember, a healthy beginning leads to a thriving plant.
What Equipments Should You Prepare Before Transplantation Yellow Foxglove?
Gardening Gloves
To safeguard your hands while working with the soil and plant material.
Shovel or Hand Trowel
To excavate the hole for yellow foxglove.
Garden Fork
To carefully lift the plant without harming its root system.
Watering Can
To hydrate the plant before and after its relocation.
Mulch
Helps maintain soil moisture post-transplanting.
Container or Bucket
To transport the plant from its initial spot to the new one.
How Do You Remove Yellow Foxglove from the Soil?
How Do You Remove Yellow Foxglove from the Soil?
From Ground: First, moisten the soil around the yellow foxglove plant by watering it, which makes digging easier and reduces root damage. Then, using your garden fork, carefully dig around the plant, keeping a safe distance from the base to protect the root ball. Gently work the fork beneath the root ball and lift the plant, ensuring as much of the root system remains intact as possible.From Pot: Water the yellow foxglove plant before beginning the process. Carefully tilt the pot sideways, and gently slide the plant out, being careful not to pull on the plant and damage the roots.From Seedling Tray: Water the yellow foxglove seedlings prior to removal. Push gently from the bottom, helping the plant emerge from the tray cell. Hold the seedling by its leaves, not its stems, to prevent damage. Minimize root disturbance as much as possible.
Step-by-Step Guide for Transplanting Yellow Foxglove
Digging
First, excavate a hole where you intend to transplant your yellow foxglove. The hole should be twice the size of the plant’s root system. Loosen the soil at the bottom and sides of the hole to allow roots to spread easily.
Placement
Position the yellow foxglove plant into the prepared hole. Ensure the plant is at the same depth it was in its original growing location. If planted too deeply, it can lead to rot.
Backfill
Refill the hole with the excavated topsoil, gently firming it around the plant's base. Avoid compacting the soil too tightly, which can hinder water and air penetration.
Watering
Thoroughly irrigate the newly transplanted plant using a watering can. Watering also aids in settling the soil around the roots.
Mulching
Apply a layer of mulch around the base of the yellow foxglove, ensuring it doesn't touch the stem directly. This helps in retaining soil moisture and suppressing weeds.
How Do You Care For Yellow Foxglove After Transplanting?
Watering
Water the yellow foxglove consistently, making sure the soil remains damp but not waterlogged. Pay attention during dry spells; additional irrigation might be necessary.
Pruning
Remove any dead or damaged foliage and stems after transplanting. This allows the yellow foxglove to focus energy on establishing new roots.
Monitoring
Closely observe the yellow foxglove for several weeks. Watch for any indications of diseases or pests, and address them promptly if detected.
The Right Temperature
Yellow foxglove thrives in cooler temperatures. Ensure it is shielded from intense heat, especially in the afternoon.
Fertilizing
Wait a few weeks after transplanting before beginning to fertilize. Applying it too soon could harm the plant's delicate new root system.
Troubleshooting Common Issues with Yellow Foxglove Transplantation.
When is the prime season to transplant yellow foxglove?
The optimal period to transplant yellow foxglove is during late summer to early fall (S2-S3). This allows the plant to establish its roots before the onset of winter's cool temperatures.
How much distance should I keep between each yellow foxglove I transplant?
For best growth, maintain a separation of 1-2 feet (30-60 cm) between each yellow foxglove plant. This ensures adequate room for the plants to develop without overcrowding.
What is the preferred soil for transplanting yellow foxglove?
Yellow foxglove favors well-draining, fertile soil. Ensure the soil pH is slightly acidic to neutral for the plant's optimal development.
How much sun does yellow foxglove need after transplantation?
Yellow foxglove thrives in partial to full sunlight. After transplanting, position the plant where it can receive at least 6 hours of sunlight daily for the best growth.
How do I water yellow foxglove after transplanting it?
Immediately after transplanting yellow foxglove, water thoroughly. Afterward, ensure the soil remains moist but not saturated. Excessive watering can lead to root rot.
What are the signs of transplant shock in yellow foxglove?
Transplant shock can appear as wilting, yellowing, or dropping leaves. This can be minimized through careful handling, sufficient watering, and gradual exposure to sunlight after transplanting.
How deep should the transplant hole be for yellow foxglove?
The transplant hole for yellow foxglove should be as deep as the root ball and twice its width. This provides ample space for the plant to establish itself.
Do I need to add fertilizer when transplanting yellow foxglove?
Yes, incorporating a slow-release, balanced fertilizer will enhance yellow foxglove growth. Mix it with the planting soil, adhering to package instructions for the correct amount.
Should I prune yellow foxglove before transplanting it?
Pruning is not essential before transplanting yellow foxglove. However, removing dead, damaged, or diseased parts can help the plant direct energy towards new growth post-transplant.
How to handle yellow foxglove while transplanting to prevent damage?
Handle yellow foxglove gently during the transplanting process. Remove the plant from its original container by inverting it and gently tapping the edge, rather than pulling the stems.


