How to Transplant Wood pink?
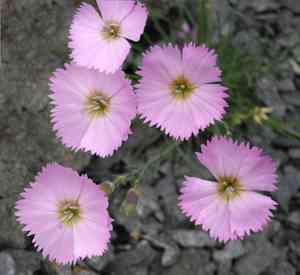
For Dianthus gratianopolitanus, the ideal period for relocation is during the transition from winter's end to spring's onset, generally spanning early spring to late spring. Select a location that receives ample sunlight and offers good drainage; if necessary, incorporating organic material into the soil can stimulate robust development. Handle with care, as the root system of your wood pink is delicate.
What Preparations are Needed Before Transplanting Wood Pink?
What is the Ideal Time for Transplanting Wood Pink?
The prime period for relocating wood pink extends from the initial emergence of buds through the peak of late spring flowering. Establishing wood pink in your garden during this window ensures its roots firmly anchor before the intense summer heat arrives. This timing allows wood pink to acclimate comfortably in mild weather, securing a strong foundation for lush growth and vibrant blooms. Your plants will reward you with robust development and abundant flowers, a testament to the perfect transplanting schedule.
How Much Space Should You Leave Between Wood Pink Plants?
When preparing to rehome wood pink, remember to provide ample room for development. A spacing of 12-18 inches (30-45 cm) between each wood pink will guarantee sufficient area for them to grow and flower beautifully.
What is the Best Soil Mix for Wood Pink Transplanting?
For wood pink, proper soil preparation is crucial for a thriving plant! Aim for soil that drains well and is rich in organic material. Before planting, incorporate a balanced, slow-release fertilizer to give your wood pink a nourishing start.
Where Should You Relocate Your Wood Pink?
Sunlight benefits wood pink. Choose a location where your plant will receive at least six hours of daily sun exposure. Partial shade is also acceptable, but ensure wood pink gets that glorious morning sun to flourish!
What Equipments Should You Prepare Before Transplantation Wood Pink?
Gardening Gloves
To safeguard your hands while handling soil and plants.
Shovel or Spade
For excavating the plant and creating a new planting site.
Garden Fork
To loosen the soil around the plant's roots and in the new spot.
Watering Can or Hose
To hydrate the plant before and after its relocation.
Wheelbarrow or Garden Cart
To move the plant and soil if necessary.
Pruners or Sharp Knife
To trim any damaged roots or foliage.
How Do You Remove Wood Pink from the Soil?
How Do You Remove Wood Pink from the Soil?
From Ground: First, moisten the soil around the wood pink. Then, dig a wide trench around the plant with a shovel or spade, ensuring the root ball remains intact. Carefully work the spade beneath the root ball to lift the plant from its original position.From Pot: Water the wood pink thoroughly in its current container. Gently tilt the pot and tap the bottom to loosen the root ball. Carefully slide the plant out, supporting the base of the stems with your hand.From Seedling Tray: Water the seedlings well. Use a garden fork or spoon to gently lift each wood pink seedling from its cell, making sure to retain as much soil around the roots as possible.
Step-by-Step Guide for Transplanting Wood Pink
Preparation
Ensure all tools are ready and the new site is prepared for transplanting, without needing soil or sunlight adjustments, as previously discussed. Gently water the wood pink if the soil is dry to facilitate easier removal and minimize root stress during the transplanting process.
Seedling/Rootball Removal
Depending on its origin, use the most suitable method from the removal section to extract the wood pink without harming its root system.
Hole Digging
Dig a hole in the chosen location that is twice the width of the wood pink's root ball and of the same depth to prevent it from settling too deeply, which could lead to stem base rot. Use a shovel or spade for this task.
Plant Placement
Carefully position the wood pink in the center of the hole. Adjust the plant so it stands upright and the top of the root ball is level with the surrounding soil surface.
Refilling the Hole
Gently, yet firmly, backfill the hole around the wood pink's root ball with soil. Use your hands or the back of a spade to press the soil down around the roots to eliminate air pockets without compacting it too tightly, which could hinder root growth. Water the wood pink generously to help settle the soil around the roots and hydrate the plant.
Support Installation
If the wood pink is large or the site is exposed to strong winds, you might need to stake the plant. Install the stake carefully without damaging the root ball and use soft ties to secure the wood pink.
Final Adjustment
Step back and assess if the wood pink is positioned as desired. Make any necessary adjustments carefully to avoid disturbing the roots. Finish by forming a small mound or 'well' around the plant to help retain water at the root zone.
Cleanup
Remove any leftover plant debris, tools, or unused soil from the area. Store your tools properly to ensure they remain in good condition for future use.
How Do You Care For Wood Pink After Transplanting?
Initial Watering
After transplanting, provide the wood pink with ample water to help reduce transplant shock and allow roots to recover and establish. Ensure the water penetrates deeply into the soil around the roots.
Monitoring
Observe the wood pink for the first few weeks, checking for signs of transplant stress, such as wilting or yellowing leaves, and address them promptly. This is crucial for its establishment and growth.
Mulching
Apply a layer of organic mulch around the wood pink to help maintain soil moisture, reduce temperature fluctuations, and suppress weeds. Be careful to leave some space around the stem to prevent moisture buildup.
Staking
If you've installed a stake, check it regularly to ensure it provides adequate support without harming the plant, and adjust ties as the wood pink grows.
Troubleshooting Common Issues with Wood Pink Transplantation.
What's the best time to transplant wood pink?
The ideal time for transplanting wood pink is from early to late spring, allowing ample time for establishment.
How far apart should wood pink be spaced when transplanting?
Space wood pink 12-18 inches (30-45 cm) apart to ensure they have sufficient room to grow and thrive.
Why is my wood pink wilting after transplanting?
Wilting may be due to shock. Keep the soil moist and provide shade for a few days to aid wood pink's recovery.
How deep should I plant wood pink during transplanting?
Plant wood pink so that the root ball is level with the soil surface, ensuring proper root establishment.
Can I transplant wood pink during summer or fall?
It's best to transplant wood pink in spring. Doing so in summer or fall may stress the plant and impact its survival.
What soil type is best for transplanting wood pink?
Use well-draining soil enriched with organic matter to ensure the health and growth of transplanted wood pink.
Should I prune wood pink before transplanting?
Light pruning can help reduce stress on wood pink during transplanting, but extensive pruning is not necessary.
How much water does wood pink need after transplanting?
Initially, water wood pink deeply to settle the soil around the roots, then maintain consistent moisture without overwatering.
When will wood pink start to bloom after transplanting?
With proper care, wood pink should bloom the following blooming season as it requires time to establish after transplanting.
My wood pink looks unhealthy after transplanting, what should I do?
Ensure wood pink isn't waterlogged, overexposed to sunlight, or undernourished. Adjust care as needed and monitor its recovery.



