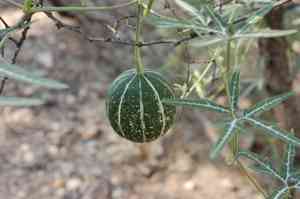
How to Transplant Fingerleaf gourd?
The ideal period for transplanting fingerleaf gourd is as temperatures rise, generally from the close of spring into the initial weeks of summer, which encourages vigorous development. Select locations that receive ample sunlight and have good drainage, and handle the root structure with care to facilitate a smooth establishment.
What Preparations are Needed Before Transplanting Fingerleaf Gourd?
What is the Ideal Time for Transplanting Fingerleaf Gourd?
The optimal period for relocating fingerleaf gourd is during late spring, extending into early summer. This timeframe ensures the ground has adequately warmed, fostering robust root development. By selecting this season, you provide fingerleaf gourd with the best conditions to acclimate and flourish, benefiting from longer days and rising temperatures. Moving fingerleaf gourd at this point sets the stage for a vigorous growth cycle, aligning with its natural development. Therefore, gently place fingerleaf gourd in its new spot as spring flowers fade, and observe its growth under the nurturing sun.
How Much Space Should You Leave Between Fingerleaf Gourd Plants?
When getting ready to plant fingerleaf gourd, make sure each plant has ample room to grow. Aim for a separation of approximately 36-48 inches (91-122 cm). This provides sufficient space for expansion and air circulation, which is crucial for healthy growth.
What is the Best Soil Mix for Fingerleaf Gourd Transplanting?
A well-draining soil, rich in organic matter, creates the perfect environment for fingerleaf gourd. Before transplanting, enrich your soil with compost or a balanced, slow-release fertilizer. Do this carefully to prevent root disturbance and establish a welcoming base for your plants.
Where Should You Relocate Your Fingerleaf Gourd?
Fingerleaf gourd thrives in a location that receives full sunlight. Choose a spot that gets at least 6-8 hours of direct sun daily. Plenty of light will keep your fingerleaf gourd healthy and productive, so consider the sun's daily path when selecting your site.
What Equipments Should You Prepare Before Transplantation Fingerleaf Gourd?
Gardening Gloves
To safeguard your hands while handling soil and fingerleaf gourd.
Shovel or Spade
For digging around and lifting the fingerleaf gourd from its current spot.
Garden Trowel
Used for smaller digging tasks and refining the planting hole.
Watering Can or Hose
To pre-moisten the fingerleaf gourd and maintain adequate soil moisture after transplant.
Garden Fork
To help loosen soil around the fingerleaf gourd without harming the roots.
Wheelbarrow or Garden Cart
To easily move the fingerleaf gourd and accompanying soil.
Secateurs or Pruning Shears
To trim any damaged roots or foliage prior to transplanting.
Measuring Tape
To ensure correct spacing between transplanted plants in the ground.
How Do You Remove Fingerleaf Gourd from the Soil?
How Do You Remove Fingerleaf Gourd from the Soil?
From Ground: Thoroughly water the fingerleaf gourd to make the surrounding soil moist and pliable. Use a shovel or garden fork to dig a wide circle around the plant, taking care not to disturb or harm the roots. Gently work the tool beneath the root ball, and lift the plant from the ground, retaining as much soil around the roots as possible.From Pot: Start by watering the fingerleaf gourd well so the root ball stays intact when removed. Invert the pot and tap the bottom to loosen the plant. Support the fingerleaf gourd by its base and carefully ease it out of the pot. If the plant is firmly lodged, you might need to cut the pot to avoid damaging the plant.From Seedling Tray: Water the seedlings to keep the root ball intact during removal. Use a trowel or your fingers to gently lift each fingerleaf gourd from its cell, being careful not to pull on the plant and damage the roots or stem.
Step-by-Step Guide for Transplanting Fingerleaf Gourd
Transplant Timing
Schedule the relocation of fingerleaf gourd either in the early morning or late afternoon to protect the plant from intense sun exposure during the day's hottest hours.
Hole Preparation
Excavate a hole twice as wide and as deep as the fingerleaf gourd's existing root system to ensure ample space for root expansion without constriction.
Plant Positioning
Gently place the fingerleaf gourd in the hole, ensuring it stands upright. The top of the root ball should be level with the ground surface.
Refilling Hole
Carefully backfill the hole with soil, gently firming it around the fingerleaf gourd to eliminate air pockets. Confirm that the fingerleaf gourd is stable and erect.
Watering
Immediately after planting, thoroughly water the fingerleaf gourd to settle the soil and hydrate the roots.
Follow-Up Care
Monitor the plant for any signs of stress and provide necessary care as needed.
How Do You Care For Fingerleaf Gourd After Transplanting?
Checking
Regularly inspect the fingerleaf gourd for indications of wilting or distress, which may require immediate attention.
Stabilizing
Provide support structures if the fingerleaf gourd appears unstable or top-heavy in its new location.
Adjust Watering
Carefully monitor soil moisture. While initial watering after transplant is crucial, prevent waterlogging by allowing the topsoil to dry slightly between watering sessions.
Pruning
Trim any broken or damaged leaves or stems to direct the fingerleaf gourd's energy towards recovery and new growth.
Mulching
Apply a layer of mulch around the fingerleaf gourd to retain moisture, regulate soil temperature, and suppress weed growth.
Troubleshooting Common Issues with Fingerleaf Gourd Transplantation.
When's the best time to transplant fingerleaf gourd for optimal growth?
The ideal period is late spring to early summer when the soil has warmed sufficiently.
What's the ideal distance for planting fingerleaf gourd seedlings apart?
Aim for ample space between plants, roughly 36-48 inches (91-122 cm) for healthy development.
How do I prepare the soil for transplanting fingerleaf gourd?
Enrich the soil with well-rotted compost or manure to ensure nutrient-rich and well-draining conditions.
What's the correct depth for planting fingerleaf gourd seedlings?
Position the seedlings so the base is at the same level it grew in the pot, avoiding excessive burial.
Why is my fingerleaf gourd wilting after transplant?
Wilting may indicate shock; ensure consistent watering but avoid overwatering to allow roots to recover.
How much sunlight does fingerleaf gourd need after transplanting?
Fingerleaf gourd requires full sunlight, so select a spot that receives at least 6 to 8 hours of direct sun daily.
Should I fertilize fingerleaf gourd right after transplanting?
Wait 3-4 weeks before applying a balanced fertilizer to prevent burning the roots of the newly transplanted plants.
How do I protect fingerleaf gourd from pests after transplanting?
Regularly inspect for pests, use appropriate insecticides if needed, and encourage beneficial insects by planting diverse flora.
Can I transplant fingerleaf gourd in containers?
Yes, but ensure pots are large enough for root development and have adequate drainage holes.
How often should I water fingerleaf gourd after transplanting?
Water thoroughly after transplant, then maintain consistent moisture, especially during dry periods, without waterlogging the soil.


