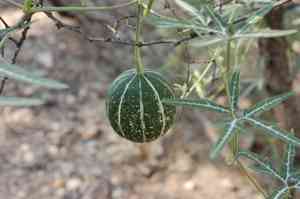
How to Propagate Fingerleaf gourd?
Fingerleaf gourd flourishes when planted in properly prepared, well-draining earth enriched with compost or mature manure. To ensure successful propagation, seeds should be sown at a depth allowing their initial leaves to quickly emerge, typically twice the seed's width. Sufficient distance between seeds is crucial, as fingerleaf gourd needs space for development. Careful irrigation is necessary to sustain soil dampness without creating waterlogging, which can harm seed sprouting. Providing warmth and illumination during the initial stages is vital for strong seedling growth.
Optimal Propagation Period for Fingerleaf Gourd
Propagation Type
Sowing
Propagation Season
Spring
Tools for Propagating Fingerleaf Gourd
Seed trays
Seed trays are crucial for initiating fingerleaf gourd's seeds indoors or in controlled settings. These trays facilitate uniform temperature and moisture distribution, essential for fingerleaf gourd germination. Their segmented design aids in seedling organization, simplifying management and eventual transplanting without root damage.
Potting mix
A premium potting mix offers the vital nutrients and aeration needed for successful germination and growth of fingerleaf gourd seeds. For fingerleaf gourd, a well-draining, nutrient-rich mix can significantly boost initial growth by preventing waterlogging and supplying ample nourishment.
Watering can with a fine rose
Gentle water delivery is key to avoid disturbing or washing away small fingerleaf gourd seeds. A watering can with a fine rose attachment ensures a soft, even spray that moistens the soil without causing erosion or seed displacement.
Heat mat
A heat mat promotes successful germination by maintaining a steady soil temperature, which is vital for fingerleaf gourd due to its temperature sensitivity. This tool helps create an ideal growing environment, especially in cooler climates or seasons.
Grow lights
If propagating indoors, grow lights provide regulated light exposure, necessary for fingerleaf gourd's seedlings to develop robust, healthy foliage. These specialized lights mimic sunlight, encouraging photosynthesis and promoting stronger plant growth, crucial when natural light is insufficient.
How to Propagate Fingerleaf Gourd?
Propagation Type
Easy
Post-Propagation Care for Fingerleaf Gourd
How to Care for Your Newly Propagated Fingerleaf Gourd?
After propagation, ensure fingerleaf gourd receives consistent moisture, but avoid excessive watering to prevent root issues. Fingerleaf gourd requires full sun exposure and regular checks for pests and diseases. A balanced, slow-release fertilizer may be beneficial once the first true leaves appear, supporting growth and fruiting. Monitor plant development and adjust care as needed for healthy growth and abundant fruit.
Common Propagation Errors for Fingerleaf Gourd
Overwatering
Overwatering can cause root rot in fingerleaf gourd, a plant suited to dry conditions. Excess soil moisture disrupts oxygen supply to the roots, leading to a weakened or dead plant.
Deep planting
Planting fingerleaf gourd seeds too deep can impede germination. These seeds need light to germinate and should be sown shallowly for successful sprouting.
Using cold soil
Using cold soil for planting fingerleaf gourd seeds can delay germination. This plant is sensitive to cold and prefers warm soil to initiate the germination process.
Neglecting acclimatization
Failing to acclimatize fingerleaf gourd seedlings before outdoor transplanting can result in transplant shock. This may lead to stunted growth or death as the plant struggles to adapt to new conditions.
Tips for Propagating Fingerleaf Gourd
Well-draining soil
Utilize a well-draining soil mix for fingerleaf gourd to prevent water retention around the roots. A blend of sand, perlite, and compost ensures proper drainage and nutrient delivery.
Sow seeds shallowly
Sow fingerleaf gourd seeds shallowly, no more than a quarter inch deep, to provide the necessary light exposure for optimal germination.
Warm environment
Provide a warm environment for germinating fingerleaf gourd seeds. A heat mat can help maintain a consistent soil temperature, boosting germination rates.
Gradual acclimatization
Gradually acclimatize fingerleaf gourd seedlings when moving them from indoors to outdoor conditions. Start with brief outdoor periods in a sheltered spot, progressively increasing exposure over a week.


