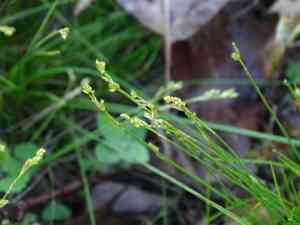
How to Transplant Bristleleaf sedge?
For bristleleaf sedge, the comfortable temperatures and consistent development environment of late spring and summer provide a perfect period for relocation. Utilize this timeframe for its root system to become established in permeable soil that is rich in organic compounds. If bristleleaf sedge is carefully moved to its new spot, it flourishes, adapting to the area with its robust characteristics.
What Preparations are Needed Before Transplanting Bristleleaf Sedge?
What is the Ideal Time for Transplanting Bristleleaf Sedge?
The best time to move bristleleaf sedge is during late spring or early summer. This period aligns with bristleleaf sedge's active growth, ensuring a smooth transition and strong root development in its new spot. Relocating bristleleaf sedge during this warm, rejuvenating window offers optimal weather conditions. This helps minimize transplant shock, speeds up recovery, and encourages vigorous growth. Moving bristleleaf sedge to a new home during these seasons harmonizes with nature's cycles, boosting your gardening success.
How Much Space Should You Leave Between Bristleleaf Sedge Plants?
When transplanting bristleleaf sedge, ensure each plant is spaced approximately 1 foot (30.48 cm) apart. This spacing provides ample room for them to expand and thrive without excessive competition for resources.
What is the Best Soil Mix for Bristleleaf Sedge Transplanting?
For bristleleaf sedge, well-draining soil is ideal. To prepare the ground, incorporate a balanced fertilizer into the soil. If uncertain, choose a fertilizer labeled suitable for perennial plants.
Where Should You Relocate Your Bristleleaf Sedge?
Location is crucial for bristleleaf sedge. It thrives best in full or partial sunlight. This means it should be planted where it receives at least 6 hours of direct sun daily. However, it can also tolerate some partial shade.
What Equipments Should You Prepare Before Transplantation Bristleleaf Sedge?
Gardening Gloves
To protect your hands while handling soil and plants.
Gardening Shovel/Spade
For carefully digging up and moving the plant and its root system.
Hand Trowel
Useful for digging a small, precise hole suitable for your bristleleaf sedge's size.
Garden Hose or Watering Can
To evenly water the bristleleaf sedge plant both before and after its relocation.
Compost
This will be used to enrich the soil and supply nutrients to the bristleleaf sedge plant.
Mulch
To safeguard the bristleleaf sedge plant's roots post-transplant and maintain soil moisture.
How Do You Remove Bristleleaf Sedge from the Soil?
How Do You Remove Bristleleaf Sedge from the Soil?
From Ground: Start by watering the bristleleaf sedge plant to moisten the soil, making removal easier. Then, carefully dig a wide trench around the plant with a shovel or spade, ensuring the root ball remains intact. Gradually work your spade beneath the root ball to lift the plant from its current spot without damage.From Pot: First, water the bristleleaf sedge plant in its pot to dampen the soil. Then, turn the pot on its side, gently hold the plant by its stems or leaves, tap the bottom of the container, and slide it out. Carefully inspect the roots and gently untangle them if needed before transplanting.From Seedling Tray: Water the bristleleaf sedge seedlings to soften the soil. Using a hand tool or wooden stick, gently loosen the soil around the seedling's base. Carefully lift the seedling by its leaves, not the stem, ensuring a good amount of soil remains attached to the roots.
Step-by-Step Guide for Transplanting Bristleleaf Sedge
Soil Prep
Add a layer of compost to enrich your garden soil, providing nutrients for your bristleleaf sedge plant.
Digging
Using your hand trowel, dig a hole twice as wide and the same depth as the bristleleaf sedge plant's root ball.
Placing the Plant
Position the bristleleaf sedge plant in the center of the hole, ensuring it stands upright. The top of the plant's root ball should be level with or slightly above the surrounding soil.
Backfilling
Carefully fill in the hole, firming the soil around the plant as you go. Avoid burying the bristleleaf sedge plant deeper than it was in its previous location.
Watering
Gently water around the base of the bristleleaf sedge plant, allowing the soil to settle around the root ball.
Mulching
Apply a layer of mulch around the bristleleaf sedge plant to help retain moisture, prevent weed competition, and protect the roots.
How Do You Care For Bristleleaf Sedge After Transplanting?
Watering
Water the bristleleaf sedge plant regularly after transplanting. While excessive watering can cause root rot, insufficient watering can stress the plant. Insert your finger into the soil around the plant; if it feels dry about an inch deep, it's time to water.
Checking
Monitor your bristleleaf sedge plant for any signs of disease or pests. It's normal for the plant to show some stress, such as yellow leaves, but if it begins to wilt or shed many leaves, it may require more attention.
Re-mulching
Replenish the mulch layer as needed to continue protecting the bristleleaf sedge plant's roots and maintain soil moisture.
Pruning
Remove any yellowing or dead leaves you observe. This will not only improve your bristleleaf sedge plant's appearance but also help it focus on new growth.
Troubleshooting Common Issues with Bristleleaf Sedge Transplantation.
When is the best time to transplant bristleleaf sedge?
The optimal period for transplanting bristleleaf sedge is between the third and sixth seasons. This corresponds to late summer through early spring.
How much spacing should I leave when transplanting bristleleaf sedge?
You should aim for approximately 1 foot (30 cm) of space between each bristleleaf sedge plant. This will ensure healthy development.
What should I do if the bristleleaf sedge looks wilted after transplanting?
Do not be concerned if bristleleaf sedge appears wilted after transplanting â this is typical. Keep the soil adequately moist and provide indirect light. Its condition should improve within a week or two.
What kind of soil does bristleleaf sedge prefer for a successful transplant?
Bristleleaf sedge thrives in well-drained soil, so ensure it is transplanted into soil that is neither excessively wet nor dry. This promotes proper growth and development.
What if there are yellow leaves on my bristleleaf sedge after transplanting?
Yellow leaves could indicate transplant shock. It might also suggest overwatering. Allow it to adapt to its new environment, but if the issue persists, review your watering schedule.
Should I prune bristleleaf sedge before or after transplanting?
Trimming bristleleaf sedge before transplanting can lessen stress on the plant. However, avoid heavy pruning until it has adjusted to its new location.
What is the optimal depth to plant bristleleaf sedge during transplantation?
The hole for bristleleaf sedge should be deep enough to fully cover the roots, typically about the same depth as the root ball. This is usually around 6 inches (15 cm).
Can I transplant bristleleaf sedge in full sun?
Bristleleaf sedge prefers partial to full shade for optimal health and vigor. If it must be in a sunny spot, consider providing shade during the hottest parts of the day.
Do I need to fertilize bristleleaf sedge after transplanting?
You can, but it's not immediately necessary. After a few weeks, once bristleleaf sedge has settled into its new location, a light application of balanced fertilizer will encourage growth.
What if bristleleaf sedge shows no growth after transplanting?
Patience is essential; bristleleaf sedge may take time to establish in its new spot. If you've provided proper care but see no improvement after several weeks, consult a local nursery or extension service.


