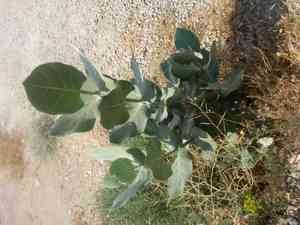
How to Transplant Apple of Sodom?
The ideal period for relocating apple of Sodom is when temperatures rise, specifically from late spring through midsummer. Select locations that receive ample sunlight and possess soil that drains effectively. Recommendation: Gradually introduce apple of Sodom to its new environment to avoid stress, facilitating a seamless move to its permanent site.
What Preparations are Needed Before Transplanting Apple Of Sodom?
What is the Ideal Time for Transplanting Apple Of Sodom?
The period from late spring to early summer offers the best conditions for apple of Sodom to establish roots. This mild season promotes optimal root development, significantly boosting apple of Sodom's vigor. Moving apple of Sodom during this time leverages longer days and moderate temperatures, encouraging strong growth. This carefully chosen transplant window aligns perfectly with the plant's natural growth cycle, ensuring a healthy start in its new location.
How Much Space Should You Leave Between Apple Of Sodom Plants?
Proper spacing is crucial when relocating apple of Sodom. You need to provide ample room for your plants to develop robustly. A general guideline is to space them approximately 6-8 feet (1.8-2.4 meters) apart. This ensures they have sufficient area to flourish!
What is the Best Soil Mix for Apple Of Sodom Transplanting?
Before you begin transplanting apple of Sodom, prepare your soil with a sandy or gritty composition and incorporate organic matter like compost or well-rotted manure. This will create an ideal foundation for apple of Sodom to thrive.
Where Should You Relocate Your Apple Of Sodom?
When selecting a site to transplant your apple of Sodom, choose a spot that receives full sun exposure. Apple of Sodom flourishes when bathed in sunlight!
What Equipments Should You Prepare Before Transplantation Apple Of Sodom?
Gardening Gloves
To protect your hands from potential irritants in the soil or on the apple of Sodom plant.
Shovel or Garden Spade
To excavate the plant from its current spot or to create a hole in the new location.
Pruning Shears
To trim any dead or damaged roots, stems, or leaves from the apple of Sodom plant during the relocation process.
Hose or Watering Can
To moisten the plant's original and new soil to minimize root stress.
Trowel
Useful for extracting smaller apple of Sodom plants from containers or seedling trays.
Wheelbarrow or Plant Trolley
To move the apple of Sodom plant from its initial position to the transplant site, especially if the plant has grown quite large.
How Do You Remove Apple Of Sodom from the Soil?
How Do You Remove Apple Of Sodom from the Soil?
From Ground: To extract an apple of Sodom plant from the ground, begin by watering the plant thoroughly to dampen the soil around its roots. Once watered, use your shovel or spade to carefully dig around the plant's perimeter, ensuring to dig deep enough to avoid harming the root system. Gradually work your shovel/spade beneath the root ball and gently lift the plant from the ground. Avoid pulling or tugging, which could damage the roots.From Pot: For a potted apple of Sodom plant, water it one day before transplanting to facilitate easier removal. To remove the plant, tilt the pot sideways and gently tap it, while supporting the plant at its base with your other hand. The apple of Sodom plant should slide out effortlessly.From Seedling Tray: For smaller apple of Sodom plants in a seedling tray, water the tray first. Use a trowel or your fingers to carefully loosen the soil around the seedling. Once loosened, hold the seedling by its leaves (not the stem or roots) and delicately lift it from the tray.
Step-by-Step Guide for Transplanting Apple Of Sodom
Preparation
Use your shovel or spade to dig a hole at the transplant site. The hole should be twice as wide and as deep as the apple of Sodom's root ball.
Examine
Inspect the roots of the apple of Sodom plant and use your pruning shears to remove any roots that are dead, diseased, or damaged.
Placement
Carefully position the apple of Sodom plant in the center of the hole, ensuring that the top of the root ball is level with the surrounding soil surface.
Backfill
Refill the hole with the excavated soil, gently tamping it around the root ball. Avoid compacting the soil too firmly, as this can hinder root growth into the surrounding soil.
Watering
Thoroughly water the transplanted area to settle the soil and eliminate any air pockets.
How Do You Care For Apple Of Sodom After Transplanting?
Watering
During the initial weeks following transplantation, ensure the soil around the apple of Sodom plant remains consistently moist but not waterlogged, to aid in the development of strong roots.
Pruning
Remove any damaged or dead foliage after the transplant to promote better growth and overall health of the apple of Sodom.
Pest Control
Monitor closely for pests and diseases, as apple of Sodom will be more vulnerable after transplantation. If observed, opt for an environmentally friendly pest or disease management approach.
Monitoring
Regularly observe the plant's growth and any changes in leaf color, which could signal a need for different care strategies or potential issues.
Troubleshooting Common Issues with Apple Of Sodom Transplantation.
When's the best time to transplant apple of Sodom?
You should aim to transplant apple of Sodom during the period between mid-spring and early summer.
How much space should be provided between each apple of Sodom while transplanting?
For successful development, ensure each apple of Sodom has 6 to 8 feet (approximately 1.8 to 2.4 meters) of space when transplanting.
How do I prepare the soil before transplanting apple of Sodom?
Ensure the soil drains well. Turning over the soil and adding compost can boost nutrient content, which benefits apple of Sodom.
What depth should I plant apple of Sodom when transplanting?
When transplanting apple of Sodom, dig a hole that's twice as wide and the same depth as the plant's root system. Allow the top roots to sit at ground level.
How should I water apple of Sodom after transplanting?
Water apple of Sodom immediately after transplanting, ensuring the soil is thoroughly saturated. Continue to water regularly, but avoid over-watering as it may lead to root rot.
Do I need to mulch around apple of Sodom after transplanting?
Yes, applying about 2 inches (5 cm) of mulch helps retain moisture, control weeds, and stabilize soil temperature. Avoid piling mulch against the stem; instead, create a ring.
How can I ensure successful rooting for apple of Sodom after transplanting?
Ensure the plant receives adequate water and sunlight, and shield it from strong winds or disturbances to allow it to establish roots during the initial weeks.
Can I transplant apple of Sodom in a pot?
Yes, apple of Sodom can be transplanted into a pot. Make sure the pot is sufficiently large to accommodate growth and has proper drainage holes.
How do I deal with transplant shock in apple of Sodom?
Reduce transplant shock by watering consistently, providing shade if necessary, removing damaged leaves, and minimizing root disturbance during the transplanting process.
What signs should I look for to understand if apple of Sodom is growing properly after transplant?
Healthy new growth, such as emerging leaves or flowers, is a positive indicator. Conversely, yellowing leaves or stunted growth can signal a problem.


