How to Transplant Ground plum?
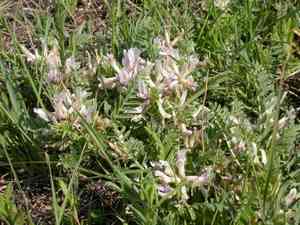
The most favorable time to transplant ground plum is as temperatures gradually rise from late spring into early summer, allowing sufficient duration for roots to settle. Select a location bathed in sunlight with soil that drains effectively, and if necessary, aerate the adjacent ground to foster development.
What Preparations are Needed Before Transplanting Ground Plum?
What is the Ideal Time for Transplanting Ground Plum?
The optimal period for relocating ground plum is when late spring's warmth transitions into the gentle start of early summer. This timeframe allows the plant ample opportunity to develop robust roots prior to the colder months. Furthermore, moving ground plum during this season leverages the steadily rising temperatures and extended daylight, which foster vigorous growth. By selecting this prime window, you enhance ground plum's prospects for resilience and vitality, ensuring a thriving growth cycle ahead.
How Much Space Should You Leave Between Ground Plum Plants?
Hello, gardening enthusiast! When preparing to rehome your ground plum, remember to provide them with adequate personal space. Aim for approximately 12-18 inches (30-46 cm) between plants. This spacing ensures each ground plum can expand its root system and flourish without feeling constrained!
What is the Best Soil Mix for Ground Plum Transplanting?
For your ground plum, consider preparing a comfortable bed with soil that drains effectively. They prefer a rich, loamy, or sandy environment. Before planting, enrich the site with a balanced slow-release fertilizer. These minor preparatory steps will significantly contribute to a happy, healthy ground plum!
Where Should You Relocate Your Ground Plum?
Sunlight is beneficial for ground plum! Identify a location where your plant companions can soak in full sunlight for most of the day. This sunny exposure will help your ground plum grow strong and produce beautiful blooms. A well-illuminated area is crucial for their new beginning!
What Equipments Should You Prepare Before Transplantation Ground Plum?
Gardening Gloves
To safeguard your hands when handling soil and the plant.
Shovel or Spade
For excavating and carefully lifting the plant.
Garden Trowel
Useful for smaller digging tasks and refining the planting hole.
Watering Can or Hose
To hydrate the plant before and after its relocation.
Garden Fork
To loosen the soil and assist with root separation if necessary.
Wheelbarrow or Plant Dolly
For moving the plant with minimal disruption.
Pruning Shears
To trim any damaged roots or foliage.
Measuring Tape
To accurately space out the new planting site.
Mulch
To apply around the plant's base after transplanting for moisture retention.
How Do You Remove Ground Plum from the Soil?
How Do You Remove Ground Plum from the Soil?
From Pot: Gently tap the pot's sides to loosen the soil. Incline the pot and carefully slide ground plum out, supporting the plant's base. Avoid pulling on the stem.From Seedling Tray: Water the tray to facilitate removal. Use a garden trowel or your fingers to carefully lift ground plum from the cell without disturbing the root ball.From Ground: Thoroughly water ground plum to moisten the soil. Use a shovel or spade to dig around and gently lift ground plum, ensuring a substantial amount of soil remains around its roots.
Step-by-Step Guide for Transplanting Ground Plum
Preparation
Ensure the new planting location is free of weeds and debris. Measure the area to accommodate ground plum's root ball.
Digging the Hole
Excavate a hole that is twice as wide and the same depth as ground plum's root ball. Loosen the soil at the bottom of the hole with a garden fork.
Placing the Plant
Carefully position ground plum in the hole, making sure the top of the root ball is level with the soil surface. Adjust the depth if needed.
Backfilling
Fill the hole around ground plum's roots with soil, gently tamping down to remove air pockets. Water thoroughly once the hole is half-filled, then complete the backfilling.
Watering
After transplanting, water ground plum generously to settle the soil and hydrate the roots.
Mulching
Apply a layer of mulch around ground plum's base to help retain moisture and regulate soil temperature.
How Do You Care For Ground Plum After Transplanting?
Monitoring
Periodically check ground plum to ensure the soil stays moist and to identify any signs of stress.
Supports
If ground plum appears to be leaning or unstable, gently stake it for support until its roots become established.
Adjustments
Observe ground plum at various times of the day to confirm it is adapting well to its new surroundings.
Pruning
Remove any dead or damaged foliage to help ground plum concentrate on developing new growth.
Troubleshooting Common Issues with Ground Plum Transplantation.
Why is my newly transplanted ground plum wilting?
Wilting after relocating ground plum often results from root disturbance. Ensure careful handling and sufficient water post-transplant for recovery.
What's the best time to transplant ground plum for successful establishment?
The ideal period to transplant ground plum is during the transition from late spring to early summer, ensuring warm soil and ample growing season remaining.
How far apart should I space multiple ground plum when transplanting?
When transplanting ground plum, aim for a spacing of approximately 12-18 inches (30-46 cm) to allow adequate room for growth and air circulation.
How deep should I plant ground plum when transplanting?
Plant ground plum at the identical depth it was in its previous container or location to prevent stem rot or root desiccation.
Can I transplant ground plum during the hottest part of the year?
It is advisable to avoid transplanting ground plum during extreme heat. Early in the growing season is optimal, to prevent stress and dehydration.
Why are the leaves of my transplanted ground plum turning yellow?
Yellowing leaves post-transplant may indicate water stress, either excessive or insufficient, or a root system that has not yet established.
What type of soil is ideal for transplanting ground plum?
Transplant ground plum into well-draining soil, rich in organic matter, to encourage robust root development and overall plant health.
Should I fertilize ground plum immediately after transplanting?
Delay fertilizing ground plum until it is established, typically a few weeks post-transplant, to avoid damaging fragile roots with excess nutrients.
How much water does ground plum need right after transplanting?
Provide ground plum with consistent moisture but prevent waterlogging. Water deeply to encourage roots to extend into the surrounding soil.
Can I transplant ground plum in poor lighting conditions?
For successful establishment, transplant ground plum where it will receive full sun to partial shade, matching the plant's light requirements for optimal growth.



