How to Transplant Henequen?
For henequen, the prime period for transplanting extends from early spring to the beginning of summer, facilitating optimal root establishment. Select a well-lit location with effective drainage, and prepare the earth to accommodate nascent roots.
What Preparations are Needed Before Transplanting Henequen?
What is the Ideal Time for Transplanting Henequen?
The best period for moving henequen is during its peak growth phase, typically from late spring to early summer. Planting henequen when the ground is warm and days are longer promotes strong root development and a smooth adjustment. This timing not only encourages vigorous growth but also leverages natural conditions, ensuring a successful start for henequen.
How Much Space Should You Leave Between Henequen Plants?
When preparing your henequen's new home, sufficient space is crucial for its development. Position them 6-8 feet (1.8-2.4 meters) apart. This spacing guarantees each henequen has ample room to thrive without competing for nutrients or sunlight.
What is the Best Soil Mix for Henequen Transplanting?
Henequen prefers a well-draining soil environment! Incorporate some sandy or rocky material into your garden bed to replicate its natural habitat. Before planting, enrich the soil with a balanced slow-release fertilizer to give your henequen a robust beginning.
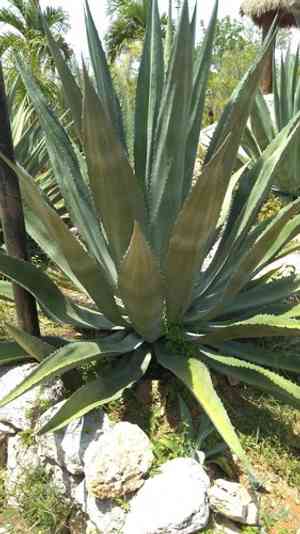
Where Should You Relocate Your Henequen?
Select a sunny location in your garden for henequen, as they flourish with ample sun exposure. This means at least 6 hours of direct sunlight daily! An area receiving abundant morning light is perfect, setting your henequen up for a productive, photosynthetic day.
What Equipments Should You Prepare Before Transplantation Henequen?
Gardening Gloves
To safeguard your hands while handling soil and the plant.
Shovel or Spade
For excavating the hole where henequen will be replanted.
Hand Trowel
For more precise digging and to manage the plant when removing it from containers or trays.
Watering Can or Hose
To hydrate the henequen before and after its relocation.
Wheelbarrow
For moving the henequen and soil materials.
Pruning Shears
To trim any damaged roots or foliage prior to transplanting.
Garden Fork
To loosen the soil surrounding the plant's roots during extraction.
Mulch
To apply around the base of henequen post-transplant for moisture retention.
How Do You Remove Henequen from the Soil?
How Do You Remove Henequen from the Soil?
From Ground: First, water the henequen to dampen the surrounding soil, which will facilitate digging. Use a shovel to carefully excavate around the plant, maintaining a wide perimeter to avoid root damage. Gently leverage with the shovel or garden fork to lift the root ball from the ground.From Pot: Water the henequen to help the roots slide out more easily. Incline the pot sideways and tap the bottom to dislodge the plant. Slowly and carefully extract the plant by the base of the stem, ensuring the root ball is supported.From Seedling Tray: Moisten the soil in the tray to help the seedlings emerge without resistance. Use a hand trowel or your fingers to gently lift each seedling by its leaves, not the stem, to prevent harm. Aim to retain as much of the root system as possible.
Step-by-Step Guide for Transplanting Henequen
Preparation
Before extracting henequen from its current spot, prepare the new planting site. The hole should match the root ball's depth and be twice its width to allow roots to spread.
Removal
Follow the appropriate extraction method based on whether henequen is from the ground, a pot, or a seedling tray. Be gentle to minimize root disturbance.
Transplanting
Position henequen into the new hole, ensuring it sits at the same depth as before. Backfill with soil, gently pressing down to eliminate air pockets around the root ball.
Watering
After transplanting, thoroughly water henequen to settle the soil and provide essential hydration for the roots.
How Do You Care For Henequen After Transplanting?
Monitoring
Regularly inspect the henequen for indications of stress, such as wilting or discolored leaves, and adjust care as necessary.
Support
If henequen appears unstable, use a plant stake or trellis to provide support until its root system becomes established.
Pruning
Trim any dead or damaged foliage to encourage healthy new growth.
Troubleshooting Common Issues with Henequen Transplantation.
What's the best time of year to transplant henequen?
The ideal period is during mid to late spring, when temperatures support root development.
How far apart should I space henequen while transplanting?
Space them 6-8 feet (1.8-2.4 meters) apart to allow adequate sunlight and growth room.
What are the soil requirements for transplanting henequen?
Ensure the soil is well-drained and has a pH between 6.0 to 7.5 for optimal growth.
How much should I water henequen after transplanting?
Water thoroughly after transplanting, then sparingly until established, as henequen are drought-tolerant.
Should I fertilize henequen after transplanting?
Wait 4-6 weeks before fertilizing to prevent root burn and allow establishment.
What depth should I plant henequen during transplantation?
Plant at the same depth they grew previously, typically not exceeding 2 inches (5 cm).
Is it necessary to prune henequen when transplanting?
Pruning is not necessary, but remove any damaged leaves to encourage healthy growth.
Can I transplant henequen in full sun exposure?
Yes, henequen thrives in full sun, but ensure to protect newly transplanted ones from intense sunlight.
How do I prepare henequen's roots for transplanting?
Gently untangle and spread out the roots to encourage them to grow outward.
What to do if henequen shows transplant shock symptoms?
Ensure proper watering, avoid over-fertilization, and protect from harsh elements while it recovers.


