How to Propagate White turmeric?
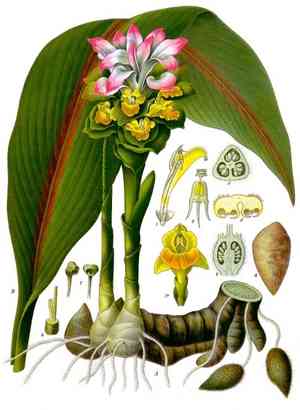
Curcuma zedoaria is generally multiplied using its rhizomes. To achieve successful cultivation, gently detach robust rhizomes from the main plant during its inactive phase. Every segment ought to possess a minimum of one sprouting eye. Embed the rhizomes in rich, well-aerated earth, making sure they are laid flat and lightly covered with substrate. Consistent irrigation will aid their progress, but refrain from overwatering to avert decay.
Optimal Period for White Turmeric Propagation
Propagation Method
Utilize The Tubers
Propagation Period
Spring
Tools Required for White Turmeric Propagation
Sharp, Clean Knife
A keen, sanitized blade is crucial for precisely severing white turmeric tubers. This minimizes harm to the tubers, fostering superior healing and post-cut development. A clean incision lowers the risk of illness and infection, vital for successful white turmeric propagation.
Gardening Gloves
Wearing protective gloves when handling white turmeric is important for both personal safety and tuber vitality. These gloves shield hands from potential skin irritants in the plant and prevent pathogen transfer from hands to plant material.
Rooting Hormone Powder
Applying rooting hormone powder to the cut surfaces of white turmeric tubers can significantly boost root formation. This product stimulates root growth at the incision site, which is essential for the successful establishment of new plants.
Potting Mix
A well-draining, nutrient-rich potting medium is suitable for planting white turmeric tubers. The mix should allow proper drainage while retaining sufficient moisture to support growth. Good soil aeration is also necessary to prevent rot and fungal infections in the tubers.
Pots or Planting Trays
Containers or trays are needed to hold the tubers once they have been prepared and treated. Ensuring these vessels have adequate drainage holes is key to preventing waterlogging, which could negatively impact white turmeric's health and growth.
Post-Propagation Care for White Turmeric
Post-Propagation Care for White Turmeric
After propagation, continue regular watering to maintain soil moisture, especially during dry periods, without oversaturating the soil. Fertilize white turmeric every four to six weeks with a balanced, water-soluble fertilizer to support robust growth. Light pruning may be necessary to remove any dead or yellowing leaves. It's also important to provide partial shade as white turmeric does not tolerate full sunlight well. Finally, remain vigilant against pests like aphids and diseases like root rot which can affect the health of your new white turmeric plants.
Common Errors to Avoid When Propagating White Turmeric
Overwatering
Excessive water saturates the soil, depriving white turmeric's roots of oxygen and encouraging rot, which is detrimental to both the health and propagation success of the rhizomes.
Using diseased rhizomes
Selecting rhizomes that are already unhealthy or damaged can result in poor germination and growth rates, rendering propagation ineffective.
Improper rhizome cutting
Incorrectly cutting rhizomes, without ensuring each piece has at least one bud, limits the potential for new growth, reducing propagation success.
Tips For Propagating White Turmeric
Healthy rhizomes selection
Choose firm and healthy rhizomes with visible growth buds to ensure vigorous growth and higher propagation success.
Adequate moisture balance
White turmeric requires moist, but not waterlogged, soil. Maintain a balance to ensure the health of the rhizomes.
Use of sterile tools
Cut rhizomes with clean, sterilized sharp tools to prevent disease transmission and encourage healthy growth.


