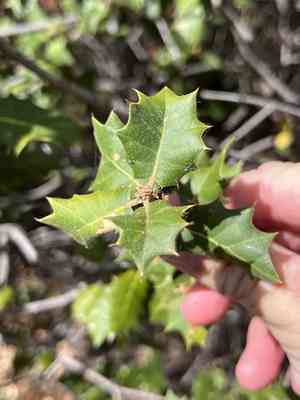
Palmer's oak (Quercus palmeri)
Also known as: Palmer oak, Palmer's oak
Palmer's oak, native to the arid regions of southwestern North America, exhibits several adaptations for survival in dry conditions. This deciduous oak features deeply lobed leaves that are dusty green on top and lighter underneath, aiding in water conservation. Its acorns, which provide sustenance for wildlife, have a rounded shape with a shallow cap. Commonly found in canyons and valleys, Palmer's oak is known to curl its leaves to minimize water loss during droughts.
In This Article
Attributes of Palmer's oak
Lifespan
Perennial
Plant Type
Tree
Plant Height
Up to 5 meters
Spread
Varies, typically spreading
Leaf Color
Dark green, leathery
Flower Size
N/A (typically wind-pollinated)
Flower Color
N/A (catkins are inconspicuous)
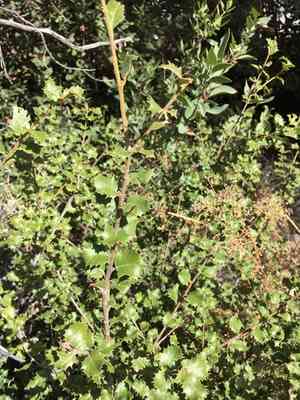
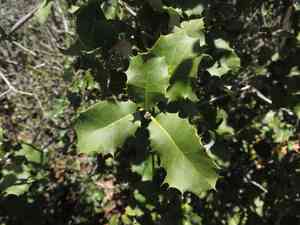
Images of Palmer's oak
Quickly Identify Palmer's oak
1
Identify Quercus palmeri by its leathery, evergreen leaves which are 1-3 cm long with spiny margins, and its small acorns that are about 1-2 cm in length. The bark is smooth and gray on young branches.
Scientific Classification of Palmer's oak
Phylum
Vascular plants
Class
Dicotyledons
Order
Fagales
Family
Beech
Genus
Oaks
Species
Palmer's oak
Planting and Growing of Palmer's oak
Care Difficulty
Hard
Watering Schedule
Every 2 days
Sunlight Requirements
Full sun
Sunshine Duration
4-8 hours
Ideal Temperature
50-80℉
Soil Type
Potting Mix, Peat Mix
Soil pH
6.5-7.5
Fertilizer Type
Balanced
Pruning Season
Spring, Summer
Pruning Area
Branches, Leaves
Pruning Frequency
2 times a year
Repotting Season
Spring
Pot Type
Terracotta, Plastic
 How to Water Palmer's oak?
Quercus palmeri, also known as Palmer oak, requires a moderate amount of water. Generally, 500 milliliters per watering session is sufficient. The goal is to keep the soil consistently moist without making it waterlogged. Ensure that water penetrates the root zone deeply.
What are the symptoms of an underwatered Palmer's oak?
›
What should I do if my Palmer's oak is not getting enough water?
›
What are the symptoms of an overwatered Palmer's oak?
›
How to save an overwatered Palmer's oak?
›
 What Are the Sunlight Requirements for Palmer's oak?
Quercus palmeri thrives in full to partial sun, benefiting from 6 to 8 hours of sunlight daily. This ideal range supports robust growth, ensuring healthy leaves and strong resistance to environmental stressors.
What is the ideal light exposure for Quercus palmeri?
›
How can you ensure Quercus palmeri receives its ideal lighting conditions?
›
What are the benefits of ideal lighting for Quercus palmeri?
›
 What Is the Ideal Temperature Range for Palmer's oak?
Quercus palmeri thrives best within a temperature range of 50 to 80 degrees Fahrenheit. This range offers optimal conditions for growth and health, ensuring that the plant can photosynthesize efficiently and maintain vigorous growth. Cool temperatures close to 50 degrees Fahrenheit help in slowing down excessive metabolism, while temperatures up to 80 degrees Fahrenheit provide ample warmth for active growth phases.
 What Soil is Best for Palmer's oak?
Quercus palmeri thrives in well-drained soils to prevent root rot and ensure adequate oxygenation. Proper drainage allows the oak's roots to access the nutrients without excess moisture, leading to healthier growth. Quercus palmeri prefers soils with a pH between 6.5 and 7.5. This pH range optimizes nutrient availability, promoting robust development and disease resistance in the plant. While not overly demanding, Quercus palmeri benefits from soils with moderate nutrient content. This ensures steady growth without excessive foliage or weak structural strength.
 How to Fertilize Palmer's oak?
For Quercus palmeri, use a balanced 10-10-10 NPK fertilizer. Apply liquid fertilizer at a concentration of 1 tablespoon per gallon of water. When using solid fertilizer, use about 1 cup per inch of trunk diameter spread evenly under the canopy.
 How to Prune Palmer's oak?
Begin by assessing the overall structure and identifying dead or diseased branches. Prioritize removing these branches to maintain tree health and improve its appearance. Make small and precise cuts just above a bud to promote healthy new growth. Avoid leaving stubs as they are prone to disease and can weaken the branch. When removing larger branches, cut in stages. First, make a preliminary cut a few inches from the branch collar to avoid bark tearing. Then, make the final cut leaving the branch collar intact.
More About Pruning Techniques→
 How to Propagate Palmer's oak plant?
1
Collect acorns from the oak tree during the fall when they are mature. It's important to select seeds that are robust and void of any visible damage or signs of disease to increase germination success rates.
2
Cut healthy, non-flowering shoots that are about 6 inches long. Remove lower leaves and ensure at least two nodes are submerged in your rooting medium. Maintain cleanliness to prevent any introduction of pathogens.
3
Place seeds in a well-draining soil medium or plant cuttings in a suitable rooting medium. Ensure consistent moisture levels without waterlogging, and provide indirect sunlight. Monitor daily for growth and signs of mold or diseases.
 How to Repot Palmer's oak plant?
1
For Quercus palmeri, the ideal time to repot is when you notice the roots beginning to circle the pot or grow through the drainage holes. It suggests that your plant has outgrown its current container, typically happening every 2-3 years.
2
Select a pot that is 2 inches larger in diameter than the current one. This ensures the roots have ample room to expand, preventing them from becoming root-bound. Choose a pot with drainage holes to avoid waterlogging.
3
Opt for a well-draining loamy soil with a balanced nutrient mix. This type of soil helps prevent root rot by allowing excess water to drain away, while still retaining adequate moisture and nutrients for healthy growth.
Toxicity
Ingestion
WARNING
The judgment on toxicity and danger is for reference only. We DO NOT GUARANTEE any accuracy of such judgment. Therefore, you SHALL NOT rely on such judgment. It is IMPORTANT TO SEEK PROFESSIONAL ADVICE in advance when necessary.



