How to Transplant Rainier violet?
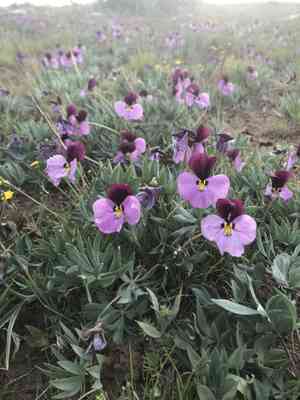
Rainier violet flourishes optimally when relocated from early spring through its later period, benefiting from the soil's warmth and ample hydration. Select a protected spot receiving partial sunlight, which aids its acclimatization.
Necessary Preparations Before Moving Rainier Violet
Optimal Period for Relocating Rainier Violet?
The best time for moving rainier violet is from the beginning to the end of spring. This timeframe allows the perennial to establish its root system prior to the summer's intense heat. Relocating during this window promotes stable growth and health, aiding better adaptation and robust flowering during the active season.
Required Distance Between Rainier Violet Plants?
When relocating rainier violet, position plants approximately 12 inches (30 cm) apart. This spacing ensures each plant has ample room to develop without crowding, facilitating air circulation and preventing disease.
Ideal Soil Mixture for Rainier Violet Relocation?
For rainier violet, select well-draining soil rich in organic material. Incorporate compost or a balanced base fertilizer to prepare the soil, ensuring it contains the necessary nutrients for healthy development.
Where to Replant Your Rainier Violet?
Place rainier violet where it can receive full sun to partial shade. This means finding a garden spot that gets 6–8 hours of sunlight daily for optimal blooming.
Equipment Needed Before Transplanting Rainier Violet?
Gardening Gloves
To safeguard your hands while handling soil and plants.
Shovel or Spade
For excavating the new hole and extracting the plant from its original spot.
Trowel
To assist in managing smaller plants or young seedlings with ease.
Watering Can or Hose
To hydrate the plant before and after its relocation.
Mulch
To maintain soil moisture and stabilize temperature around the plant.
How to Extract Rainier Violet from the Ground?
How to Extract Rainier Violet from the Ground?
From Ground: First, moisten the rainier violet plant to damp the soil. Next, dig a wide trench around the plant using a shovel or spade, ensuring the plant's root ball remains intact. Carefully work the spade beneath the root ball to lift the plant from its initial position.From Pot: Thoroughly water the rainier violet plant's soil before removal. Gently invert the pot and tap the bottom if the plant doesn't slide out easily. Support the plant with one hand while carefully extracting it from the pot.From Seedling Tray: Ensure the soil surrounding the rainier violet seedlings is damp. Use a trowel or your fingers to gently lift the seedlings from the tray, supporting the root system as you proceed. Avoid touching the delicate stems whenever possible.
Step-by-Step Guide for Relocating Rainier Violet
Prepare the Hole
Dig a hole that is twice as wide and the same depth as the root ball of your rainier violet plant. This will provide ample space for the roots to spread comfortably.
Soil Preparation
Loosen and amend the soil at the bottom and sides of the hole if necessary, ensuring proper drainage.
Remove the Plant
Carefully extract the rainier violet from its original location as detailed in the previous section.
Place the Plant
Position the rainier violet plant into the hole, making sure the top of the root ball is level with the surrounding soil surface.
Backfill the Hole
Gently fill the hole with the excavated soil, firming it in place around the root ball. Avoid leaving air pockets.
Water Thoroughly
Once the rainier violet plant is in place, water it thoroughly to help settle the soil and eliminate any remaining air pockets.
Apply Mulch
Spread a layer of mulch around the base of the plant, but keep it a few inches away from the stem to prevent rot.
Post-Transplanting Care for Rainier Violet
Watering
Keep the soil around the rainier violet consistently moist, but not waterlogged, for the initial weeks after transplanting to aid in establishing strong roots.
Support
If your rainier violet plant is tall or has abundant blooms, consider providing support with stakes or ties to prevent leaning or breakage.
Monitoring
Regularly check for signs of distress, such as wilting or yellowing leaves, and adjust care as needed.
Weeding
Keep the area around the rainier violet plant clear of weeds that can compete for nutrients and water.
Troubleshooting Common Issues with Rainier Violet Relocation.
When is the best time to move rainier violet?
The ideal time to move rainier violet is from early spring to late spring.
How should I prepare the soil for rainier violet?
Prepare well-draining soil with organic matter like compost or aged manure for healthy growth.
What is the recommended spacing for rainier violet?
Space rainier violet plants about 12 inches (30 cm) apart to ensure proper growth and air circulation.
How deep should I plant rainier violet seedlings?
Plant rainier violet seedlings at the same depth they were in their original container to avoid stress.
How can I minimize transplant shock for rainier violet?
Move rainier violet during cool, cloudy days and water well immediately after planting to reduce shock.
How much water does rainier violet need after transplanting?
Water rainier violet thoroughly after transplanting, keeping the soil consistently moist but not waterlogged.
What should I do if rainier violet shows signs of wilting after transplanting?
Ensure proper watering and provide shade to protect rainier violet from intense sun and reduce wilting.
How do I handle the roots of rainier violet during transplanting?
Handle the roots of rainier violet gently and avoid damaging them while transferring to prevent stress.
Can I use fertilizer when transplanting rainier violet?
Yes, you can mix a balanced, slow-release fertilizer into the soil during transplanting rainier violet.
What type of mulching is best for transplanted rainier violet?
Use organic mulch like straw or bark around rainier violet to retain moisture and regulate soil temperature.



