How to Transplant Wood wakerobin?
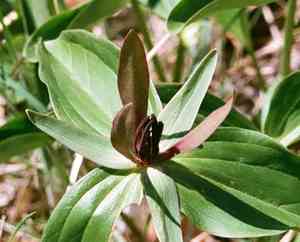
Wood wakerobin flourishes optimally when relocated from late summer through mid-fall, enabling its root system to become firmly established prior to the winter season. Select a shaded, damp spot featuring fertile earth. Hydrate comprehensively both preceding and following the transfer.
What Preparations are Needed Before Transplanting Wood Wakerobin?
What is the Ideal Time for Transplanting Wood Wakerobin?
The optimal period to relocate wood wakerobin, a perennial, is from late summer through mid-fall. This timing allows root establishment prior to winter dormancy, ensuring robust growth the following spring. Transplanting then minimizes shock and maximizes survival and development.
How Much Space Should You Leave Between Wood Wakerobin Plants?
Ensure wood wakerobin are spaced approximately 12-18 inches (30-45 cm) apart to allow ample room for growth and flourishing. This spacing promotes good air circulation and reduces nutrient competition.
What is the Best Soil Mix for Wood Wakerobin Transplanting?
Prepare a well-draining, rich, humus-filled soil mixture for wood wakerobin transplantation. Incorporating compost or leaf mold at the base will provide a strong start and enhance soil fertility. Aim for a slightly acidic to neutral pH for optimal development.
Where Should You Relocate Your Wood Wakerobin?
Select a location that receives partial to full shade, as wood wakerobin thrives in filtered sunlight. This mimics its natural forest environment, protecting it from intense sun and helping maintain soil moisture.
What Equipments Should You Prepare Before Transplantation Wood Wakerobin?
Gardening Gloves
To safeguard your hands while handling soil and the plant.
Shovel or Spade
For excavating around the plant and lifting it from the ground.
Trowel
For more precise digging and moving the plant to its new spot.
Watering Can
To hydrate the plant before and after its relocation.
Wheelbarrow or Bucket
For moving the plant from one place to another.
Mulch
To aid in retaining soil moisture and inhibiting weed growth.
Garden Fork
To loosen the soil surrounding the plant.
How Do You Remove Wood Wakerobin from the Soil?
How Do You Remove Wood Wakerobin from the Soil?
From Ground: First, moisten the wood wakerobin plant's soil. Next, dig a wide trench around the plant with a shovel or spade, keeping the root ball intact. Carefully work the spade beneath the root ball to lift the plant from its original spot.From Pot: Thoroughly water the wood wakerobin plant. Gently squeeze the pot to loosen the soil and roots. Hold the plant's base and carefully tip the pot to slide the plant out, being careful not to harm the roots.From Seedling Tray: Dampen the soil in the seedling tray. Use a trowel or your fingers to loosen the soil around each seedling. Gently lift each seedling from the tray, ensuring roots remain intact and minimizing disturbance.
Step-by-Step Guide for Transplanting Wood Wakerobin
Site Preparation
Prepare the new planting location by ensuring the soil drains well and incorporating organic matter if necessary. Dig a hole approximately twice the size of the plant's root ball to allow ample space for root expansion.
Transplanting
Position the wood wakerobin plant into the new hole at the same depth it was previously growing. Backfill the hole with soil and gently firm it around the plant. Water the plant thoroughly to help settle the soil and eliminate air pockets.
Mulching
Apply a layer of mulch around the plant's base, but not directly against the stem, to help retain moisture and prevent weed growth.
How Do You Care For Wood Wakerobin After Transplanting?
Watering
Keep the soil around the wood wakerobin consistently moist, but not waterlogged, for the initial weeks post-transplant to aid in strong root establishment.
Monitoring
Regularly inspect the plant for any indications of stress or pests and address issues promptly.
Fertilizing
After a few weeks, consider applying a balanced fertilizer to promote healthy development.
Troubleshooting Common Issues with Wood Wakerobin Transplantation.
When is the best time to transplant wood wakerobin?
Late summer to mid-fall is the ideal period for relocating wood wakerobin.
How much spacing is needed for wood wakerobin during transplanting?
Space wood wakerobin 12-18 inches (30-45 cm) apart for optimal growth.
What type of soil does wood wakerobin prefer?
Wood wakerobin thrives in well-drained, rich, and slightly acidic soil.
How should I prepare the ground for transplanting wood wakerobin?
Loosen the soil to a depth of 12 inches (30 cm) and enrich it with compost.
How do I handle the roots when transplanting wood wakerobin?
Handle with care, ensuring the roots remain intact and undamaged.
What is the ideal depth for planting wood wakerobin?
Plant wood wakerobin at the same depth it was previously growing.
Should wood wakerobin be watered immediately after transplanting?
Yes, water thoroughly right after transplanting to help the roots establish.
What kind of light does wood wakerobin require post-transplant?
Provide partial to full shade to help wood wakerobin acclimate successfully.
How can I protect wood wakerobin from transplant shock?
Mulch around wood wakerobin and keep the soil consistently moist but not waterlogged.
Do I need to fertilize wood wakerobin after transplanting?
Wait until spring to apply a balanced, slow-release fertilizer.



