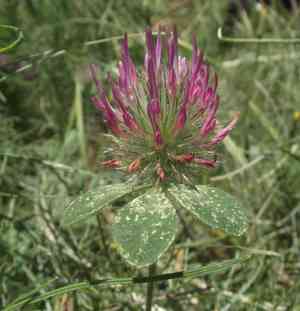
How to Transplant Rose clover?
For the vigorous development of rose clover, foundational efforts should commence from the onset of spring's warmth until its peak. Position the plant in direct sunlight and adequately draining earth; exercise caution to safeguard fragile roots throughout the relocation procedure.
What Preparations are Needed Before Transplanting Rose Clover?
What is the Ideal Time for Transplanting Rose Clover?
The optimal period for relocating rose clover extends from the onset of early spring to the pleasant days preceding mid-summer. This timeframe offers rose clover the moderate temperatures and increasing daylight it flourishes in, allowing roots to establish before intense heat. Introducing rose clover to your garden during this phase leverages nature's supportive conditions, fostering robust development and a productive season.
How Much Space Should You Leave Between Rose Clover Plants?
Greetings, aspiring gardener! For your rose clover companions, aim to provide ample room. Position each one approximately 4-6 inches (10-15 cm) apart. This spacing is close enough for companionship yet spacious enough for each plant to flourish.
What is the Best Soil Mix for Rose Clover Transplanting?
Your rose clover will appreciate a good, well-draining soil! Incorporate some organic compost for a nutrient-dense foundation. A balanced, slow-release fertilizer will give them an excellent start. Let's create a comfortable bed for your green companions!
Where Should You Relocate Your Rose Clover?
Sunshine brings joy to rose clover! Select a bright location where daylight's warmth reaches them for most of the day. This sun-drenched spot will help your rose clover grow contentedly and healthily. Enjoy your gardening journey!
What Equipments Should You Prepare Before Transplantation Rose Clover?
Gardening Gloves
To safeguard your hands while handling soil and plants.
Hand Trowel
For excavating small holes when moving seedlings.
Spade or Garden Fork
Utilized for extracting plants from the ground.
Watering Can or Hose
For hydrating rose clover prior to and following transplantation.
Measuring Tape
To correctly space out the transplanted specimens.
Pruning Shears
For trimming any damaged roots or foliage.
Soil Aerator or Fork
To loosen the soil at the new planting site if it's compacted.
Wheelbarrow or Bucket
For moving the plants and soil.
How Do You Remove Rose Clover from the Soil?
How Do You Remove Rose Clover from the Soil?
From Ground: First, irrigate the rose clover to moisten the soil, facilitating easier plant removal without root damage. Use a spade or garden fork to loosen the soil around the rose clover, gradually expanding the circle around the root system. Carefully slide the tool beneath the root ball and gently lift the plant from the ground.From Pot: Thoroughly water rose clover, ensuring moisture reaches the roots. Invert the pot and gently tap or squeeze the sides to dislodge the root ball. Hold the base of the rose clover and carefully slide the plant out while supporting the soil and roots.From Seedling Tray: Water the seedlings to ensure root moisture. Use a hand trowel or a dibber to gently loosen the soil around each rose clover seedling. Carefully lift the seedling by its leaves, not the stem, and support the root ball to prevent damage.
Step-by-Step Guide for Transplanting Rose Clover
Seedling Selection
Choose robust-looking rose clover seedlings with sturdy stems and well-developed root systems.
Prepare the Site
Clear the chosen area of weeds and debris. Loosen the soil with a soil aerator or fork to enhance drainage and root penetration.
Digging Holes
Use a hand trowel to create holes as deep as the root ball and twice as wide, spacing them according to the recommended guidelines for rose clover.
Replanting
Transport the rose clover seedling to the hole using a wheelbarrow or bucket. Gently place the seedling in the center of the hole and adjust its depth so it sits at the same level it was previously growing.
Fill the Hole
Backfill the hole with soil, gently tamping down around the root ball to ensure good soil contact and eliminate air pockets. Water the rose clover immediately after planting to settle the soil.
Support Structures
Install any necessary support structures, such as stakes, for the rose clover if the variety tends to grow taller and requires assistance to remain upright.
How Do You Care For Rose Clover After Transplanting?
First Weeks Care
Regularly check the rose clover for signs of stress and gently water when the top layer of soil feels dry to maintain consistent moisture.
Mulching
Apply a layer of organic mulch around rose clover to retain soil moisture, regulate soil temperature, and reduce weed competition.
Pruning
Trim any dead or damaged leaves with pruning shears to prevent disease and allow rose clover to focus its energy on establishing new roots.
Gradual Sun Exposure
If rose clover was previously in a shadier environment, slowly acclimate it to the new light levels to prevent shock.
Monitoring
Keep an eye out for common pests and diseases affecting rose clover, checking both the foliage and the soil around the plants.
Troubleshooting Common Issues with Rose Clover Transplantation.
How do I know when it's the best time to transplant rose clover?
Relocate rose clover during its prime growth season, which is from early to late spring, once the risk of frost has passed.
What's the ideal distance apart for transplanting rose clover?
For optimal growth, space rose clover transplants approximately 4-6 inches (10-15 cm) apart to ensure sufficient room for expansion.
Why are my transplanted rose clover wilting after planting?
Wilting can indicate transplant shock. Ensure adequate watering, avoid direct sunlight for a few days, and consider using a root stimulator.
How deep should I plant rose clover seedlings?
Plant rose clover transplants at the same depth they were in their original container to prevent burying the stem and risking rot.
What type of soil is best for transplanting rose clover?
Utilize well-draining soil rich in organic matter to ensure rose clover roots receive ample nutrients and water without becoming waterlogged.
How can I ensure rose clover transplants don't get uprooted?
Gently firm the soil around the base of rose clover after transplanting to stabilize the plants and eliminate air pockets.
Do rose clover need full sunlight after transplanting?
Rose clover thrives in full sun to partial shade. Gradually acclimate transplants to outdoor conditions if they were started indoors.
How much should I water rose clover after transplanting?
Keep the soil consistently moist, but not saturated, for the initial few weeks post-transplanting, then gradually reduce to normal watering.
What should I do if my rose clover transplants are not growing?
Stunted growth might be due to nutrient deficiency or root damage. Ensure proper feeding and that roots are intact and not girdling.
Can I fertilize rose clover immediately after transplanting?
It's advisable to wait 2-4 weeks before applying a balanced, slow-release fertilizer to allow rose clover to establish in its new location.


