How to Transplant Tasmanian waratah?
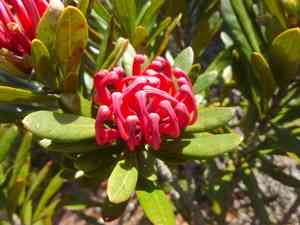
Tasmanian waratah flourishes when relocated during the revitalizing phase spanning early to late spring. A site featuring damp, adequately draining earth and partial sun exposure is crucial for effective establishment. Verify that the environmental factors are ideal for superior outcomes.
Necessary Preparations Before Moving Tasmanian Waratah?
When is the Best Time to Relocate Tasmanian Waratah?
The prime window for relocating tasmanian waratah spans from early to late spring. This timing allows the plant to develop strong root systems prior to the onset of warmer summer conditions. Moving it during this period boosts its survival chances and promotes vigorous development. Ensuring adequate soil moisture and mild ambient temperatures aids the plant's adjustment to its new setting.
What Distance Should Be Maintained Between Tasmanian Waratah Plants?
Tasmanian waratah should be positioned 3-5 feet (0.9-1.5 meters) apart to guarantee ample room for growth and thriving. This spacing helps prevent overcrowding and ensures each plant receives sufficient sunlight and nutrients.
What is the Optimal Soil Blend for Tasmanian Waratah Relocation?
Tasmanian waratah thrives in soil that drains well and is slightly acidic. Before relocation, amend the soil by incorporating compost and an organic, low-phosphorus base fertilizer to enrich it and encourage robust development.
Where Should You Replant Your Tasmanian Waratah?
Select a spot for tasmanian waratah that gets full sun to partial shade, ideally 6-8 hours of sunlight daily. This will ensure the plants receive enough light to flourish while also being protected during the hottest part of the day.
What Tools Should You Gather Before Transplanting Tasmanian Waratah?
Gardening Gloves
To safeguard your hands while handling soil and plants.
Shovel or Spade
For digging around the plant and creating the trench for removal.
Garden Trowel
For more precise digging near the root system.
Bucket or Wheelbarrow
To move the tasmanian waratah plant to its new spot.
Pruning Shears
To trim any damaged or overly long roots.
How to Extract Tasmanian Waratah from the Ground?
How to Extract Tasmanian Waratah from the Ground?
From Ground: First, hydrate the tasmanian waratah plant to moisten the soil. Next, excavate a wide trench around the plant using a shovel or spade, making sure the plant's root ball stays intact. Carefully work the spade beneath the root ball to lift the plant from its original position.From Pot: Water the tasmanian waratah plant thoroughly an hour before removal. Gently invert the pot, supporting the plant's base with your hand. Lightly tap the pot's rim to loosen the soil and slide the plant out, preserving the root ball.From Seedling Tray: Water the seedlings to facilitate easier soil manipulation. Use a garden trowel to carefully lift the seedlings from the tray, ensuring the roots and soil remain undisturbed. Handle them with care to prevent damage to the delicate roots.
Detailed Guide for Relocating Tasmanian Waratah
Site Preparation
Prepare the new location by digging a hole twice as wide and the same depth as the tasmanian waratah plant's root ball. Loosen the soil at the bottom of the hole to facilitate root penetration.
Plant Positioning
Place the tasmanian waratah plant in the hole, ensuring the top of the root ball is level with the surrounding soil. Adjust as needed to ensure the plant stands upright and straight.
Backfilling
Fill the hole with soil, pressing down gently but firmly to eliminate air pockets. Water the soil as you fill to help it settle around the roots.
Mulching
Apply a layer of mulch around the base of the tasmanian waratah plant, leaving a gap near the stem. This helps retain moisture and regulate soil temperature.
How to Care for Tasmanian Waratah After Relocation?
Watering
Maintain consistent moisture in the soil around the tasmanian waratah, but avoid waterlogging, for the initial weeks post-transplant to aid in root establishment.
Protection
Consider staking the tasmanian waratah plant if the new site is windy to provide extra support until it is firmly established.
Monitoring
Regularly inspect the tasmanian waratah plant for signs of stress such as wilting or yellowing leaves and adjust care practices as necessary.
Addressing Common Issues with Tasmanian Waratah Relocation.
When should I move tasmanian waratah?
Relocate tasmanian waratah from early spring to late spring for optimal outcomes and minimal stress.
What spacing should I use for tasmanian waratah?
Plant tasmanian waratah 3-5 feet (0.9-1.5 meters) apart to ensure proper growth and air circulation.
How do I prepare the soil for tasmanian waratah?
Enrich the soil with organic matter and ensure good drainage to support tasmanian waratah's roots.
What type of soil is ideal for tasmanian waratah?
Tasmanian waratah prefers well-draining, slightly acidic to neutral soil for optimal growth.
How deep should the hole be for transplanting tasmanian waratah?
Dig a hole twice as wide and the same depth as tasmanian waratah's root ball.
How do I handle tasmanian waratah's roots during transplanting?
Handle tasmanian waratah's roots gently and avoid damage. Loosen the soil around the roots slightly.
Should I water tasmanian waratah immediately after transplanting?
Yes, water tasmanian waratah thoroughly right after transplanting to help settle the soil.
How often should I water tasmanian waratah post-transplant?
Keep the soil consistently moist for the first few weeks, but avoid waterlogging.
What if tasmanian waratah shows signs of transplant shock?
Provide shade, keep the soil moist, and avoid fertilization until tasmanian waratah recovers.
Do I need to prune tasmanian waratah after transplanting?
Lightly prune any damaged or dead branches after transplanting to encourage healthy growth.



