How to Transplant Hazel sterculia?
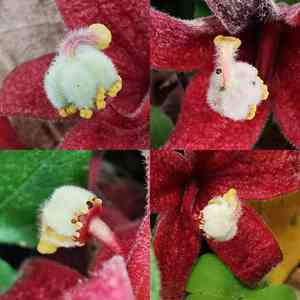
The period of dormancy, usually colder months such as winter, presents the ideal opportunity for transplanting hazel sterculia, facilitating a smooth adjustment. Select a location with ample sunlight and soil that drains effectively. If necessary, ensure a comprehensive watering after the transfer to aid in its recuperation.
What Preparations are Needed Before Transplanting Hazel Sterculia?
What is the Ideal Time for Transplanting Hazel Sterculia?
The best period for moving hazel sterculia is during its dormant phase in late winter. This timing is optimal because cooler temperatures and the onset of early spring growth encourage root development after relocation, helping the plant establish itself well in its new spot. Choosing this cooler season for the process offers the benefit of reduced shock and stress for hazel sterculia, allowing it to flourish. Transplanting hazel sterculia at this time also aligns with natural cycles, providing a smoother transition and better adaptation for vigorous growth.
How Much Space Should You Leave Between Hazel Sterculia Plants?
To allow your hazel sterculia ample room to develop, position each plant approximately 20-30 feet (6-9 meters) apart. This ensures healthy growth and prevents competition for nutrients. Always remember, a bit of extra room significantly benefits your garden.
What is the Best Soil Mix for Hazel Sterculia Transplanting?
For your hazel sterculia to thrive, it requires well-draining, fertile soil. Begin with a loamy soil base, enriched with compost or organic matter. Incorporating a balanced slow-release fertilizer will supply the necessary nutrients for robust and healthy growth!
Where Should You Relocate Your Hazel Sterculia?
Your hazel sterculia enjoys plenty of sunlight! Locate a sunny spot that receives 6 to 8 hours of sun daily. However, it also appreciates some afternoon shade, especially in very hot regions.
What Equipments Should You Prepare Before Transplantation Hazel Sterculia?
Gardening gloves
To safeguard your hands while handling soil and plants.
Shovel or spade
For excavating the hole and extracting the hazel sterculia plant from its original site.
Garden trowel
This tool will assist in placing the hazel sterculia plant into its new hole without causing harm.
Garden hose or a watering can
To adequately hydrate the soil before and after moving hazel sterculia.
Organic compost
This will provide additional nourishment to your plant.
How Do You Remove Hazel Sterculia from the Soil?
How Do You Remove Hazel Sterculia from the Soil?
From Ground: Begin by moistening the area around the hazel sterculia plant to make the soil easier to manage. Next, carefully work the shovel or spade around the plant, taking care not to damage its root system. Once the plant is loosened from the ground, gently lift it out with your hands.From a Pot: Water the pot thoroughly. Tilt the pot sideways, then carefully slide the hazel sterculia plant out while supporting its base. If it's root-bound, you might need to tap the pot's sides or break it if necessary.From a Seedling Tray: Gently grasp the base of the hazel sterculia stem and carefully lift it from its cell. It is crucial not to pull on the stem or leaves, as this can cause damage.
Step-by-Step Guide for Transplanting Hazel Sterculia
Preparation
Start by preparing the new location. Dig a hole that is twice as wide as your hazel sterculia's root ball and slightly shallower than its height. Add some organic compost to the hole for extra nutrients.
Transplanting
Carefully position the hazel sterculia plant in the center of the hole, ensuring the top of the root ball is level with the ground. Then, gently backfill the hole with soil, firming it lightly around the plant's base.
Watering
Thoroughly water the plant immediately after transplanting to help the soil settle around the roots.
How Do You Care For Hazel Sterculia After Transplanting?
Observation
Monitor the hazel sterculia plant for several weeks, paying close attention to the leaves. If wilting occurs, it may indicate a need for more water or a less sun-exposed location.
Pruning
Limit the hazel sterculia's energy expenditure to encourage root growth by trimming any excessively large leaves or flowers. Carefully snip the stems, avoiding damage to healthy parts. Only resume regular pruning once the plant has fully acclimated.
Mulching
Applying mulch helps retain moisture and suppress weed growth. Maintain a gap between the mulch and the plant's stem to prevent rot.
Frequent water
The root ball should not dry out in the initial weeks; water regularly, but avoid overwatering. To achieve this balance, check the soil's moisture level with your fingertips.
Troubleshooting Common Issues with Hazel Sterculia Transplantation.
When is the best time to transplant hazel sterculia?
The ideal time to transplant hazel sterculia is during its tenth to twelfth growth stage (S10-S12). This timing allows it to establish roots well before harsh weather conditions.
How far apart should I space each hazel sterculia when transplanting?
Provide each hazel sterculia with ample space, ideally between 20-30 feet (6-9 meters). This will promote optimal growth and prevent root entanglement.
What's the optimal soil composition for transplanting hazel sterculia?
Hazel sterculia generally thrives best in well-drained, sandy or loamy soil. Ensure it is rich in organic matter to boost growth and health post-transplant.
Do hazel sterculia plants need watering immediately after transplanting?
Absolutely! Watering hazel sterculia immediately after transplanting helps settle the soil, reducing air pockets around the roots. Be careful not to overwater to prevent root rot.
What is the best strategy to reduce shock in hazel sterculia after transplanting?
To minimize transplant shock, maintain the same sun orientation as its original location. Also, provide adequate water and reduce exposure to extreme weather.
Should I add fertilizers when transplanting hazel sterculia?
Adding a slow-release fertilizer at planting time would be beneficial. However, avoid excessive nitrogen as it can lead to an overly lush plant with weak branches.
How deep should I dig the hole when transplanting hazel sterculia?
Dig a hole that is twice as wide and the same depth as the existing root ball. This allows the roots to spread and establish easily.
What's the ideal temperature for transplanting hazel sterculia?
Hazel sterculia prefers a warmer climate. The most suitable temperature range for transplanting is approximately 68-86â (20-30â).
How to manage pests during hazel sterculia transplantation?
Inspect the hazel sterculia for pests before transplanting. If any are found, treat with an appropriate pesticide or organic solution before moving the plant to its new location.
What to do when leaves of hazel sterculia turn yellow after transplantation?
Yellowing leaves could indicate transplant shock or watering issues. Check the soil moisture, watering regimen, and ensure the plant is not exposed to extreme temperatures.



