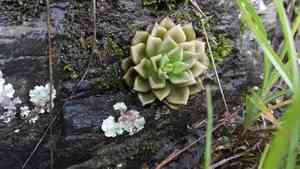
How to Transplant Indian sedum?
For indian sedum, the optimal period for relocation spans from mid-spring through early summer, coinciding with its active growth phase. Select a location offering partial shade and guarantee adequate drainage to avert root decay. Careful handling throughout the procedure facilitates a smooth adjustment.
What Preparations are Needed Before Transplanting Indian Sedum?
What is the Ideal Time for Transplanting Indian Sedum?
The optimal period for relocating indian sedum is from mid to late spring, or potentially early summer. This timing is critical due to the mild temperatures and consistent moisture levels, which create an ideal setting for young plants to establish deep roots and acclimate to their new spot. Performing this task at this time ensures your indian sedum receives the best possible start, benefiting from extended daylight hours and warm soil, which promote vigorous growth. Always remember that a gentle reminder to hydrate and care for your indian sedum after transplanting can significantly enhance your gardening reputation!
How Much Space Should You Leave Between Indian Sedum Plants?
Ensure adequate room for your indian sedum to develop. Aim for a spacing of approximately 3-5 inches (7-13 cm) between each plant. This distance facilitates proper air circulation, encourages robust development, and prevents overcrowding.
What is the Best Soil Mix for Indian Sedum Transplanting?
Preparing the appropriate soil is essential for the health and growth of indian sedum. Combine well-draining sandy or loamy soil with a slow-release base fertilizer. This mixture will supply your indian sedum with necessary nutrients while also preventing waterlogging.
Where Should You Relocate Your Indian Sedum?
Selecting the correct site for your indian sedum is crucial. It thrives in sunlight, but excessive direct sun can be harmful. Endeavor to locate a spot in your garden that receives morning sun but is shaded during the hottest part of the day.
What Equipments Should You Prepare Before Transplantation Indian Sedum?
Gardening Gloves
To safeguard your hands from any sharp parts of the indian sedum and from soil.
Shovel or Trowel
To excavate the plant from its original position and for digging the new cavity.
Garden Spade
To loosen the earth and assist in extracting the plant from its location.
Watering Can
For maintaining soil moisture during and after the relocation process.
Gardening Fork or Hand Rake
To loosen soil around the plant before lifting it.
Bucket or Plant Pot
To move the indian sedum from its initial spot to the new one.
Mulch
Helps to retain moisture after the plant has been moved.
How Do You Remove Indian Sedum from the Soil?
How Do You Remove Indian Sedum from the Soil?
From Ground: First, you should irrigate the indian sedum to moisten the soil. This will simplify the removal process and reduce stress on the plant. Gently excavate a wide circle around the plant using your shovel or trowel, ensuring you are sufficiently far from the plant to avoid damaging the roots. Gradually work your garden spade beneath the root ball and then carefully lift the plant, preserving as much of the root structure as possible. If the root ball does not lift after a few attempts, it may be deeper than anticipated; dig further and try again.From Pot: Water the plant thoroughly. Invert the pot while holding your hand over the soil around the plant. Tap the rim of the pot on a firm surface. The root ball should slide out with the soil. If it does not, it may have become root-bound, and you will need to cut the pot away.From Seedling Tray: Water the seedlings, then use a small trowel or spoon to extract the seedlings, ensuring you dig deep enough under the roots to prevent damage.
Step-by-Step Guide for Transplanting Indian Sedum
Dig New Hole
At the chosen location for transplanting the indian sedum, excavate a hole that is twice as wide and equally as deep as the indian sedum's root ball.
Place The Plant
Carefully position the indian sedum into the prepared hole. Ensure the top of the roots is level with the surrounding ground.
Backfill
Refill the hole with the same soil that was removed, gently patting it down to eliminate any air pockets. The indian sedum should be stable and not sway.
Water
Thoroughly water the area immediately after planting. This aids in settling the soil around the indian sedum.
How Do You Care For Indian Sedum After Transplanting?
Watering
Consistent water supply is necessary for the indian sedum after transplant, but be careful not to overwater to prevent root rot.
Mulching
Apply a layer of mulch around the base of indian sedum to help retain moisture and suppress weed growth.
Observation
Monitor the indian sedum regularly for the initial few weeks. Wilting or discoloration can indicate plant stress and may require additional attention.
Pruning
If the indian sedum plant becomes too large for its new space, trimming may be required. Just ensure to only remove necessary branches.
Troubleshooting Common Issues with Indian Sedum Transplantation.
What's the best time of year to transplant indian sedum?
The optimal period to relocate indian sedum is from late spring to early fall, which offers the ideal growing conditions it requires.
How far apart should indian sedum be spaced when transplanting?
When relocating, ensure each indian sedum is positioned approximately 3 to 5 inches (7.5 to 12.7 cm) apart. This provides them ample room to spread and grow.
Does indian sedum require any special preparation before transplanting?
Ensure you select a robust indian sedum specimen for transplanting. Water the plant a day prior to moving it to facilitate the process and reduce plant stress.
What type of container or pot should I use when transplanting indian sedum?
Opt for a pot with adequate drainage holes. Indian sedum prefers arid conditions, and extra drainage helps prevent waterlogging, which could harm the roots.
How deep should I plant indian sedum when transplanting?
Excavate a hole deep enough to accommodate the indian sedum's root ball. This allows it to grow comfortably while gradually adapting to its new environment.
What soil should I use when transplanting indian sedum?
Indian sedum thrives in well-draining soil. A mixture of sand, peat, and standard potting soil typically works well. Remember to adjust based on your local climate conditions.
How much water does indian sedum need right after transplanting?
Thoroughly water the indian sedum immediately after transplanting, then reduce irrigation and allow the soil to dry out between waterings to prevent over-saturation.
Should I fertilize indian sedum immediately after transplanting?
It is advisable to wait a short period before fertilizing newly transplanted indian sedum. Allow them about 2 to 3 weeks to acclimate to their new home before applying fertilizer.
How can I help indian sedum adjust after transplanting?
Minimize shock to the indian sedum by maintaining its original soil orientation and avoid any unnecessary pruning until it is fully established in the new location.
What if my transplanted indian sedum is showing signs of distress, like wilting or browning?
If your indian sedum is wilting post-transplant, it may be experiencing transplant shock. Reduce watering, keep it in a partially shaded area, and refrain from applying any fertilizer until it recovers.


