How to Transplant Widowsfrill?
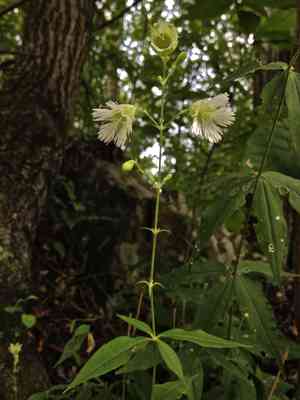
The optimal period for relocating widowsfrill is from late spring into early summer, as these warmer conditions are conducive to root development. Select a location offering filtered light and soil that drains effectively to ensure widowsfrill thrives. A thorough watering after moving the plant will aid its adjustment.
What Preparations are Needed Before Transplanting Widowsfrill?
What is the Ideal Time for Transplanting Widowsfrill?
The perfect time to move widowsfrill is from late spring to early summer. This timing allows roots to settle before intense heat and promotes strong development. Choosing this period for transplanting helps widowsfrill build a solid base, increasing its resistance to summer stress. A friendly reminder: relocating widowsfrill during these favorable months maximizes its growth potential, ensuring a smooth transition to its new location.
How Much Space Should You Leave Between Widowsfrill Plants?
When relocating widowsfrill, aim for ample room. Position individual plants approximately 3 feet (91 cm) to 6 feet (183 cm) apart. This ensures each widowsfrill has sufficient space to thrive and access to adequate nutrients.
What is the Best Soil Mix for Widowsfrill Transplanting?
For widowsfrill, a well-draining soil rich in organic matter is ideal. Before transplanting, incorporate a balanced, slow-release fertilizer to create a nourishing base. This helps your widowsfrill get a strong start!
Where Should You Relocate Your Widowsfrill?
Select a location for your widowsfrill where they will receive partial to full sunlight. Avoid heavily shaded areas to ensure your plants flourish. A combination of sun and shade throughout the day is optimal for widowsfrill.
What Equipments Should You Prepare Before Transplantation Widowsfrill?
Shovel or Spade
For excavating and moving the widowsfrill's root mass.
Gardening Gloves
To safeguard your hands while handling soil and plants.
Watering Can
To pre-moisten the plant and keep the soil damp after relocation.
Measuring Tape
To ensure accurate spacing between transplanted specimens.
Garden Fork
To assist in loosening the soil around the plant's roots if required.
Wheelbarrow or Garden Cart
To transport the excavated plant and soil without strain.
Pruning Shears
To trim any damaged roots or foliage prior to transplanting.
How Do You Remove Widowsfrill from the Soil?
How Do You Remove Widowsfrill from the Soil?
From Ground: Begin by hydrating the widowsfrill to make the soil easier to manage. Next, use a shovel or spade to dig a wide circle around the plant, being generous to keep the root ball intact. Angle the shovel blade beneath the plant and gently pry it loose, carefully lifting it from the ground.From Pot: Water the plant thoroughly beforehand. Turn the pot sideways and gently tap the sides to loosen the soil. Hold the base of the plant with one hand and pull the pot away with the other. If the plant is stuck, you can roll the pot or gently press on the sides to release it.From Seedling Tray: Water the tray to facilitate root ball removal. Use a fork or your fingers to carefully lift the seedling from the cell, ensuring to support the root ball to prevent it from disintegrating.
Step-by-Step Guide for Transplanting Widowsfrill
Prepare the New Site
Dig a hole in your chosen spot that is twice as wide as the widowsfrill's root ball and of equal depth. Loosen the soil at the bottom of the excavation.
Inspect the Roots
Examine the root ball for any circling roots and gently separate them. Trim any broken or excessively long roots.
Place the Plant
Center the widowsfrill in the new hole, ensuring it is planted at the same depth it was previously growing. Orient the plant to face the desired direction.
Backfill the Hole
Carefully place soil around the root ball, firming it down lightly as you go to eliminate air pockets.
Water Generously
After transplanting, water the widowsfrill thoroughly to settle the soil and hydrate the roots.
Stabilize the Plant
If the widowsfrill is tall or unstable, support it with a stake or plant support. Gently tie the plant to the support without damaging the stems.
How Do You Care For Widowsfrill After Transplanting?
Watering
Be sure to establish a consistent watering routine for the widowsfrill, keeping the soil uniformly moist to encourage root development.
Mulching
Apply a layer of mulch around the base of the plant to help retain soil moisture and regulate soil temperature.
Monitoring Growth
Observe your widowsfrill for signs of stress, such as wilting or discoloration, and adjust care as needed.
Protection
Shield the newly transplanted widowsfrill from strong winds or intense sun for the initial few days if possible.
Troubleshooting Common Issues with Widowsfrill Transplantation.
What's the best time to transplant widowsfrill?
Aim for a period between late spring and early summer when conditions promote root establishment.
How much space does widowsfrill need when transplanting?
Ensure to space the plants about 3 feet to 6 feet (0.9 m to 1.8 m) apart for optimal growth.
Why are my widowsfrill's leaves turning yellow after transplanting?
Yellowing may indicate overwatering or poor drainage. Ensure the soil is moist but well-draining.
What soil conditions favor widowsfrill after transplanting?
Plant widowsfrill in rich, well-draining soil with a neutral to slightly acidic pH for best results.
How should I water widowsfrill after transplanting?
Water generously initially, then reduce to maintain consistent soil moisture without overwatering.
Can widowsfrill be transplanted in full sun?
Widowsfrill thrives in partial shade to full sun. Just ensure to acclimate it gradually to prevent shock.
Is fertilizing necessary after transplanting widowsfrill?
Fertilize sparingly. Over-fertilization can harm the delicate root systems of newly transplanted widowsfrill.
How deep should I plant widowsfrill during transplantation?
The root ball should be level with the ground surface to encourage healthy growth.
What are the signs of transplant shock in widowsfrill?
Wilting, leaf drop, or stunted growth can indicate transplant shock. Provide shade and proper watering.
How do I protect widowsfrill from pests after transplanting?
Monitor for pests and treat with appropriate methods if necessary. Avoid chemical sprays that can harm the plant.



