How to Transplant Creeping sibbaldia?
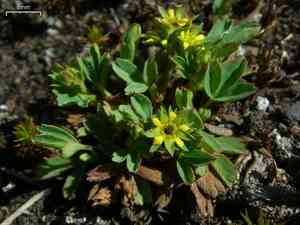
For Sibbaldia procumbens, the ideal period for relocation is from late spring to early summer, providing prime conditions for development. Select a location featuring adequately draining soil and dappled sunlight. Careful manipulation is crucial to prevent root trauma.
Preparations Required Before Relocating Creeping Sibbaldia?
Optimal Period for Moving Creeping Sibbaldia?
The ideal time for relocating creeping sibbaldia is during the mild transition from late spring to early summer. Moving it then ensures creeping sibbaldia establishes well, benefiting from increasing daylight and stable temperatures, which promote robust root development. This timing is vital as it allows creeping sibbaldia to adjust to its new spot before summer's intense growth. A gentle reminder: this milder climate phase is less stressful for creeping sibbaldia, encouraging a strong start in its new home!
Required Spacing Between Creeping Sibbaldia Plants?
When preparing to move your creeping sibbaldia, remember to provide ample room for growth. Position them approximately 6-12 inches (15-30 cm) apart. This spacing allows each creeping sibbaldia sufficient area to spread its foliage and flourish without competing for nutrients.
Best Soil Blend for Creeping Sibbaldia Relocation?
For your creeping sibbaldia, you'll want to use soil that drains effectively. Enhance your garden bed with compost or a balanced slow-release fertilizer to give your plants an excellent start. Fertilizers labeled '10-10-10' are generally a safe choice for new gardeners.
Where to Replant Your Creeping Sibbaldia?
Select a location where your creeping sibbaldia will receive partial sunlight. Excessive direct sun can be harsh, so find a spot that gets sun for only part of the day, perhaps with some filtered shade from a nearby tree.
Equipment to Prepare Before Relocating Creeping Sibbaldia?
Gardening Gloves
To safeguard your hands while handling soil and plants.
Trowel
For digging small holes and gently removing the creeping sibbaldia plant from its container or tray.
Spade or Shovel
For excavating larger holes in the ground and lifting the plant with its root ball from its original spot.
Watering Can or Hose
To thoroughly hydrate the plant before and after its relocation.
Pruners or Sharp Knife
To trim any damaged or dead roots or leaves.
Wheelbarrow or Garden Cart
To transport soil and the plant being moved.
Plant Supports/Stakes
To offer stability for the creeping sibbaldia after relocation if necessary.
Mulch
To help retain soil moisture and prevent weed growth after planting.
How to Extract Creeping Sibbaldia from the Ground?
How to Extract Creeping Sibbaldia from the Ground?
From Ground: Start by watering the creeping sibbaldia plant to make the soil easier to manage. Use a spade or shovel to carefully dig a wide trench around the plant, avoiding damage to the root ball. Gently lift the plant, ensuring a good amount of soil remains with the roots.From Pot: Water the creeping sibbaldia to ensure the soil is damp. Gently tap the sides of the pot to loosen the root ball. Invert the pot sideways and carefully pull the plant out by its base, making sure to support the root ball.From Seedling Tray: Lightly water the creeping sibbaldia to facilitate removal. Using a trowel or your fingers, gently lift the seedling from the tray while keeping the soil around the roots intact.
Step-by-Step Guide for Relocating Creeping Sibbaldia
Preparation
Prepare the new planting site by loosening the soil and incorporating compost if needed to enhance drainage and nutrient content.
Root Ball Size
Assess the size of the creeping sibbaldia's root ball to determine the appropriate dimensions for the planting hole.
Digging Hole
Excavate a hole twice as wide and as deep as the root ball. Break up the soil at the base of the hole.
Placing the Plant
Position the creeping sibbaldia in the center of the hole. The plant's crown should be level with the ground surface.
Fill In Soil
Carefully backfill the hole, gently firming the soil around the roots to eliminate air pockets.
Water Deeply
Thoroughly water the plant to settle the soil and provide moisture to its roots.
Adding Mulch
Apply a layer of mulch around the plant to maintain moisture and reduce soil temperature fluctuations.
Supporting the Plant
If necessary, insert plant supports or stakes into the ground to help the creeping sibbaldia remain upright and stable.
How to Care for Creeping Sibbaldia After Relocation?
Watering
Regularly water your creeping sibbaldia, especially during dry periods, to encourage new root growth. The soil should remain consistently moist but not waterlogged.
Observation
Monitor the creeping sibbaldia for signs of transplant shock, such as wilting or discolored leaves, and take appropriate action if needed.
Trimming
Prune away any damaged or dead foliage to help the plant direct its energy towards establishing new roots.
Weed Control
Keep an eye out for weeds competing with your creeping sibbaldia and remove them regularly.
Fertilizing
Refrain from fertilizing creeping sibbaldia immediately after relocation to prevent root burn. Begin a fertilization regimen only after the plant shows signs of new growth.
Addressing Common Issues with Creeping Sibbaldia Relocation.
When is the best time to move creeping sibbaldia?
The optimal moment to relocate creeping sibbaldia is during milder weather, between late spring and early summer.
How far apart should creeping sibbaldia be spaced when relocating?
Space creeping sibbaldia approximately 6-12 inches (15-30 cm) apart to allow ample room for spreading.
What soil conditions are best for creeping sibbaldia after relocation?
Aim for well-draining soil with good fertility. Creeping sibbaldia thrives in soil that is neither too wet nor too dry.
How much should I water creeping sibbaldia after relocation?
Water creeping sibbaldia generously after relocation, then maintain consistent moisture without overwatering.
Should I fertilize creeping sibbaldia after relocation, and when?
No immediate fertilization is necessary. Wait a few weeks and apply a balanced, slow-release fertilizer.
How do I know if creeping sibbaldia is planted at the correct depth?
The root crown of creeping sibbaldia should be at soil level. Planting too deep or shallow can stress the plant.
Can creeping sibbaldia handle sun exposure after being relocated?
Gradually acclimate creeping sibbaldia to its new location's sunlight to prevent shock from overexposure.
What signs indicate transplant shock in creeping sibbaldia?
Wilting, discolored, or dropping leaves may indicate transplant shock in creeping sibbaldia.
How do I prepare the soil before relocating creeping sibbaldia?
Enrich the soil with organic matter and ensure it is loose and aerated before planting creeping sibbaldia.
Any special care for creeping sibbaldia relocation in cooler climates?
In cooler climates, protect creeping sibbaldia with mulch and relocate on a cloudy day to reduce stress.



